Category Archives: Ionic 2
Ionic 2 Check App Availability
Ionic 2 Check App Availability: This plugin enables us to check whether the app is installed on User’s device or not. It requires a URI Scheme (e.g. twitter://) on iOS or a Package Name (e.g com.twitter.android) on Android. Here in this tutorial, we are going to explain how to check App Availability in the Ionic framework.
Ionic 2 Check App Availability Example
Cordova plugin cordova-plugin-appavailability is used to check the app availability. You can install it simply as below –
Ionic Check App Availability Example:
$ ionic plugin add cordova-plugin-appavailability $ npm install --save @ionic-native/app-availability |
Supported Platform
- Android
Example
Here is simple example of checking App availability –
Ionic 2 Check App Availability Example:
import { AppAvailability } from '@ionic-native/app-availability';
import { Platform } from 'ionic-angular';

constructor(private appAvailability: AppAvailability, private platform: Platform) { }

...

let app;

if (this.platform.is('ios')) {
  app = 'twitter://';
} else if (this.platform.is('android')) {
  app = 'com.twitter.android';
}

this.appAvailability.check(app)
  .then(
    (yes: string) => console.log(app + ' is available'),
    (no: string) => console.log(app + ' is NOT available')
  );
|
Instance Members
- check(app): Checks if app is available on device.
| Param | Type | Details |
|---|---|---|
| app | string | Package name on android, or URI scheme on iOS |
- Returns: It returns the promise.
Ionic 2 Android Full Screen
Ionic 2 Android Full Screen: Android full screen plugin enables developers to create a true fullscreen experience for users. It supports all Android 4.0+ versions, This provides functionality to expand in fullscreen mode and hides navigation bar and status until the user interacts it. Here in this documentation, we are going to explain how you can use this feature in the Ionic framework.
Ionic 2 Android Full Screen | Native Full Screen Example
You can install the Cordova-plugin-fullscreen plugin simply as below-
Install Ionic 2 Android Fullscreen Plugin
Run the below command to install this plugin –
Install Ionic 2 Android Full Screen Plugin Syntax:
$ ionic plugin add cordova-plugin-fullscreen $ npm install --save @ionic-native/android-full-screen |
Supported Platforms
- Android
Example
Let us create a simple example of cordova full screen plugin in Ionic-
Ionic 2 Android Full Screen Example:
import { AndroidFullScreen } from '@ionic-native/android-full-screen';

constructor(private androidFullScreen: AndroidFullScreen) { }

...

this.androidFullScreen.isImmersiveModeSupported()
  .then(() => this.androidFullScreen.immersiveMode())
  .catch((error: any) => console.log(error));
|
Instance Members
Following Instance Members are available –
- isSupported()– This is used to check whether this plugin is supported or not.
- isImmersiveModeSupported()– This is used to check whether ImmersiveMode is Supported or not.
- immersiveWidth()– Returns the width in immersive mode.
- immersiveHeight()– Returns the height in immersive mode.
- leanMode()– Hide system UI until user interacts.
- showSystemUI()– This is used to show the system UI.
- showUnderStatusBar()– Extend your app underneath the status bar. This is supported only on Android 4.4+.
- showUnderSystemUI()– Extend your app underneath the system UI. This is supported only on Android 4.4+.
- immersiveMode()– Hide system UI and keep it hidden. This is supported only on Android 4.4+.
Ionic 2 Android Fingerprint Auth
Ionic 2 Android Fingerprint Auth– Install cordova-plugin-android-fingerprint-auth plugin to use the android native fingerprint aunthentication feature. Here in this tutorial we are going to explain how you can use Ionic 2 Android Native Fingerprint Authentication.
Ionic 2 Android Fingerprint Auth Example | Command
First install the fingerprint Auth plugin simply as below –
Ionic 2 Android Fingerprint Auth Plugin Install Example:
$ ionic plugin add cordova-plugin-android-fingerprint-auth $ npm install --save @ionic-native/android-fingerprint-auth |
After Installing the plugin you will be able to use the androd fingerprint’s features.
Supported Platform
- Android
Usage
Let us create a simple example to access the native fingerprint feature in Ionic 2 –
Ionic 2 Android Fingerprint Auth Example:
import { AndroidFingerprintAuth, AFAAuthOptions } from '@ionic-native/android-fingerprint-auth';

constructor(private androidFingerprintAuth: AndroidFingerprintAuth) { }

...


this.androidFingerprintAuth.isAvailable()
  .then((result)=> {
    if(result.isAvailable){
      // it is available

      this.androidFingerprintAuth.encrypt({ clientId: "myAppName", username: "myUsername", password: "myPassword" })
        .then(result => {
           if (result.withFingerprint) {
               console.log("Successfully encrypted credentials.");
               console.log("Encrypted credentials: " + result.token);
           } else if (result.withBackup) {
             console.log('Successfully authenticated with backup password!');
           } else console.log('Didn\'t authenticate!');
        })
        .catch(error => {
           if (error === "Cancelled") {
             console.log("Fingerprint authentication cancelled");
           } else console.error(error)
        });

    } else {
      // fingerprint auth isn't available
    }
  })
  .catch(error => console.error(error));
|
Instance Members
- 1. encrypt(options) : This opens a native dialog fragment to use the device hardware fingerprint scanner to authenticate the against the fingerprints registered on the device.
| Param | Type | Details |
|---|---|---|
| options | AFAAuthOptions | Options |
- Returns – Promise
- 2. decrypt(options) : This opens a native dialog fragment to use the device hardware fingerprint scanner to authenticate the against the fingerprints registered on the device.
| Param | Type | Details |
|---|---|---|
| options | AFAAuthOptions | Options |
- Returns – Promise
- 2. isAvailable(options) : This checks if fingerprint auth service is avilable on devide.
- Returns – Promise
- 2. delete(options) : This is used to delete the ciper used for the encryption and decryption by username.
- Returns – Promise : This Returns a promise that resolves if ciper was deleted successfully.
AFAAuthOptions
Following options are avialeble for AFAAuthOptions
| Param | Type | Details |
|---|---|---|
| clientId | string | Required Used as the alias for your key in the Android Key Store. |
| username | string(optional) | Used to create credential string for encrypted token and as alias to retrieve the cipher. |
| password | string(optional) | Used to create credential string for encrypted token |
| token | string(optional) | Required for decrypt() Encrypted user credentials to decrypt upon successful authentication. |
| disableBackup | boolean | Set to true to remove the “USE BACKUP” button |
| locale | string(optional) | Change the language. (en_US or es)(optional) |
| maxAttempts | number(optional) | The device max is 5 attempts. Set this parameter if you want to allow fewer than 5 attempts. |
| userAuthRequired | boolean(optional) | Require the user to authenticate with a fingerprint to authorize every use of the key. New fingerprint enrollment will invalidate key and require backup authenticate to re-enable the fingerprint authentication dialog. |
| dialogTitle | string(optional) | Set the title of the fingerprint authentication dialog. |
| dialogMessage | string(optional) | Set the message of the fingerprint authentication dialog. |
| dialogHint | string(optional) | Set the hint displayed by the fingerprint icon on the fingerprint authentication dialog. |
AFAEncryptResponse
| Param | Type | Details |
|---|---|---|
| withFingerprint | boolean | Biometric authentication |
| withBackup | boolean | Authentication using backup credential activity. |
| token | string | base64encoded string representation of user credentials. |
AFADecryptOptions
| Param | Type | Details |
|---|---|---|
| withFingerprint | boolean | Biometric authentication |
| withBackup | boolean | Authentication using backup credential activity. |
| token | string | FingerprintAuth.CipherMode.DECRYPT Decrypted password. |
Ionic 2 Native 3DTouch
Ionic 2 Native 3DTouch– Install cordova-plugin-3dtouch plugin to use the native 3DTouch feature. 3DTouch is only supported in IOS platform. Here in this tutorial we are going to explain how you can use Ionic 2 Native 3DTouch in IOS.
Ionic 2 Native 3DTouch Example
You can install the 3DTouch plugin simply as below-
Installation
3DTouch Plugin Installation Syntax:
$ ionic plugin add cordova-plugin-3dtouch |
3DTouch Example
After Installing the 3DTouch plugin you can use it. Here is an example of Native 3DTouch.-
Ionic 2 Native 3DTouch Example:
import { ThreeDeeTouch } from 'ionic-native';
// import for type completion on variables
import { ThreeDeeTouchQuickAction, ThreeDeeTouchForceTouch } from 'ionic-native';
ThreeDeeTouch.isAvailable().then(isAvailable => console.log("3D Touch available? " + isAvailable));
ThreeDeeTouch.watchForceTouches()
.subscribe(
(data: ThreeDeeTouchForceTouch) => {
console.log("Force touch %" + data.force);
console.log("Force touch timestamp: " + data.timestamp);
console.log("Force touch x: " + data.x);
console.log("Force touch y: " + data.y);
}
);
let actions: Array
|
Supported Platforms
This feature is only supported in IOS.
Static Methods
Following static methods are available-
- 1. isAvailable
- 2. watchForceTouches
- 3. configureQuickActions
- 4. onHomeIconPressed
- 5. enableLinkPreview
- 6. disableLinkPreview
Ionic 2 Native Overview
Ionic 2 Native Overview– Ionic native is organised set of ES5/ES6/Typescript wrapper for Cordova/Phonegap Plugins that enables us to add/access the native functionality. It is very easy to access the native features in Ionic 2. Here in this tutorial we are going to give overview on Ionic 2 native features.
Ionic 2 Native Overview Example
Let us go through the steps to install, access native features in Ionic 2.
Installation
Ionic native is included everywhere by default in Ionic 2 so you don’t need to install ionic native in Ionic 2. If you are using Lower version of Ionic, you can install ionic native simply as –
Ionic Native Installation Example:
npm install ionic-native --save |
Promises and Observables
Ionic Native wraps plugin callbacks in a promise or observable which provides a common interface for all plugins and it ensures the native events trigger change detection in Angular 2.
Ionic 2 Native Example
In the below example we have imported the Geolocation plugin from ionic-native package. Using this plugin you can access the current gelocation of device.
Ionic 2 Native Example:
import {Geolocation} from 'ionic-native';

Geolocation.getCurrentPosition().then(pos => {
  console.log('lat: ' + pos.coords.latitude + ', lon: ' + pos.coords.longitude);
});

let watch = Geolocation.watchPosition().subscribe(pos => {
  console.log('lat: ' + pos.coords.latitude + ', lon: ' + pos.coords.longitude);
});

// to stop watching
watch.unsubscribe();
|
Ionic 2 Slides
Ionic 2 Slides: Slides are an important component that provides functionality to slide the content to left or right. Slides can be used to create galleries, page-based layouts, one page layouts etc. ion-slides component is used to create slides in Ionic 2. There are various configurations available that can be used easily.
Here in this tutorial we are going to explain how to create slides in Ionic 2 framework. You can use our online editor to run the demo online.
Ionic 2 Slides Example
ion-slides component is multi section container, each section can be swiped or dragged between. Let us first create the very basic slides in Ionic 2.
Ionic 2 Slides Example:
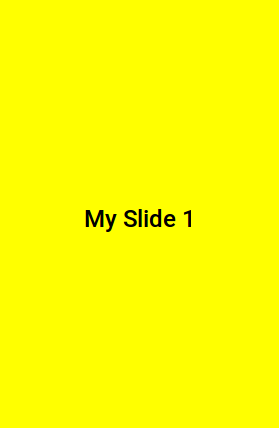
<ion-slides pager>

  <ion-slide style="background-color: yellow">
    <h2>My Slide 1</h2>
  </ion-slide>

  <ion-slide style="background-color: pink">
    <h2>My Slide 2</h2>
  </ion-slide>

  <ion-slide style="background-color: green">
    <h2>My Slide 3</h2>
  </ion-slide>

</ion-slides>
|
If you run the above example it will produce the output something like this –
Ionic 2 Select
Ionic 2 Select ion-select component is used to create the select element similar to the HTML <select> element. Ionic 2 provides various types of select boxes which can be used easily. It is very simple to create different types of select box in Ionic 2. Here in this tutorial we are going to explain how you can create select box with options, You can also use our online editor to run and see the output of the example.
Ionic 2 Select Dropdown | Multiselect Checkbox Example
Let us first create very basic select box-
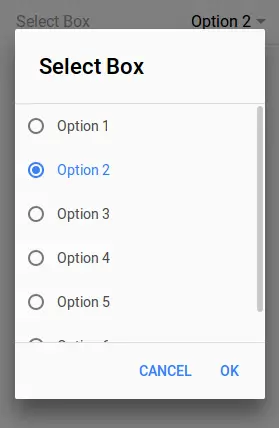
Ionic 2 Select Example:
<ion-list>
  <ion-item>
    <ion-label>Select Box</ion-label>
    <ion-select [(ngModel)]="demoSelectBox">
      <ion-option value="1">Option 1</ion-option>
      <ion-option value="2">Option 2</ion-option>
      <ion-option value="3">Option 3</ion-option>
      <ion-option value="4">Option 4</ion-option>
      <ion-option value="5">Option 5</ion-option>
      <ion-option value="6">Option 6</ion-option>
    </ion-select>
  </ion-item>
<ion-item>
 You Selected = {{demoSelectBox}}
</ion-item>
</ion-list>
|
By Default ion-select uses the AlertController API to open the options in overlay, You can change it to use the ActionSheetController API By passing the action-sheet to the interface property.
If you run the above example it will produce the output something like this –
Multiselect Dropdown
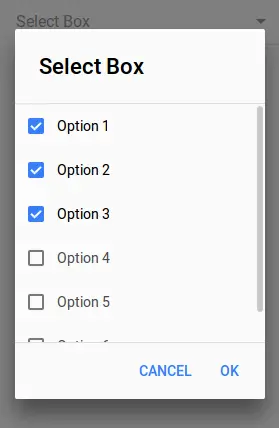
You can also create multiple select dropdown by adding the attribute multiple=”true”. Here is an example of multiple select dropdown example-
Multiple Select Dropdown Example:
<ion-list>
  <ion-item>
    <ion-label>Select Box</ion-label>
    <ion-select [(ngModel)]="demoSelectBox" multiple="true">
      <ion-option value="1">Option 1</ion-option>
      <ion-option value="2">Option 2</ion-option>
      <ion-option value="3">Option 3</ion-option>
      <ion-option value="4">Option 4</ion-option>
      <ion-option value="5">Option 5</ion-option>
      <ion-option value="6">Option 6</ion-option>
    </ion-select>
  </ion-item>
<ion-item>
 You Selected = {{demoSelectBox}}
</ion-item>
</ion-list>
|
If you run the above example it will produce the output something like this –
Ionic 2 Segment
Ionic 2 Segment – Segment is basically group of buttons that are displayed in single line and these buttons can be used to show and hide the element based upon the segment’s value. Segments provide functionality like tabs. Here in this tutorial we are going to explain how you can create segment in ionic 2. You can also use our online demo to edit and see the output of the example.
Ionic 2 Segment Example
ion-segment component is used to create segment in ionic 2. Create segment and add the model for segment. ion-segment-button is used to add the segment buttons. After Adding button use ngSwitch and ngSwitchCase to add respective elements for the buttons. Let us first create very basic segment example. This contains following parts-
- Html Part
- Controller Part
Html Part : demo.html
Ionic 2 Segment Example: Html Part
<div padding>
  <ion-segment [(ngModel)]="cat">
    <ion-segment-button value="men">
      Men
    </ion-segment-button>
    <ion-segment-button value="women">
      Women
    </ion-segment-button>
    </ion-segment>
</div>

<div [ngSwitch]="cat">
  <ion-list *ngSwitchCase="'men'">
    <ion-item>
      <ion-thumbnail item-left>
        <img src="img/men-image1.png">
      </ion-thumbnail>
      <h2>Cothing</h2>
    </ion-item>
    <ion-item>
      <ion-thumbnail item-left>
        <img src="img/men-image2.png">
      </ion-thumbnail>
      <h2>Watches</h2>
    </ion-item>
    <ion-item>
      <ion-thumbnail item-left>
        <img src="img/men-image3.png">
      </ion-thumbnail>
      <h2>Footwear</h2>
    </ion-item>
  </ion-list>

  <ion-list *ngSwitchCase="'women'">
   <ion-item>
      <ion-thumbnail item-left>
        <img src="img/women-image1.png">
      </ion-thumbnail>
      <h2>Cothing</h2>
    </ion-item>
    <ion-item>
      <ion-thumbnail item-left>
        <img src="img/women-image1.png">
      </ion-thumbnail>
      <h2>Watches</h2>
    </ion-item>
    <ion-item>
      <ion-thumbnail item-left>
        <img src="/img/women-image1.png">
      </ion-thumbnail>
      <h2>Footwear</h2>
    </ion-item>
 </ion-list>
</div>
|
Now let us create controller script part.
Controller Part : demo.ts
Ionic 2 Segment Example: Controller
import { Component } from '@angular/core';
@Component({
  templateUrl: 'demo.html'
})

export class DemoPage {
  cat: string = "men"; // default button
 }
|
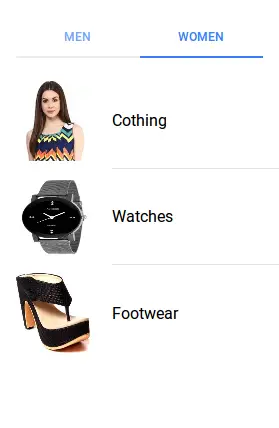
If you run the above example it will produce output something like this-
Input Properties
Following input properties are available-
| Attribute | Type | Details |
|---|---|---|
| color | string | This is used to change the color of segment, you can add the predefined colors using this attribute . For example: color = “primary”, color =”secondary”, color= “danger”. |
| mode | string | The mode to apply to this component. Mode can be ios, wp, or md. |
| disabled | boolean | This is used to disable the segment button. |
Output Properties
Following Output properties is available-
| Attribute | Details |
|---|---|
| ionChange | Emitted when a segment button has been changed. |
Ionic 2 Searchbar
Ionic 2 Searchbar – Searchbar provides search functioinality to the users. A searchbar basically binds a model with input which triggers an event when model is changed. It is very simple to create searchbar in Ionic 2. Here in this tutorial we are going to explain how you can create searchbar in Ionic 2. You can also use our online editor to run and see the output of the example.
Ionic 2 Searchbar | Search Functionality Example
Let us create very basic searchbar –
It contains the following part-
- Html Part
- Controller Part
Now let us go one by one to understand how it works-
Html Part: demo.html
Html part contains the following input elements for searchbar.
Ionic 2 Searchbar | Search Functionality | Example:
<ion-searchbar (ionInput)="getItems($event)"></ion-searchbar>
<ion-list>
  <ion-item *ngFor="let item of items">
    {{ item }}
  </ion-item>
</ion-list>
|
Now let us create the controller part of the above example.
Controller Part: demo.ts
Controller part contains the following script-
Searchbar Controller Example:
import { Component } from '@angular/core';
@Component({
  templateUrl: 'demo.html'
})

export class DemoPage {
  items;
  constructor() {
    this.initializeItems();
  }

  initializeItems() {
    this.items = [
      'Google',
      'Facebook',
      'Microsoft',
      'Yahoo',
      'IBM',
      'Oracle',
      'Airtel',
      'HCL',
      'HP',
      'Wipro',
      'TCS'
      ]
 }
     getItems(ev) {
    // Reset items back to all of the items
    this.initializeItems();

    // set val to the value of the ev target
    var val = ev.target.value;

    // if the value is an empty string don't filter the items
    if (val && val.trim() != '') {
      this.items = this.items.filter((item) => {
        return (item.toLowerCase().indexOf(val.toLowerCase()) > -1);
      })
    }
  }
  }
|
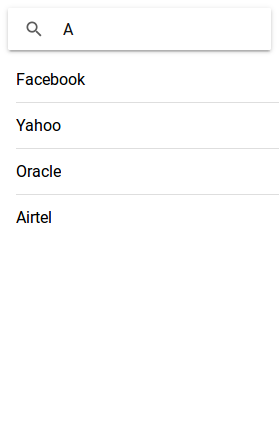
If you run the above example it will produce the output something like this-