Ionic 2 Inputs
Ionic 2 Inputs Inputs are an important component of any framework, Inputs are used to collect and handle the user data. Ionic 2 provides the rich inputs that can be used easily. Ionic 2 uses Angular 2’s form library for the form controls. Here in this tutorial we are going to explain how you can create form inputs in Ionic 2. You can also use our online editor to run the online demo.
Ionic 2 Inputs | Form Example
ion-input is used to create inputs such as -text, email, password, number, search, telephone and url. ion-textarea is used to create textarea.
ion-input is not used for non-text type such as-
checkbox, radio, range, select, toggle etc.
There are Following types of labels in Ionic 2 form Inputs-
- 1. Fixed Inline Labels
- 2. Floating Labels
- 3. Inline Labels
- 4. Inset Labels
- 5. Placeholder Labels
- 6. Stacked Labels
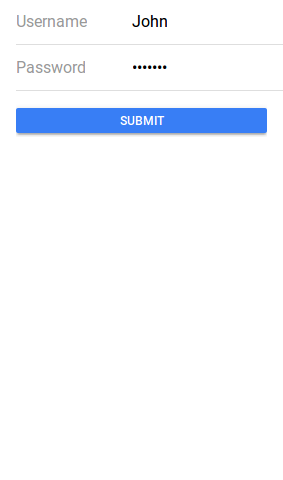
Fixed Inline Labels
To create fixed inline lables fixed attribute is used. Fixed inline lables are fixed to its position although you enter some text in the text input field, you can also add the placeholder for input field. Here in an example of the fixed inline label-
Ionic 2 Inputs Example: Inline lables Example-
<ion-list>

  <ion-item>
    <ion-label fixed>Username</ion-label>
    <ion-input type="text" value=""></ion-input>
  </ion-item>

  <ion-item>
    <ion-label fixed>Password</ion-label>
    <ion-input type="password"></ion-input>
  </ion-item>
  <ion-item>
    <button ion-button block>Submit</button>
  </ion-item>

</ion-list>
|
If you run the above example it will produce the output something like this –
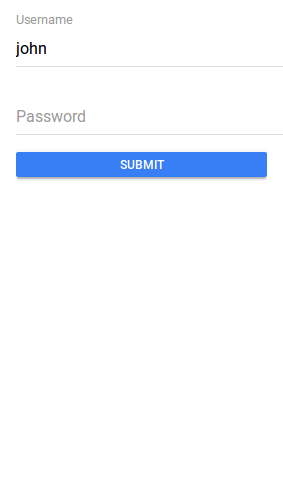
Floating Labels
Floating labels are basically “float”(animates) Up when user selects the input. To create floating label add floating attribute to ion-label. Here in an example of the floating inline label-
Ionic 2 Inputs: Floating lables Example-
<ion-list>

  <ion-item>
    <ion-label floating>Username</ion-label>
    <ion-input type="text" value=""></ion-input>
  </ion-item>

  <ion-item>
    <ion-label floating>Password</ion-label>
    <ion-input type="password"></ion-input>
  </ion-item>
  <ion-item>
    <button ion-button block>Submit</button>
  </ion-item>

</ion-list>
|
If you run the above example it will produce the output something like this –
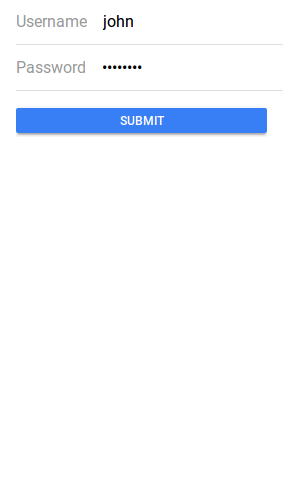
Inline Labels
An ion-label without any attribute is inline, Inline label does not hide when you enter text. You can also add placeholder in the text field. Here is an example of inline label-
Inline lables Example-
<ion-list>

  <ion-item>
    <ion-label>Username</ion-label>
    <ion-input type="text" value=""></ion-input>
  </ion-item>

  <ion-item>
    <ion-label>Password</ion-label>
    <ion-input type="password"></ion-input>
  </ion-item>
  <ion-item>
    <button ion-button block>Submit</button>
  </ion-item>

</ion-list>
|
If you run the above example it will produce the output something like this –
Inset Labels
By default each input field’s width is 100% of its parent container, You can make input inset by adding attribute inset to ion-list simply as below –
Ionic 2 Inset lables Example-
<ion-list inset>

  <ion-item>
    <ion-label>Username</ion-label>
    <ion-input type="text" value=""></ion-input>
  </ion-item>

  <ion-item>
    <ion-label>Password</ion-label>
    <ion-input type="password"></ion-input>
  </ion-item>
  <ion-item>
    <button ion-button block>Submit</button>
  </ion-item>

</ion-list>
|
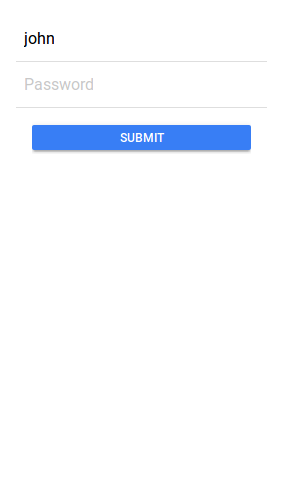
Placeholder Labels
To create placeholder lables placeholder attribute is added to the input element. –
Ionic 2 Placeholder lables Example-
<ion-list inset>

  <ion-item>
    <ion-input type="text" placeholder="Username"></ion-input>
  </ion-item>
  <ion-item>
    <ion-input type="password" placeholder="Password"></ion-input>
  </ion-item>
  <ion-item>
    <button ion-button block>Submit</button>
  </ion-item>

</ion-list>
|
If you run the above example it will produce the output something like this –
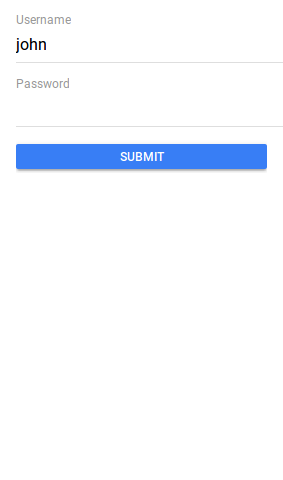
Stacked Labels
To create stacked labels add stacked attribute to ion-label. Stacked labels always appear above the input field-
Ionic 2 Stacked lables Example-
<ion-list>

  <ion-item>
    <ion-label stacked>Username</ion-label>
    <ion-input type="text"></ion-input>
  </ion-item>

  <ion-item>
    <ion-label stacked>Password</ion-label>
    <ion-input type="password"></ion-input>
  </ion-item>
  <ion-item>
    <button ion-button block>Submit</button>
  </ion-item>

</ion-list>
|
If you run the above example it will produce the output something like this –
Advertisements
Add Comment
📖 Read More
- 1. Ionic 2 Lists
- 2. Ionic 2 Loading
- 3. Ionic 2 Menus
- 4. Ionic 2 Modals
- 5. Ionic 2 Popover
- 6. Ionic 2 Radio
- 7. Ionic 2 Range
- 8. Ionic 2 Searchbar
- 9. Ionic 2 Segment
- 10. Ionic 2 Select


