Category Archives: Laravel Tutorial
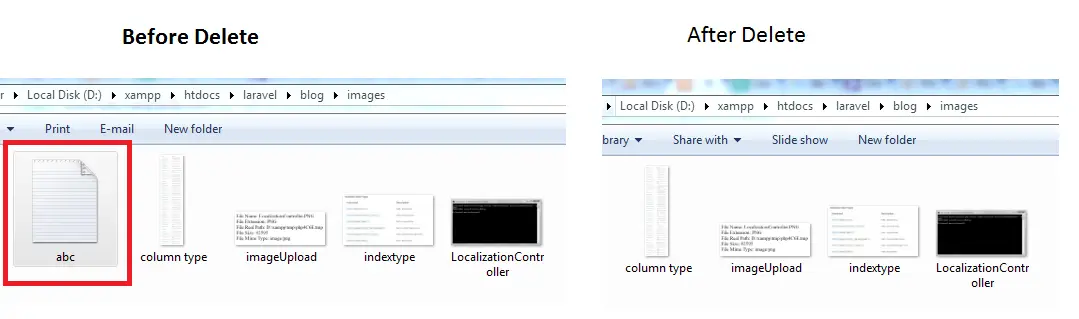
Laravel delete file from folder
Laravel delete file from folder – The Laravel delete file from folder is used to delete file from the directory.
Laravel delete file from folder | with full Example.
Let us understand how to use Laravel delete file from the folder.
Full example of laravel delete file.
Now here i am going to explain how to delete file from directory.
First we have to create controller page and save as [DeleteController.php].
Let’s look at a simple example.
|
|
Route Part:-
Route::get('/delete','ImportController@dodelete');
Output will be same like this:-
Laravel Import Data from CSV to Table
Laravel Import Data from CSV to Table – The Laravel Import Data from CSV to Table is used to import file to CSV to table.
Laravel Import Data from CSV to Table | with full Example.
Let us understand how to use Laravel Import Data from CSV to Table.
Full example of Import Data from CSV to Table.
Now here i am going to explain how to Import Data from CSV to Table.
First we have to create controller page and save as [ImportController.php].
Let’s look at a simple example.
getClientOriginalName();
		$file->move('files', $file_name);
		$result = Excel::load('files/'.$file_name, function($reader)
		{
			$reader->all();
		})->get();
		return view('Import');
	}
}
|
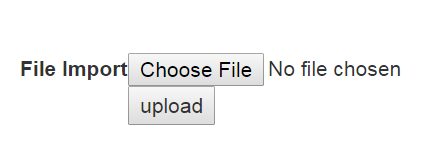
Then create a view page and save as [Import.blade.php]
Let’s look at a simple example.
|
Route Path:-
Route::get('/Import','ImportController@upload');
Route::post('/import1','ImportController@ImportClient');
Laravel Export Table Data to CSV, XSL And XSLX file
Laravel Export Table Data to CSV, XCL And XSLX file – The Laravel Export Table Data to CSV, XCL And XSLX file is used to get data from database or table and export in the excel CSV, XCL Ans XSLX file.
Laravel Export Table Data to CSV, XSL And XSLX file | with full Example.
Let us understand how to use Laravel Export Table Data to CSV, XCL And XSLX file.
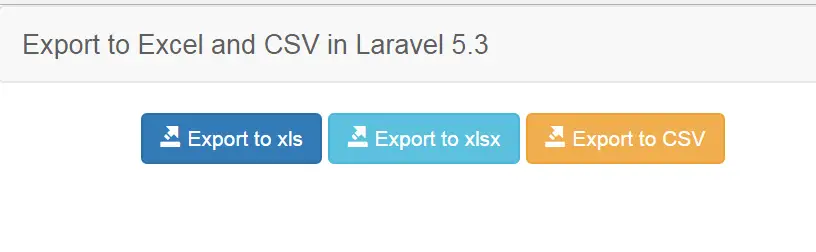
Full example of export table data to csv, xsl and xslx file.
Now here i am going to explain how to export table data in different excel format.
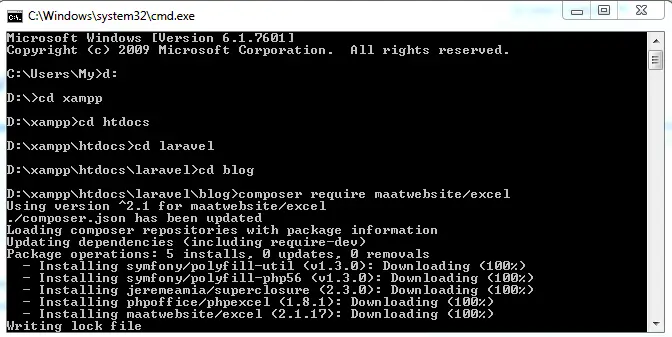
First we have to run composer require maatwebsite/excel in command prompt.
Then create a controller page.
[Save as ExportController.php]
toArray();
return Excel::create('export_to_excel_example', function($excel) use ($data) {
$excel->sheet('mySheet', function($sheet) use ($data)
{
$sheet->fromArray($data);
});
})->download($type);
}}
|
Now create a view part.
Route path:-
Route::get('export',function()
{
   return view('export');
});
   Route::get('exportTo/{type}', 'ExportController@index');
We will use the model because data will be fetched from a database. It is not necessary to use model we can also use manually.
Model Part:-
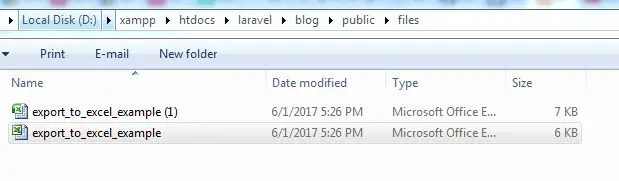
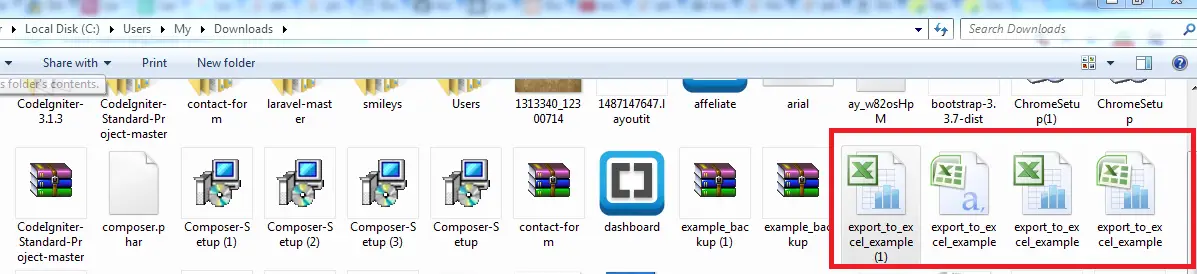
Output will be like this:-
Then you can check export file in download folder.
Laravel Image Upload
Laravel Image Upload – The Laravel Image Upload is used to upload a file and image.
Laravel Image Upload | with full Example.
Let us understand how to use Laravel Image Upload.
Now here i am going to explain how to upload image and file.
First we have to create a view file which is place at resources/views/file_name.
Views part:-
Let’s look at a simple example.
|
Then create a controller page at app/http/controller/file_name.
Controller part:-
Let’s look at a simple example.
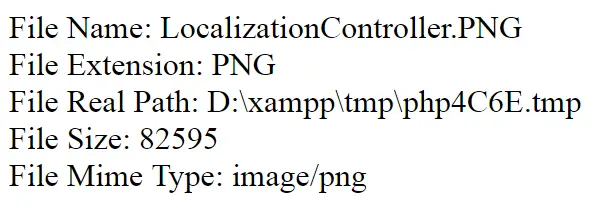
file('image_file');
echo 'File Name: '.$file->getClientOriginalName();
echo '
|
Now define the route in routes/web.php.
Route::get('/uploadfile','ImageController@index');
Route::post('/uploadfile','ImageController@showUploadFile');
Output will be like this:-
storage path:-

Laravel Database Redis
Laravel Database Redis – The Laravel Database Redis is used to referred to as a data structure server from key can contain string, hashes, list, sets and sorted sets.
Laravel Database Redis.
Let us understand how to use laravel Database Redis.
Function:-
There are some followings function available in laravel Database Redis.
- 1. Introduction.
- 2. Interacting With Redis.
- 3. Pub / Sub.
1. Introduction.
Redis is a open source, advanced key value stored. It is often referred to as a data structure server since keys can contain strings, hashes, lists. sets and sorted sets.
Before using Redis, you will need to install the predis/predis package through composer.
composer require predis/predis
Configuration
The redis configuration for your application is placed in the config/database.php configuration file. Then you will see a redis array containing the Redis servers utilized by your application.
Let’s look at a simple example.
'redis' => [
    'client' => 'predis',

    'default' => [
        'host' => env('REDIS_HOST', 'localhost'),
        'password' => env('REDIS_PASSWORD', null),
        'port' => env('REDIS_PORT', 6379),
        'database' => 0,
    ],

],
|
The default server configuration should suffice for development.Each redis sever defined in your configuration file is required to have a name, host, and port.
Configuring Clusters
If your application is utilizing a cluster of Redis servers, you should define these cluster within a clusters key.
Let’s look at a simple example.
'redis' => [

    'client' => 'predis',

    'clusters' => [
        'default' => [
            [
                'host' => env('REDIS_HOST', 'localhost'),
                'password' => env('REDIS_PASSWORD', null),
                'port' => env('REDIS_PORT', 6379),
                'database' => 0,
            ],
        ],
    ],

],
|
By default, cluster will perform client-side sharding across your nodes, allowing you to pool nodes and create a large amount of available RAM.
Let’s look at a simple example.
'redis' => [

    'client' => 'predis',

    'options' => [
        'cluster' => 'redis',
    ],

    'clusters' => [
        // ...
    ],

],
|
Predis
In addtion to the default host, port, database and password
server configuration options, predis supports connection parameters that can be defined for each of your redis server.
'default' => [
    'host' => env('REDIS_HOST', 'localhost'),
    'password' => env('REDIS_PASSWORD', null),
    'port' => env('REDIS_PORT', 6379),
    'database' => 0,
    'read_write_timeout' => 60,
],
PhpRedis
Utilize the PhpRedis extension, you should change the client option of your Redis configuration to PhpRedis.
'redis' => [

    'client' => 'phpredis',

    // Rest of Redis configuration...
],
In addition to the default, host, port, database and password server configuration options, PhpRedis supports the following additional connection parameters persistant, prefix, read_timeout and timeout.
'default' => [
    'host' => env('REDIS_HOST', 'localhost'),
    'password' => env('REDIS_PASSWORD', null),
    'port' => env('REDIS_PORT', 6379),
    'database' => 0,
    'read_timeout' => 60,
],
2. Interacting With Redis.
We can interact with Redis by calling various method on the Redis facade. The redis facade supports dynamic methods, meaning you can call any Redis command on the facade and the command will be passed directly to Redis.
Let’s look at a simple example.
 $user]);
    }
}
|
As mentioned above, you can call any of the Redis commands on the Redis facade.
Redis::set('name', 'Taylor');

$values = Redis::lrange('names', 5, 10);
You can also pass commands to the server using the command method which accepts the name of the command as its first argument, and an array of values as its second argument.
$values = Redis::command('lrange', ['name', 5, 10]);
Using Multiple Redis Connections
You can get a Redis instance by calling the Redis::connection method.
$redis = Redis::connection();
You can also pass the connection or cluster name to the connection method.
$redis = Redis::connection('my-connection');
Pipelining Commands
Pipelining should be used when you need to send many commands to the server in one operation. The pipeline method accept one argument
Redis::pipeline(function ($pipe) {
    for ($i = 0; $i < 1000; $i++) {
        $pipe->set("key:$i", $i);
    }
});
3. Pub / Sub.
Laravel provides a simple interface to the Redis publish and subscribe commands. These Redis commands allow you to listen for messages on a given “channel”. You may publish messages to the channel from another application, or even using another programming language, allowing easy communication between applications and processes.
Let’s look at a simple example.
|
|
Now we can publish message to the channel using the publish method.
Route::get('publish', function () {
    // Route logic...

    Redis::publish('test-channel', json_encode(['foo' => 'bar']));
});
Wildcard Subscriptions
We can subscribe to a wildcart channel by using psubscribe method which can be useful for catching all messages on all channels. The $channel name will be passed as the second argument to the provided callback closure.
Redis::psubscribe(['*'], function ($message, $channel) {
    echo $message;
});

Redis::psubscribe(['users.*'], function ($message, $channel) {
    echo $message;
});
Laravel Database Seeding
Laravel Database Seeding – The Laravel Database Seeding is used to test data seed classes.
Laravel Database Seeding.
Let us understand how to use laravel Database Seeding.
Function:-
There are some followings function available in laravel Database Seeding.
- 1. Introduction.
- 2. Writing Seeders.
- 3. Running Seeders.
1. Introduction.
Laravel includes a simple method of seeding your database with test data using seed classes. Seed classes are stored in the database/seeds directory. Seed classes can have any name you want, but probably should follow some sensible convention, such as UsersTableSeeder.
2. Writing Seeders.
To generate a seeder, execute the make:seeder Artisan command. All seeders generated by the framework will be placed in the database/seeds directory.
php artisan make:seeder UsersTableSeeder
A seeder class only contains one method by default run. This method is called when the
db:seed Artisan command is execute. Within the run command you can insert data into your browser however you want.
Let’s look at a simple example.
insert([
            'name' => str_random(10),
            'email' => str_random(10).'@gmail.com',
            'password' => bcrypt('secret'),
        ]);
    }
}
|
Using Model Factories
To generate large amount of database records we can use model factories. Once you have defined your factories, you can use the factory helper function to insert records into your database.
Let’s look at a simple example.
public function run()
{
    factory(App\User::class, 50)->create()->each(function ($u) {
        $u->posts()->save(factory(App\Post::class)->make());
    });
}
|
Calling Additional Seeders
Within the DatabaseSeeder class, you can use the call method to execute additional seed classes.
Let’s look at a simple example.
public function run()
{
    $this->call(UsersTableSeeder::class);
    $this->call(PostsTableSeeder::class);
    $this->call(CommentsTableSeeder::class);
}
|
3. Running Seeders.
Once you have written your seeder classes, you can use the db:seed Artisan command to seed your database. The db:seed command runs the DatabaseSeeder class, which can be used to called other seed classes.
php artisan db:seed

php artisan db:seed --class=UsersTableSeeder
You can also seed your database using the migrate:refresh command, which will also rollback and re-run all of your migrations.
php artisan migrate:refresh --seed
Laravel Database Migrations
Laravel Database Migrations – The Laravel Database Migrations is used to controll on your database and allowing user to easily modify and create the database.
Laravel Database Migrations.
Let us understand how to use laravel Database Migrations.
Function:-
There are some followings function available in laravel Database Migrations.
- 1. Introduction.
- 2. Generating Migrations.
- 3. Migration Structure.
- 4. Running Migrations.
- 5. Tables.
- 6. Columns.
- 7. Indexes.
1. Introduction.
It is like a version control for your database. Its allows user to easily modify and share the application database schema. Migrations are typically paired with Laravel’s schema builder to easily build your application’s database schema.
The Laravel schema facade provides database support for creating and manipulating tables across all of laravel’s supported database system.
2. Generating Migrations.
To create migration you can use make:migration Artisan Command.
php artisan make:migration create_users_table
The new migration will be placed at database/migrations directory
The –table and –create options can also be used to indicate the name of the table and the migration will be creating a new table.
php artisan make:migration create_users_table --create=users

php artisan make:migration add_votes_to_users_table --table=users
If you want to specify a custom output path for the generated migration, you can use the –path option when executing the make:migration command.
3. Migration Structure.
A migration class hold two method up and down. The up method is used to add new tables, columns or indexes to your database. The down method is used to delete tables and column from the database.
Let’s look at a simple example.
increments('id');
            $table->string('name');
            $table->string('airline');
            $table->timestamps();
        });
    }

    public function down()
    {
        Schema::drop('flights');
    }
}
|
4. Running Migrations.
To run all of your outstanding migrations, execute the migrate Artisan command.
php artisan migrate
Forcing Migrations To Run In Production
Some migration operations are destructive, which means they can cause you to lose data. In order to protect you from running these commands against your production database, you will be prompted for confirmation before the commands are executed. To force the commands to run without a prompt, use the –force flag.
php artisan migrate --force
Rolling Back Migrations
To rollback the latest migration operation, you can use the rollback command.
php artisan migrate:rollback
You can rollback a limited number of migrations by providing the step option to the rollback command.
php artisan migrate:rollback
Rolling Back Migrations
To rollback the latest migration operation, you can use the rollback command. This command rollback the last batch of migration, which is include multiple migration file.
php artisan migrate:rollback
You can rollback a limited number of migration by providing the step option to the rollback command.
php artisan migrate:rollback --step=5
The migrate:reset command will rollback all of your application migrations.
php artisan migrate:reset
Rollback & Migrate In Single Command
The migrate:refresh will rollback all of your migration and then execute the migrate command.
php artisan migrate:refresh

php artisan migrate:refresh --seed
The following command will rollback & re-migrate the last five migration.
php artisan migrate:refresh --step=5
5. Tables.
Creating Tables
To create a new database table, use the create method on the schema facade.
The create method accept two arguments. The first is the name of the table and the second is closure which receives a blueprint object that can be used to define the new table.
Schema::create('users', function (Blueprint $table)
{
    $table->increments('id');
});
When creating the table, you can use any of the schema builders column methods to define the table columns.
Checking For Table / Column Existence
You can easily check for the existence of a table or column using the hasTable and hasColumn methods.
if (Schema::hasTable('users')) {
    //
}

if (Schema::hasColumn('users', 'email')) {
    //
}
Connection & Storage Engine
If you want to perform schema operation on a database connection that is not your default connection, you can use connection method.
Schema::connection('foo')->create('users', function (Blueprint $table) {
    $table->increments('id');
});
You can use the engine property on the schema builder to define the table’s storage engine.
Schema::create('users', function (Blueprint $table) {
    $table->engine = 'InnoDB';

    $table->increments('id');
});
Renaming / Dropping Tables
To rename an existing database table, use the rename method.
Schema::rename($from, $to);
To drop an existing table, you can use the drop or dropIfExists methods.
Schema::drop('users');

Schema::dropIfExists('users');
6. Columns.
Creating Columns
The table method on the schema facade can be used to update existing table
Schema::table('users', function (Blueprint $table) {
    $table->string('email');
});
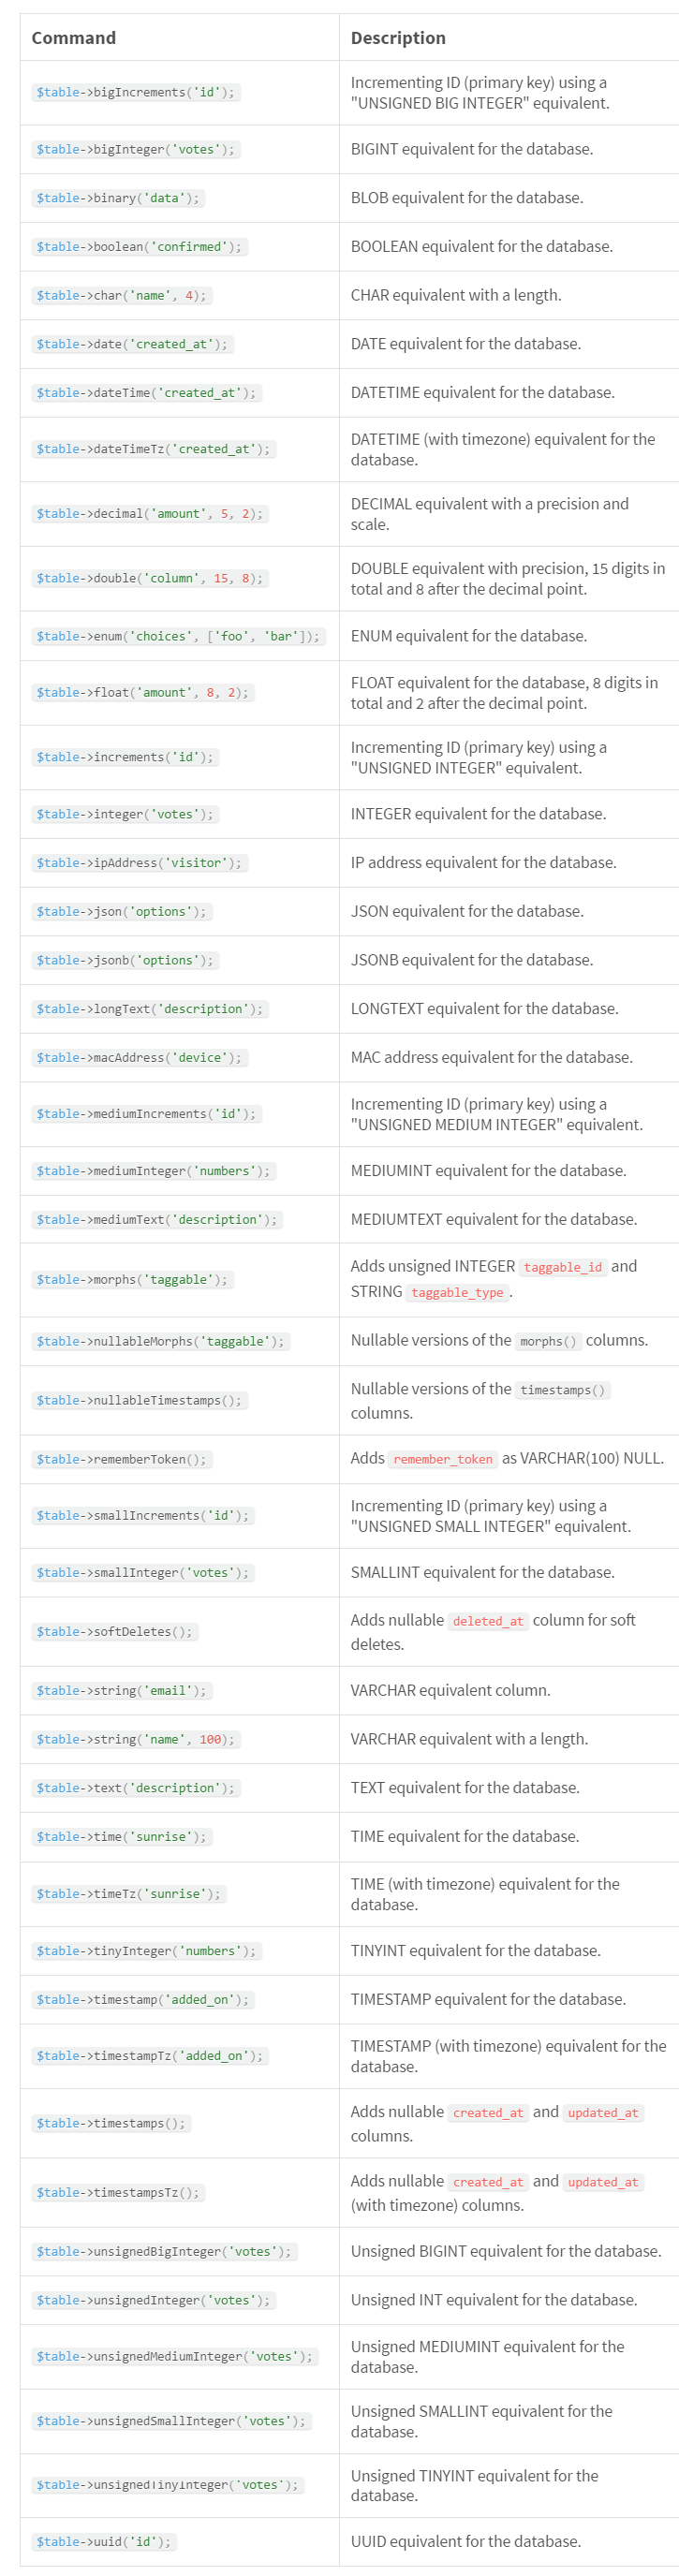
Available Column Types
The schema builder contains a variety of column types that you can specify when buiding your tables.
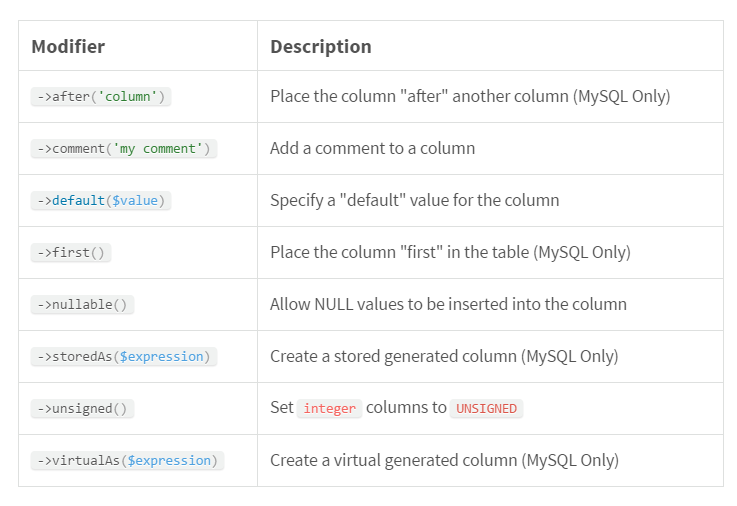
Column Modifiers
In addition to the column types listed above, there are several column “modifiers” you may use while adding a column to a database table.
Schema::table('users', function (Blueprint $table) {
    $table->string('email')->nullable();
});
Below is a list of all the available column modifier.
Modifying Columns
Prerequisites
Before modifying a column, be sure to add the doctrine/dbal dependency to your composer.json file.
composer require doctrine/dbal
Updating Column Attributes
The change method allows you to modify some existing column types to a new type or modify the column’s attributes.
Schema::table('users', function (Blueprint $table) {
    $table->string('name', 50)->change();
});
We can also modify a column to be nullable.
Schema::table('users', function (Blueprint $table) {
    $table->string('name', 50)->nullable()->change();
});
Renaming Columns
To rename a column, you can use renameColumn method on the Schema builder.
Schema::table('users', function (Blueprint $table) {
    $table->renameColumn('from', 'to');
});
Dropping Columns
The dropColumn method is used to drop the column.
Schema::table('users', function (Blueprint $table) {
    $table->dropColumn('votes');
});
You can also drop multiple column from a table by passing an array.
Schema::table('users', function (Blueprint $table) {
    $table->dropColumn(['votes', 'avatar', 'location']);
});
7. Indexes.
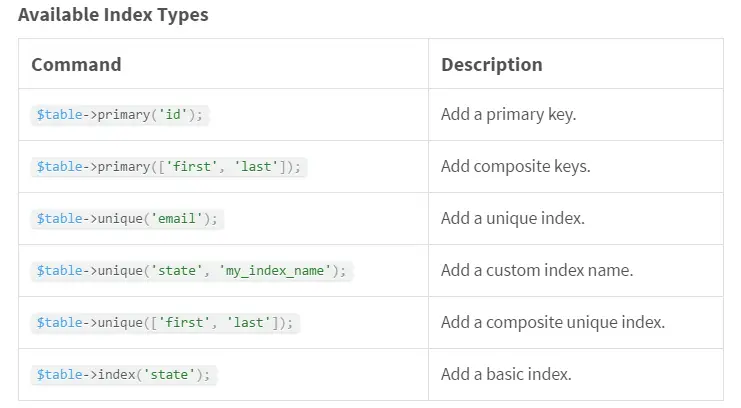
Creating Indexes
The schema builder supports several types of indexes. For example that specifies a column’s values should be unique. To create the index, we can simply chain the unique method onto the column defination.
$table->string('email')->unique();
You can create the index after defining the column.
$table->unique('email');
You can pass an array of columns to an index method to create a compound index.
$table->index(['account_id', 'created_at']);
Dropping Indexes
To drop an index, you must specify the index’s name. Laravel automatically assigns a reasonable name to the indexes. Simply concatenate the table name, the name of the indexed column, and the index type.
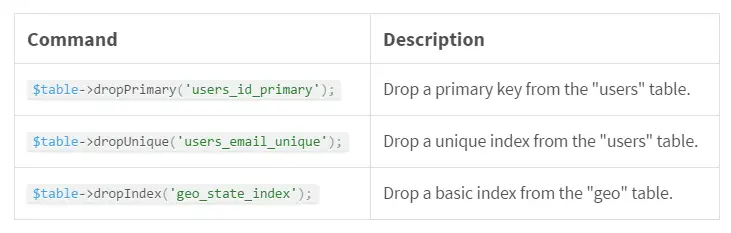
If you pass an array of columns into a method that drops indexes, the conventional index name will be generated based on the table name, columns and key type.
Schema::table('geo', function (Blueprint $table) {
    $table->dropIndex(['state']); // Drops index 'geo_state_index'
});
Laravel Database Pagination
Laravel Database Pagination – The Laravel Database Pagination is provide simple and easy to use pagination of database result out of the box.
Laravel Database Pagination.
Let us understand how to use laravel Database Pagination.
Function:-
There are some followings function available in laravel Database Pagination.
- 1. Introduction.
- 2. Basic Usage.
- 3. Displaying Pagination Results.
- 4. Customizing The Pagination View.
- 5. Paginator Instance Methods.
1. Introduction.
It other framework pagination create very hard but in laravel paginator is complete with the query builder and Eloquent ORM. It is provide simple and easy to use pagination of dabase result.
The HTML generated by the paginator is compatible with Bootstrap CSS framework.
2. Basic Usage.
Paginating Query Builder Results
There are many way to create pagination item. The simple way is by using the paginate
method on the query builder or an Eloquent query. This method automatically takes care of setting the proper limit and offset based on the current page being viewed by the user.
Let’s look at a simple example.
paginate(15);

        return view('user.index', ['users' => $users]);
    }
}
|
Simple Pagination
If you have to need to display simple Next and Previous link in your pagination view. Then you can use simplePaginate method to perform a more efficient query.
$users = DB::table('users')->simplePaginate(15);
Paginating Eloquent Results
You can also paginate Eloquent queries, like we will paginate the user model with 10 item per page.
$users = DB::table('users')->simplePaginate(10);
You can call paginate after setting other constraints on the query, such as where clauses.
$users = User::where('votes', '>', 100)->paginate(15);
You can also use the simplePaginate method when paginating Eloquent models.
$users = User::where('votes', '>', 100)->simplePaginate(15);
3. Displaying Pagination Results.
You can display the result and render the page links using blade.
@foreach ($users as $user) {{ $user->name }} @endforeach{{ $users->links() }}
The links method will render the link to the rest of the page inthe result set.
Customizing The Paginator URI
The withPath method allows you to customize the URI used by the paginator when generating links.
Let’s look at a simple example.
Route::get('users', function () {
    $users = App\User::paginate(15);

    $users->withPath('custom/url');

    //
});
|
Appending To Pagination Links
You can append to the query string of pagination links using the appemds method.
{{ $users->appends(['sort' => 'votes'])->links() }}
If you want to append a “hash fragment” to the paginator’s URLs, you may use the fragment method.
{{ $users->fragment('foo')->links() }}
Converting Results To JSON
The Laravel pagination result classes implemented the Illuminate/Contracts/Support/Jsonable Interface contract and expose the toJson
method. So it is very simple to convert pagination result to JSON. You can also convert a paginator instance to JSON by simply returning it from a route or controller action.
Route::get('users', function () {
    return App\User::paginate();
});
Let’s look at a simple example.
{
   "total": 50,
   "per_page": 15,
   "current_page": 1,
   "last_page": 4,
   "next_page_url": "http://laravel.app?page=2",
   "prev_page_url": null,
   "from": 1,
   "to": 15,
   "data":[
        {
            // Result Object
        },
        {
            // Result Object
        }
   ]
}
|
4. Customizing The Pagination View.
You can customize the pagination view like this:-
{{ $paginator->links('view.name') }}

// Passing data to the view...
{{ $paginator->links('view.name', ['foo' => 'bar']) }}
The simplest way to customize the pagination views is by exporting them to your resources/views/vendor directory using the vendor:publish command.
php artisan vendor:publish --tag=laravel-pagination
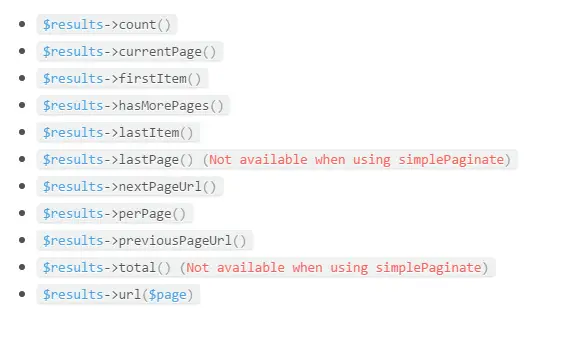
5. Paginator Instance Methods.
Each paginator instance provides additional pagination information via the following methods.
Laravel Database Inserts, Updates And Deletes
Laravel Database Inserts, Updates And Deletes – The Laravel Database Inserts, Updates And Deletes is used insert, update and delete the data from the database.
Laravel Database Inserts, Updates And Deletes.
Let us understand how to use Laravel Database Inserts, Updates And Deletes.
Function:-
There are some followings function available in Laravel Database Inserts, Updates And Deletes.
- 1. Inserts.
- 2. Updates.
- 3. Deletes.
- 4. Pessimistic Locking.
1. Inserts.
The query builder also provide an insert method for inserting records into the database table. This method accepts an array of column name and values.
DB::table('users')->insert(
    ['email' => 'sonu@example.com', 'name' => 0]
);
You can even insert several records into the table with single call call of insert method but passing in array format.
DB::table('users')->insert([
    ['email' => 'sonu@example.com', 'votes' => 0],
    ['email' => 'abhi@example.com', 'votes' => 0]
]);
Auto-Incrementing IDs
If the table has auto increment id, use the insertGetId method to insert a record.
$id = DB::table('users')->insertGetId(
    ['email' => 'sonu@example.com', 'votes' => 0]
);
2. Updates.
The update method is used to update the record which is already inserted in the database.
DB::table('users')
            ->where('id', 1)
            ->update(['votes' => 1]);
Updating JSON Columns
When updating a JSON column, you should use -> syntax to access the key in the JSON object.
DB::table('users')
            ->where('id', 1)
            ->update(['options->enabled' => true]);
Increment & Decrement
The query builder also provides convenient methods for incrementing or decrementing the value of a given column. This is simply a shortcut, providing a more expressive and terse interface compared to manually writing the update statement.
DB::table('users')->increment('votes');

DB::table('users')->increment('votes', 5);

DB::table('users')->decrement('votes');

DB::table('users')->decrement('votes', 5);
You can also specify additional columns to update during the operation.
DB::table('users')->increment('votes', 1, ['name' => 'John']);
3. Deletes.
The query builder can also be used to delete records from the database by using the delete method.
DB::table('users')->delete();

DB::table('users')->where('votes', '>', 100)->delete();
If you want to truncate the entire table which will remove all rows and reset the auto-incrementing ID to zero, you may use the truncate method.
DB::table('users')->truncate();
4. Pessimistic Locking.
The query builder also includes a few functions to help you do “pessimistic locking” on your
select statements. To run the statement with a shared lock, you may use the shareLock method on a query.
DB::table('users')->where('votes', '>', 100)->sharedLock()->get();
You can also use lockForUpdate method.
DB::table('users')->where('votes', '>', 100)->lockForUpdate()->get();


