Laravel Homestead
Laravel Homestead – Laravel Homestead is used to provide you a wonderfull development enviroment without requiring you to install PHP, a web server and any other server software on your local machine..
Laravel Homestead.
Let us understand how to use laravel homestead.
Function:-
There are some followings function available in laravel homestead.
- 1. Introduction.
- 2. Installation & Setup.
- 3. Daily Usage.
- 4. Network Interfaces.
- 5. Updating Homestead.
- 6. Old Versions.
- 7. Provider Specific Settings.
1. Introduction.
Laravel strives to make the entire php development experience delightful, including your local development enviroment.
Laravel homestead is an official, pre packaged vagrant box that provides you a wonderfull development enviroment and no need to install php and other software on your machine. No more worrying about messing up your operating system. Vagrant boxes are completely disposable. If something goes wrong, you can destroy and re-create the box in minutes.
Homestead runs on any windows, MAC or linux system and includes the Nginx web server, PHP 7.1, MySql, Postgres, Redis, Memcached, Node and all of the other goodies you need to develop amazing Laravel applications.
Included software
Ubuntu 16.04
Git
PHP 7.1
Ngnix
MySql
MariaDB
Sqlite3
Postgres
Composer
Node
Redis
Memcached
Beanstalkd
Mailhog
ngrok
2. Installation & Setup.
First Steps
Before launching you Homestead enviroment, you must install Virtualbox5.1, Vmware or Parallels as well as Vagrant. All of these software packages provide easy to use visual installer for all popular operating systems.
To use the VMware provide, you will need to purchase both VMware fusion/ Workstation and the VMware Vagrant plug-in. Through it is not free, VMware can provide faster shared folder performance out of the box.
To use the parallel provider, you have to need to install parallels Vagrant plug-in. It is free to charge.
Installing the homestead vagrant box
VirtualBox/ VMware and Vagrant have been installed, you should add the laravel/homestead box to your vagrant installation using these command. It will take a few minutes to download the box.
vagrant box add laravel/homestead
Installing Homestead
You can install Homestead by simply create a clone the storage. Consider clone the storage into a Homestead folder within your home directory.
cd ~

git clone https://github.com/laravel/homestead.git Homestead
You should check out a tagged version of homestead.
cd Homestead

git checkout v4.0.5
Once you have cloned the homestead repository, run the bash init.sh command from the homestead directory to create the homestead.yaml configuration file. The homestead.yaml file will be placed in the homestead directory.
bash init.sh

init.bat
Configuring Homestead
Setting Your Provider
The provider key in your Homestead.yaml file indicates which vagrant provider should be used.
You may set to the provider you prefer.
provider: virtualbox
Configuring Shared Folders
The folder property of the Homestead.yaml file lists all of the folders you want to share with your Homestead environment. As files within these folders are changed, they will be kept in sync between your local machine and the Homestead environment. You may configure as many shared folders as necessary.
folders:
    - map: ~/Code
      to: /home/vagrant/Code
To enable NFS, just add a simple flag to your synced folder configuration.
folders:
    - map: ~/Code
      to: /home/vagrant/Code
      type: "nfs"
You can also pass any options supported by Vagrant synced folders by listing them under the option key.
folders:
    - map: ~/Code
      to: /home/vagrant/Code
      type: "rsync"
      options:
          rsync__args: ["--verbose", "--archive", "--delete", "-zz"]
          rsync__exclude: ["node_modules"]
Configuring Nginx Sites
The sites property allows you to easily map a domain to the folder on your homestead environment. A sample site configuration is included in the Homestead.yaml file.
sites:
    - map: homestead.app
      to: /home/vagrant/Code/Laravel/public
If you change the sites property after supply the homestead box, you should re-run vagrant reload–provision to update the Nginx configuration on the virtual machine.
The Hosts File
The hosts file will redirect request for your Homestead sites into your Homestead machine. On Mac and Linux file is located at /etc/hosts. On window it is loacted at C:\Windows\System32\drivers\etc\hosts.
192.168.10.10 homestead.app
Make sure the IP address listed is the one set in your Homestead.yaml file.
http://homestead.app
Launching The Vagrant Box
You have edited the Homestead.yaml to your liking, run the vagrant up command from your Homestead directory. It will boot the machine and automatically configure your shared folder and Nginx sites.
If you want to destroy the machine you can use the vagrant destroy –force command.
Per Project Installation
Earlier of installing Homestead globally and sharing the same Homestead box across all of your projects, you may earlier configure a Homestead instance for each project you manage
To install Homestead directly into your project. Require it using composer.
composer require laravel/homestead --dev
When Homestead has been installed, use the make command to generate the vagrantfile and Homestead.yaml file in your project root. The make command will automatically configure the sites and folders directive in the homestead.yaml.
Mac/Linux:
php vendor/bin/homestead make
Windows:
vendor\\bin\\homestead make
Installing MariaDB
If you prefer to use MariaDB instead of mysql. You may add the mariadb option to your homestead.yaml file. This option will remove MYSQL and instal MariaDB.
box: laravel/homestead
ip: "192.168.20.20"
memory: 2048
cpus: 4
provider: virtualbox
mariadb: true
3. Daily Usage.
Accessing Homestead Globally
Sometimes you want to vagrant up your homestead machine from anywhere on your filesystem. You can do this on Mac/Linux systems by adding a bash function to your bash profile. On window, you may accomplish this by adding a “batch” file to your path.
Mac/Linux:
function homestead() {
    ( cd ~/Homestead && vagrant $* )
}
Window:
@echo off

set cwd=%cd%
set homesteadVagrant=C:\Homestead

cd /d %homesteadVagrant% && vagrant %*
cd /d %cwd%

set cwd=
set homesteadVagrant=
Connecting Via SSH
You can SSH into your virtual machine by issuing the vagrant ssh terminal command from your Homestead directory.
Connecting To Databases
A Homestead database is configured for both MySql and Postgres out of the box. Laravel .env file configures the framework to use this database out of the box.
To connect the database, you should connect to 127.0.0.1 and port 33060 MySql or 54320 Postgres. The username and password for both databases is homestead / secret.
Adding Additional Sites
You can run as many Laravel installations as you wish on a single Homestead environment. To add an additional site, simply add the site to your Homestead.yaml file.
sites:
    - map: homestead.app
      to: /home/vagrant/Code/Laravel/public
    - map: another.app
      to: /home/vagrant/Code/another/public
If Vagrant is not automatically managing your “hosts” file, you may need to add the new site to that file as well
192.168.10.10  homestead.app
192.168.10.10  another.app
Site Types
Homestead supports several types of sites which allow you to easily run projects that are not based on Laravel
sites:
    - map: symfony2.app
      to: /home/vagrant/Code/Symfony/public
      type: symfony2
Configuring Cron Schedules
The schedule:run command will examine the job schedule defined in your App/console/kernel class to determine which jobs should be run. You can set the schedule option to true when you define sites.
sites:
    - map: homestead.app
      to: /home/vagrant/Code/Laravel/public
       schedule: true
Ports
By default, the following ports are forwaded to your homestead environment.
SSH:2222 → Forwards To 22
HTTP:8000 → Forwards To 80
HTTPS:44300 → Forwards To 443
MySQL:33060 → Forwards To 3306
Postgres:54320 → Forwards To 5432
Mailhog:8025 → Forwards To 8025
Forwarding Additional Ports
If you wish, you may forward additional ports to the Vagrant box, as well as specify their protocol
ports:
    - send: 93000
      to: 9300
    - send: 7777
      to: 777
      protocol: udp
Sharing Your Environment
Sometimes you may wish to share what you’re currently working on with coworkers or a client. Vagrant has a built-in way to support this via vagrant share; however, this will not work if you have multiple sites configured in your Homestead.yaml file.
To solve this problem, Homestead includes its own share command.
share homestead.app
After running the command, you will see an Ngrok screen appear which contains the activity log and the publicly accessible URLs for the shared site.
share homestead.app -region=eu -subdomain=laravel
4. Network Interfaces.
The networks property of the Homestead.yaml configures networks interfaces for your Homestead environment. You may configure as many interfaces as neccessary.
networks:
    - type: "private_network"
      ip: "192.168.10.20"
To enable a bridge interface, configure a bridge setting and change the network type of public network.
networks:
    - type: "public_network"
      ip: "192.168.10.20"
      bridge: "en1: Wi-Fi (AirPort)"
To enable DHCP, just remove the ip option from your configuration.
networks:
    - type: "public_network"
      bridge: "en1: Wi-Fi (AirPort)"
5. Updating Homestead.
You can update Homestead in two simple way. First, you should update the vagrant box using this command.
vagrant box update
If you have installed Homestead via your project’s composer.json file, you should ensure your composer.json file contains “laravel/homestead”: “^4” and update your dependencies.
composer update
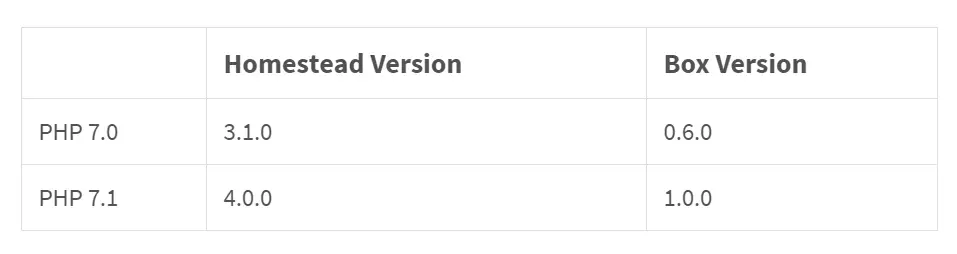
6. Old Versions.
You can easily override the version of the box that Homestead uses by adding the following line to your Homestead.yaml file.
version: 0.6.0
An Example:
box: laravel/homestead
version: 0.6.0
ip: "192.168.20.20"
memory: 2048
cpus: 4
provider: virtualbox
The old version will be updated like this:-
7. Provider Specific Settings.
VirtualBox
By default, Homestead configures the natdnshostresolver setting to on. This allows Homestead to use your host operating system’s DNS settings. If you would like to override
this behaviour, add the following lines to your Homestead.yaml file.
provider: virtualbox
natdnshostresolver: off
Advertisements


