Laravel Validation
Laravel Validation – The Laravel Validation is used to validate the incoming data. Laravel always check the error in the session data and automatically bind them to the view if they are available.
Laravel Validation.
Let us understand how to use laravel Validation.
Function:-
There are some followings function available in laravel Validation.
- 1. Introduction.
- 2. Validation Quickstart.
- 3. Form Request Validation.
- 4. Manually Creating Validators.
- 5. Working With Error Messages.
- 6. Available Validation Rules.
- 7. Conditionally Adding Rules.
- 8. Validating Arrays.
- 9. Custom Validation Rules.
1. Introduction.
Laravel provide several way to validate your incoming data. Laravel base conmtroller class uses a ValidatesRequests which provide a convenient method to validate incoming HTTP request with powerfull validation rules.
2. Validation Quickstart.
To learn about Laravel’s powerful validation feature. Here i am going to explain full example of validate a form and displaying the error message to the user.
Defining The Routes
Here we have to defined following routes in our routes/web.php file.
Route::get('create', 'PostController@create');

Route::post('post', 'PostController@store');
get method is for displaying a form for the user and post method is used to store the data in the database.
Creating The Controller
Lets see the simple controller that handle these routes.
Let’s look at a simple example.
<?php
namespace App\Http\Controllers;
use Illuminate\Http\Request;
use App\Http\Controllers\Controller;

class PostController extends Controller
{
    public function create()
    {
        return view('post.create');
    }

    public function store(Request $request)
    {
        // Validate and store the blog post...
    }
}
|
Writing The Validation Logic
Here i am going to explain how to validate input field. We may use validate method to set the validation rules. If the validation rules pass your code will be executed normally.If validation fails the error response will be sent bank to the user.
To get better understanding of the validate method.
Let's look at a simple example.
public function store(Request $request)
{
    $this->validate($request, [
        'title' => 'required|unique:posts|max:255',
        'body' => 'required',
    ]);
}
|
Stopping On First Validation Failure
Sometimes you want to stop running validation rules after the first valiadtion failure. That time we are use bail rule to the attribute.
$this->validate($request, [
    'title' => 'bail|required|unique:posts|max:255',
    'body' => 'required',
]);
A Note On Nested Attributes
If HTTP request has nested parameter. You may specify them in your validation rules using dot syntax.
$this->validate($request, [
    'title' => 'required|unique:posts|max:255',
    'author.name' => 'required',
    'author.description' => 'required',
]);
Displaying The Validation Errors
Your incoming request do not pass the validation rules. Laravel will automatically redirect the user back to the previous location. The user will be redirected to our controller when validation fails and allowing us to display the error message in the views.
@if (count($errors) > 0)
        <ul>
            @foreach ($errors->all() as $error)
                <li>{{ $error }}</li>
            @endforeach
        </ul>
    </div>
@endif
A Note On Optional Fields
Laravel include the TrimStrings and ConvertEmptyStringToNull middleware in your application. You will need to mark your optional request field as null and do not want the validator to consider null value as invalid.
$this->validate($request, [
    'title' => 'required|unique:posts|max:250',
    'body' => 'required',
    'publish_at' => 'nullable|date',
]);
Customizing The Flashed Error Format
You want to customize the format of the validation errors that are flashed to the session. When validation fails overRide the formatValidationErrors on your base controller. Most important is don't forget to import Illuminate\Contracts\Validation\Validator class at the top of your controller file.
Let's look at a simple example.
<?php
namespace App\Http\Controllers;
use Illuminate\Foundation\Bus\DispatchesJobs;
use Illuminate\Contracts\Validation\Validator;
use Illuminate\Routing\Controller as BaseController;
use Illuminate\Foundation\Validation\ValidatesRequests;

abstract class Controller extends BaseController
{
    use DispatchesJobs, ValidatesRequests;
    protected function formatValidationErrors(Validator $validator)
    {
        return $validator->errors()->all();
    }
}
|
AJAX Requests & Validation
We used AJAX Request & Validation for traditional form to send data to the application. When using the validate method during an AJAX request. Laravel will not generate a redirect response. Its generates a JSON response.
3. Form Request Validation.
Creating Form Requests
If you want to create a form request. It is custom request class that contain validation logic. We can create like this:-
php artisan make:request StoreBlogPost
The generated class will be placed in app/Http/Requests directory. if directory doesn't exists, it will be created when run the make:request command.
public function rules()
{
    return [
        'title' => 'required|unique:posts|max:255',
        'body' => 'required',
    ];
}
Adding After Hooks To Form Requests
You want to add an after hook to a form request, you can use withValidator
method. Its allows you to call any of its methods before the validation rules.
public function withValidator($validator)
{
    $validator->after(function ($validator) {
        if ($this->somethingElseIsInvalid()) {
            $validator->errors()->add('field', 'Something is wrong with this field!');
        }
    });
}
Authorizing Form Requests
The form request class also contain an authorize method. You can check if the autheticated user actually has the authority to update a given resource.
public function authorize()
{
    $comment = Comment::find($this->route('comment'));

    return $comment && $this->user()->can('update', $comment);
}
route method:-
Route::post('comment/{comment}');
4. Manually Creating Validators.
If you don't want to use the ValidatesRequests traits Validate method. You can create a validator instance manually using the validator facade method.
Let's look at a simple example.
<?php
namespace App\Http\Controllers;
use Validator;
use Illuminate\Http\Request;
use App\Http\Controllers\Controller;

class PostController extends Controller
{
    public function store(Request $request)
    {
        $validator = Validator::make($request->all(), [
            'title' => 'required|unique:posts|max:255',
            'body' => 'required',
        ]);

        if ($validator->fails()) {
            return redirect('post/create')
                        ->withErrors($validator)
                        ->withInput();
        }
    }
}
|
Automatic Redirection
If you want to create a validator instance manually but take advantage of the automatic redirection. Then you can use validate method on existing validator instance.
Validator::make($request->all(), [
    'title' => 'required|unique:posts|max:255',
    'body' => 'required',
])->validate();
Named Error Bags
Error bags allow to pass the error message for a specific form. If you have multiple form in a single page then we use Errors bags. We can simply pass a name as a second argument to WithErrors.
return redirect('register')
            ->withErrors($validator, 'login');
You may access like this:-
{{ $errors->login->first('email') }}
After Validation Hook
This method allows you to easily perform further validation and even add more error message to the message collection. You may use after method on a validator instance.
$validator = Validator::make(...);
$validator->after(function ($validator) {
    if ($this->somethingElseIsInvalid()) {
        $validator->errors()->add('field', 'Something is wrong with this field!');
    }
});

if ($validator->fails()) {
    //
}
5. Working With Error Messages.
The $error variable that is automatically made available to all views is also an instance of the MessageBag class. After calling the error method on a validator
instance, you will recieve an Illuminate\Support\MessageBag instance.
Retrieving The First Error Message For A Field
To get the first error message for a given field. We can use first method.
$errors = $validator->errors();

echo $errors->first('email');
Retrieving All Error Messages For A Field
If you need to get an array of the given input. You may use get method.
foreach ($errors->get('email') as $message) {
    //
}
If you are validating an array form field. You can get all of the messages for each of the array elements using the "*" character.
foreach ($errors->get('attachments.*') as $message) {
    //
}
Retrieving All Error Messages For All Fields
To get an array of all message for all fields, use all method.
foreach ($errors->all() as $message) {
    //
}
Determining If Messages Exist For A Field
If any message exist for given field, You can use has method.
if ($errors->has('email')) {
    //
}
Custom Error Messages
There are many way to specify custom message. First, you can pass the custom message as the third argument to the validator::make method.
$messages = [
    'required' => 'The :attribute field is required.',
];

$validator = Validator::make($input, $rules, $messages);
The attributes placed-holder will be replaced by the actual name of the field under validation.
$messages = [
    'same'    => 'The :attribute and :other must match.',
    'size'    => 'The :attribute must be exactly :size.',
    'between' => 'The :attribute must be between :min - :max.',
    'in'      => 'The :attribute must be one of the following types: :values',
];
Specifying A Custom Message For A Given Attribute
$messages = [
    'email.required' => 'We need to know your e-mail address!',
];
Specifying Custom Messages In Language Files
'custom' => [
    'email' => [
        'required' => 'We need to know your e-mail address!',
    ],
],
Specifying Custom Attributes In Language Files
'attributes' => [
    'email' => 'email address',
],
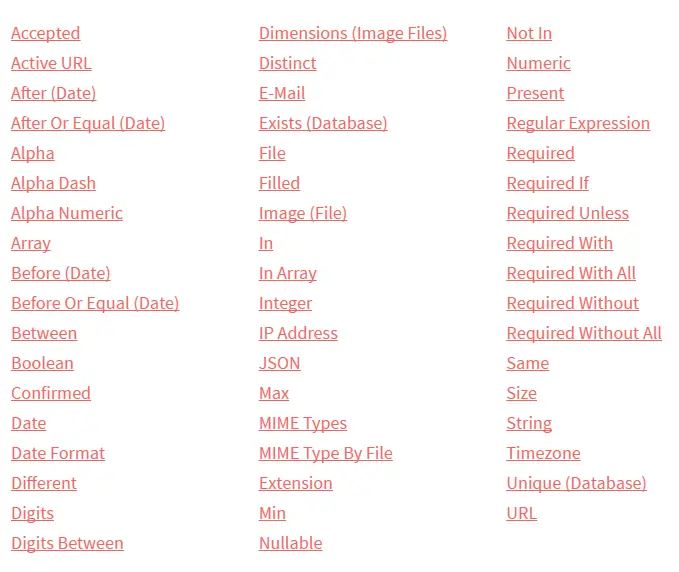
6. Available Validation Rules.
The list of all available validation rules and their function.
7. Conditionally Adding Rules.
Validating When Present
In some condition, you want to run validation checks against a field only if field is present in the input array. Add the sometimes rule to your rule list.
$v = Validator::make($data, [
    'email' => 'sometimes|required|email',
]);
Complex Conditional Validation
Sometimes you wish to add validation rules based on more complex conditional logic. Like: you have to required a given field only if another field has greater value than 100. Then you may need two fields to have a given value only when another field is present. First, create a validator instance with static rules.
$v = Validator::make($data, [
    'email' => 'required|email',
    'games' => 'required|numeric',
]);
Suppose our web application is for game collector. We can sometimes method on the validator instance.
$v->sometimes('reason', 'required|max:500', function ($input) {
    return $input->games >= 100;
});
$v->sometimes(['reason', 'cost'], 'required', function ($input) {
    return $input->games >= 100;
});
8. Validating Arrays.
Validating array based form input fields to validate that each e-mail in a given array input field is unique.
$validator = Validator::make($request->all(), [
    'person.*.email' => 'email|unique:users',
    'person.*.first_name' => 'required_with:person.*.last_name',
]);
You can use the "*" character when specifying your validation message in your language files.
'custom' => [
    'person.*.email' => [
        'unique' => 'Each person must have a unique e-mail address',
    ]
],
9. Custom Validation Rules.
Laravel provides a variety of helpful validation rules to registering custom validation rules is using the extend method on the validator facade.
Let's look at a simple example.
<?php
namespace App\Providers;
use Illuminate\Support\ServiceProvider;
use Illuminate\Support\Facades\Validator;

class AppServiceProvider extends ServiceProvider
{

    public function boot()
    {
        Validator::extend('foo', function ($attribute, $value, $parameters, $validator) {
            return $value == 'foo';
        });
    }

    public function register()
    {
        //
    }
}
|
You may also pass a class and method to the extend method
Validator::extend('foo', 'FooValidator@validate');
Defining The Error Message
you will also need to define an error message for the custom rules.
"foo" => "Your input was invalid!",

"accepted" => "The :attribute must be accepted.",
When creating a custom validation rule, you may sometime need to define custom place-holder for error message.
Let's look at a simple example.
public function boot()
{
    Validator::extend(...);

    Validator::replacer('foo', function ($message, $attribute, $rule, $parameters) {
        return str_replace(...);
    });
}
|
Implicit Extensions
when an attribute being validated is not present or contains an empty value as defined by the required rule, normal validation rules, including custom extensions, are not run.
$rules = ['name' => 'unique'];

$input = ['name' => null];

Validator::make($input, $rules)->passes();
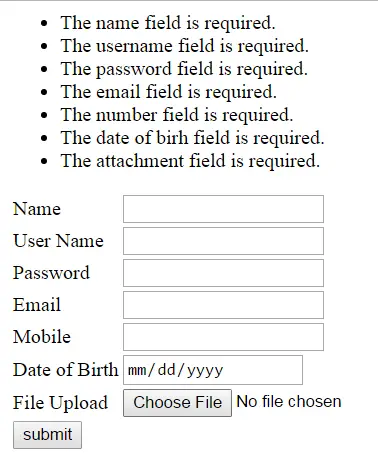
Full Example of Form Validation
Here i am going to explain how to validate a complete form.
Create a controller called RegistrationController.php by Artsian command.
php artisan make:controller RegistrationController --plain
Views Part:-[Registration.blade.php]
Let's look at a simple example.
<html>

<body>
@if (count($errors) > 0)
   <div class = "alert alert-danger">
      <ul>
         @foreach ($errors->all() as $error)
            <li>{{ $error }}</li>
         @endforeach
      </ul>
   </div>
@endif
<form action="validation" method="post">
<table>
<tr>
<td>Name</td>
<td><input type="text" name="name"></td>
</tr>
<tr>
<td>User Name</td>
<td><input type="text" name="username"></td>
</tr>
<tr>
<td>Password</td>
<td><input type="password" name="password"></td>
</tr>
<tr>
<td>Email</td>
<td><input type="text" name="email"></td>
</tr>
<tr>
<td>Mobile</td>
<td><input type="number" name="number"></td>
</tr>
<tr>
<td>Date of Birth</td>
<td><input type="date" name="date_of_birh"></td>
</tr>
<tr>
<td>File Upload</td>
<td><input type="file" name="attachment"></td>
</tr>
<input type = "hidden" name = "_token" value = "<?php echo csrf_token() ?>">
<tr>
<td>
<input type="submit" name="submit" value="submit">
</td>
</tr>
</form>
</body>
</html>
|
Controller Parts:-[RegistrationController.php]
Let's look at a simple example.
<?php
namespace App\Http\Controllers;
use Illuminate\Http\Request;
use App\Http\Requests;
use App\Http\Controllers\Controller;

class RegistrationController extends Controller
{
  public function showform(){
      return view('Registration');

   }
   public function validate2(Request $request)
   {
	   print_r($request->all());
       $this->validate($request,[
	     'name'=>'required',
         'username'=>'required|max:8',
         'password'=>'required',
		 'email'=>'required',
		 'number'=>'required',
		 'date_of_birh'=>'required',
		 'attachment'=>'required'
      ]);
	}
}
|
Route Part:-
Route::get('/validation','RegistrationController@showform');
Route::post('/validation','RegistrationController@validate2');
Advertisements


