Category Archives: Vue.JS Tutorial
Vue.js Create Dynamic Table Component
Vue.js Create Dynamic Table Component – Rendering dynamic data in react is very simple, we can use v-for for looping table rows. Here in this example we are going to explain how to display dynamic data in vue js.
Vue.js Create Dynamic Table Component
JS Part contains the following code-
import Vue from 'vue';
export default {
data() {
    return {
    items: [
        {
            'id':'1',
            'name': 'John',
            'phone': '9832321***',
            'country': 'USA'
        },
        {
           'id':'2',
            'name': 'David',
            'phone': '9543231***',
            'country': 'CHINA'
        },
       {
           'id':'3',
            'name': 'Parthi',
            'phone': '9643261***',
            'country': 'INDIA'
        }
     ],
  }
}
}
Now Let’s create view part and render the above data in simple table.
  <table>
      <thead>
          <tr>
              <th>ID</th>
              <th>Name</th>
             <th>Phone</th>
              <th>Country</th>
          </tr>
      </thead>
      <tbody>
          <tr v-for="(item, index) in items" :key="index">
              <td>{{item.id}}</td>
              <td>{{item.name}}</td>
             <td>{{item.phone}}</td>
              <td>{{item.country}}</td>
          </tr>
      </tbody>
    </table>
Using the above example we can display any object data in simple table.
Vue.Js Reactivity
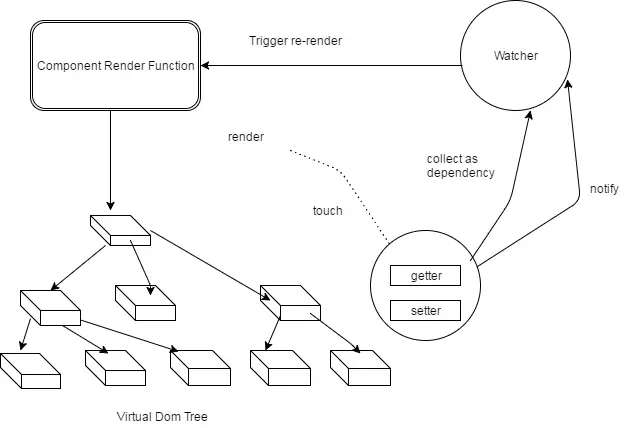
Vue.Js Reactivity:–Alright, we come to the point that you are very clear with the basics of Vue.js so the time is for studying more advance topic in Vue.js. Here we will teach you about reactivity system in detail. Because reactivity is most important feature of Vue.js.
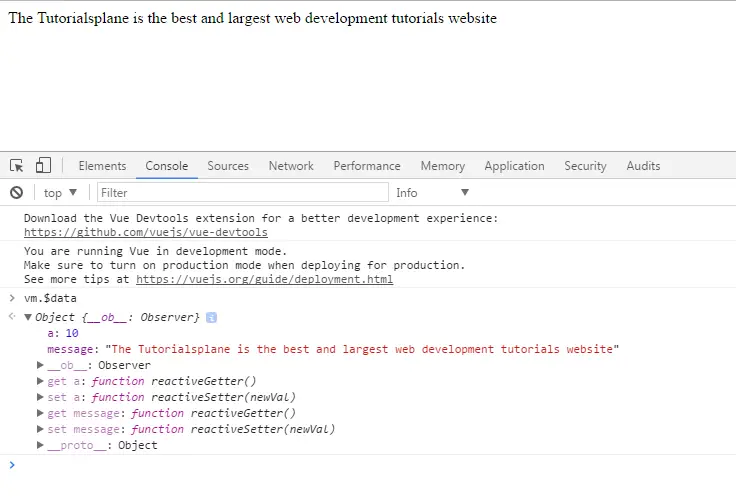
In this tutorial you will learn all about Vue.js reactivity system. When we assign a javascript object’s value to the data option in Vue instance , Vue calls itself it’s internal hoods to invoke the properties and immediately convert them into getters and setters. These getters and setters are responsible for dependency tracking and change notification when property getting changed and cause to re-render the template again in DOM. During the process a watcher instance is associated with a component instance which records any properties “touched” during the component rendering. Hence so when a setter is triggered, it notifies the watcher and re-renders a component again.
Vue.Js Reactivity | Example
Reactivity | Demo | Example
|
reactiveSetter() and reactiveGetter() | Example
When Vue’s instance is created then automatically Vue.js calls getters and setters internally. If any data property changes then reactiveSetter is invoked. Hence so there are two methods which are being invoked when a property id modified.
Reactivity | Demo | Example
|
|

Explanation Of Program
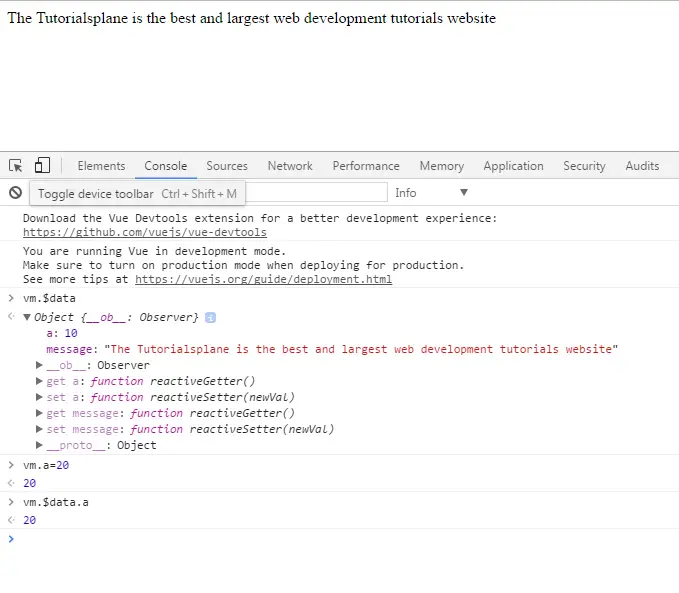
Explanation:– In above screenshot you can see the change in a’s value. Initially a’s value is ’10’ but you can change it dynamically in javascript console by typing vm.a=20. But all changes will remove from the program once you close the browser’s window.
Change Detection Precautions | Example
Vue does not allow adding new root level property dynamically to the existing Vue instance. However it is possibly done by nested object using Vue.set(object, key, value) method which you will see later in this tutorial.
To add a root level property you have to initialize a Vue instance by declaring all root level properties upfront without a value assigned to it.
Example
|


Explanation of Program
Explanation:–Here we are attaching two screenshots for your better understanding. Here main motive is how to follow the precaution to define a data property in vue instance because a getter looks over it when Vue is instantiated itself in the program.
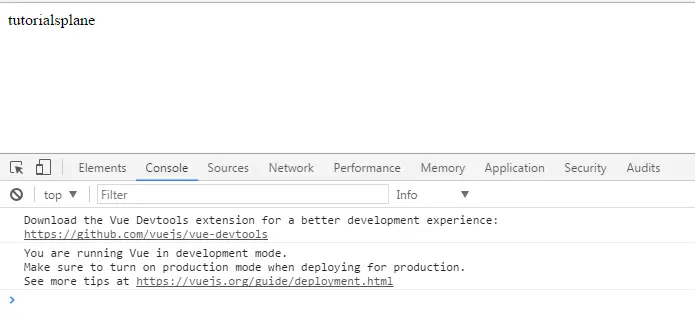
In first screenshot red lines indicates the warning message for data property named message saying something like “message is not defined but referencing during rendering process of Vue.js system.” Hence so to remove this problem we have to define “message” property with a blank string by a symbol single quotes(‘ ‘). Now you get the desired output string tutorialsplane assigned to message property.
How To Update Data Property In Vue.Js | Example
To understand much better read each step given below carefully:
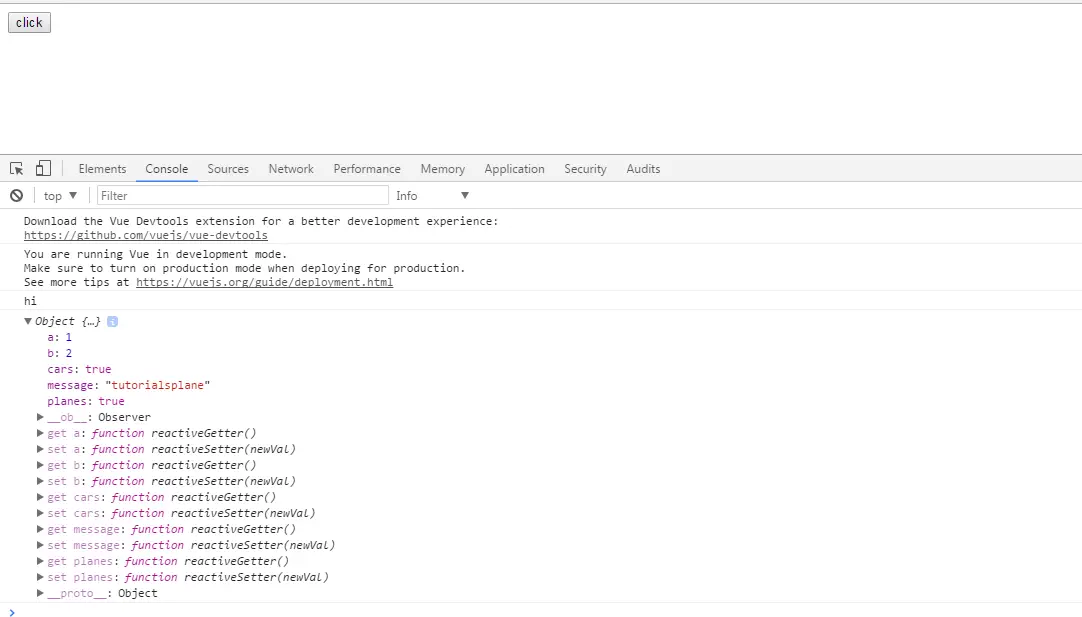
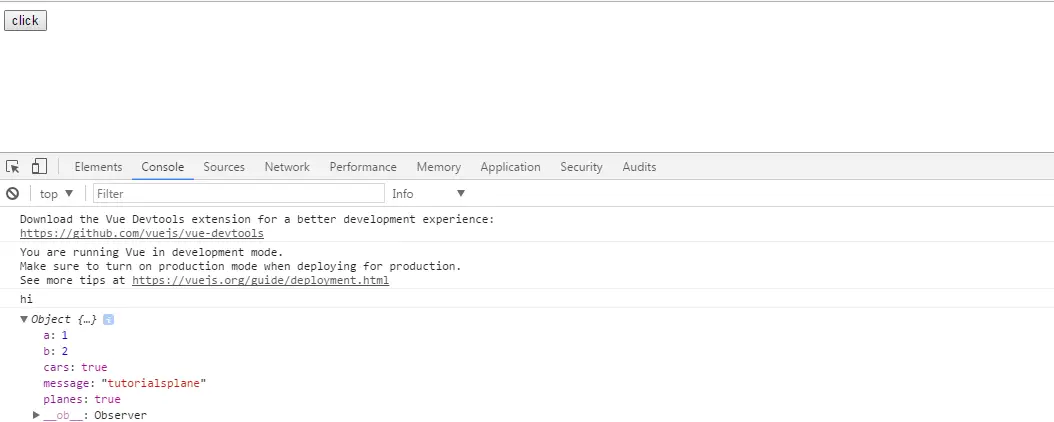
1.Now here we will tell you how to add a data property programmatically in existing Vue instance. Now we will have to create a nested object and therefore we will reference it in our main Vue object.
2.In this tutorial we are showing three propertiesa, b and planes which are added programmatically. We have justified their getters and setters which are shown in program output console.
3.We have used Object.assign() method to add three properties which we have told you in above line.
Example
|
|
Explanation of Program
Explanation:–Once we click on button then we see the getters and setters on console. Usually we have three properties a,b,cars and planes added to the root Vue instance.
Also you can access each of them by typing vm.$data.someObject.planes and see the result on console. Same thing you can do in your program to change the data properties which is clearly represented in above code snippet.
Async Update Queue | Example
Vue observes especially for the change in any data property and updates it’s DOM asynchronously. Hence so it calls itself the watcher to see the change and if if it founds a change quickly it keeps it in buffer inside a queue. If one watcher triggers many times then it will be pushed in queue only once in order to reduce DOM manipulations. So in next event loop “tick” iteration, it calls the queue data to be executed and flushes out the queue accordingly.
In this process Vue performs execution of different phases in each loop cycle using the following internal methods Promise.then,MutationObserver,setTimeout(fn, 0)
Example
|
Explanation Of Program
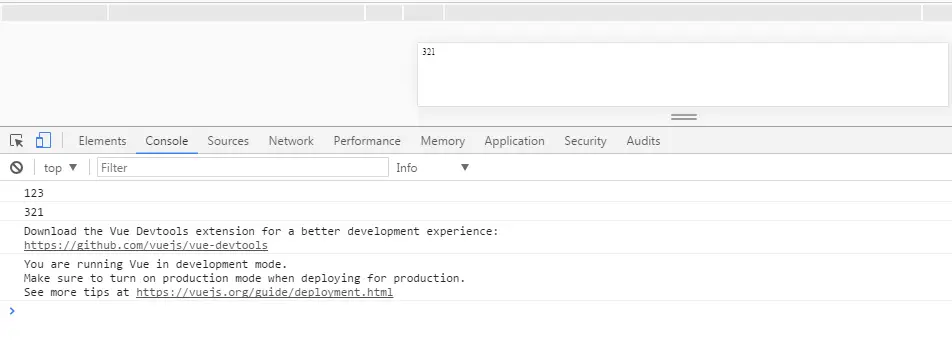
Explanation:–In above example we have writtten nextTick(callBack) function which tells Vue that a specific data property is being changed so it gives instruction to the Vue system to update DOM model. Don’t confuse with the method how does it work. It is useful in re-rendering of DOM itself when a change is occured in Vue instance variable, data properties etc.
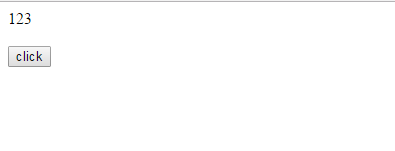
How To Use vm.$nextTick() In Components | Example
A method vm.$nextTick() can be used in Vue components to ensure the updation in DOM but but thing to keep in mind is that you can apply this method while using comonent’s template. See the below examples whichs explains everything possible which is needed while DOM Manipulations.
Example
|
Before Button Click
After Button Click Browser Window
After Button Click Window Console
Vue.Js Template With Components
Vue.Js Template With Components:–In this tutorial we will teach you basic concept of components. When we make a larger app then we need components because we can divide our program in various component modules. Hence so our project becomes easier to code and maintain by using components strategy.
Vue.Js Template With Components | Example
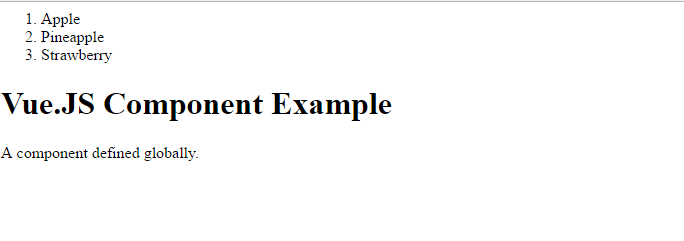
A component is a Vue’s instance itself with predefined options which can be used inside vue instance but here we will discuss all possible ways to define a component in View-Model.
Registration of Component | Example
You can use the following code syntax to register a component Vue.component(tagName,options). To register a global component following things keep in mind:
1. Always register a component before Vue instantiation.
2.Once you register your Vue component then use it as an instance’s template inside the predefine tagName that is my-component in below code snippet. So we have explained how to register and how to use it in View-Model.
Component | Registration | Example
Now we will understand how to register a component globally outside the Vue’instance.
Global Registration | Demo | Example
Vue.component('my-component', {
template: '
|
Rendering Template Using Component | Syntax
Now we will show our component part into DOM structure of document using View-Model.
Global Registration | Example
In below code example we are combining both above code snippets to make a meaningful example for your better understanding also you can use this code snippet in your program to justify it.
Example
|
|
Explanation of Program
Explanation:–Above program defines a component carrying two parameters(tagName and options). Here tagName parameter takes as a tagName and a template A Custom Component! as second parameter to make a complete component. So the output presents the template in between my-component in View-Model using DOM structure. You can see this View-Model by writing myapp.$e1 on output console.
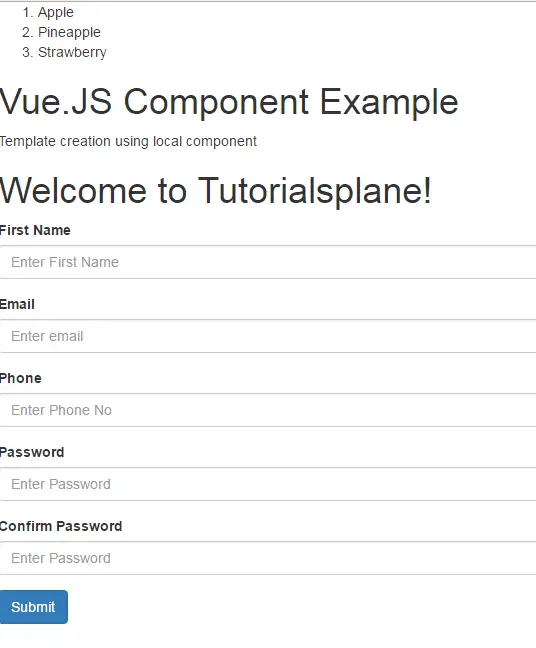
Local Registration | Example
You can register a component locally inside a Vue’s instance using the option components. Below is a code snippet for syntax of local registration.
Below is syntax for local registration of a component.
Syntax
var comp= {
  template: 'Template creation using component'
}
new Vue({
  // ...
  components: {
    //  will only be available in parent's template
    'my-component': comp
  }
})
Combination Of Both The Above Programs | Complete | Example
Below example carries the complete information about the creation and registration of a component and therefore it illustrates how does we render a template in View of browser using View-Model.
Local Registration | Demo | Example
|
|

Execution of Program
Explanation:–In here we see only the difference between local registration and global registration is that unlikely we don’t need to write opening and closing my-component as a tagName to render the template value stored in “comp” variable ; instead we have used ‘my-component’: comp code in our program inside the view instance itself.
Creating Component Based Template Using Template Tag | Example
What we have done here is that we don’t use opening and closing tagName my-component to render form Template option of component in our program.
In other words we are using an id selector #greeting-template as a reference in our template option in component.
Example
|
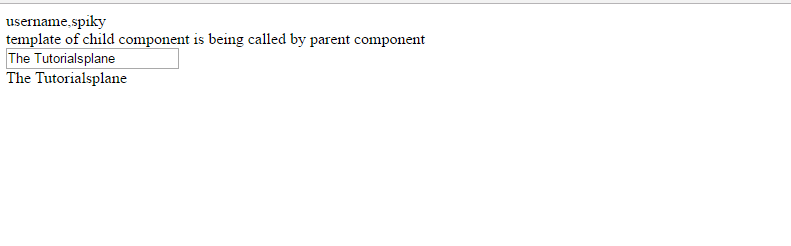
Parent-child Component Relationship using props | Example
Here we do explain data flow between child and parent components. So parent component takes template data from child component. In our example the following template is imported by parent component from child component.template: ‘
‘ by using
Another scenario you can see here is about props property which is used to import user string value from anonymous root component into another child component named my-component>
; also we have utilize the actual power of v-bind to attach it’s value in the template of my-component.
props | Example
|
|
Vue.Js Computed And Watcher Properties
Vue.Js Computed And Watcher Properties:–In earlier tutorials we have already seen the templates and their rendering in DOM structure very well. But now we will learn about computed properties. We will study the following topic and concepts?
What are computed and watcher properties and where and how do we use them in our application?
We will cover both topics one by one in detail. First we come across computed property. So let you know about the computed property.
Vue.Js Computed Property | Example
You have oftenly seen that we can bind javascript data properties in a template directly by using string interpolation approach. Therefore we need not to call property on data object explicity. Vue.Js does itself this operation for us.
But here comes a serious problem itself when we need to execute more complex logic like looping using interpolation to bind with template. So it is recommended not to use any loop or complex data operation in template interpolation. To avoid this problem in order to maintain our code easily Vue.Js provide us computed property.
Converting Javascript Object into Template Without Computed Property | Example
Here we are going to discuss only about the scenario where you can see only interpolation concept to access javascript data object’s properties.
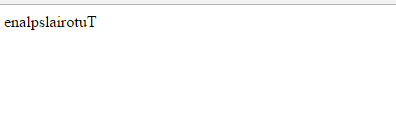
In example we write a code to reverse the message value. See the example how does the changes take place.
Example
|
Converting Javascript Object into template With Computed Property | Example
By using comp property approach makes it pretty neat and concise method to make any change in data property.
Here we have used {{ reversedMessage }} interpolation notation to reverse the “message”.
Example
|

Computed Caching Vs Methods
1.In above example we can bind the message property by using method declaration instead of computed propertyreversedMessage. But computed property has a unique feature cashing which methods don’t provide.You know cashing is a more powerful principle of any operation in programming which helps a programmer in many ways.
2.In general computed properties provide caching which in turn works efficiently than a method approach in program.
3.In other words you can reach by the term uncaching means extraneous work done by the program which reduces performance for the program.
4.So we recommend you to write computed propert only when they are needed.
5.So computed property fetches ole evaluated data and returns it each time until no change is seen in data object.
6.A computed property re-evaluate itself only if data property got changed using dependency updation.
7.Below example is the beast suitable example of computed property where we are cashing the date in our program.
computed: {
  now: function () {
    return Date.now()
  }
}
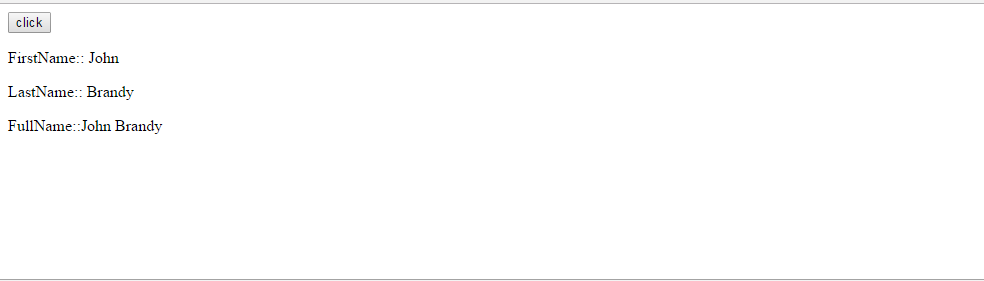
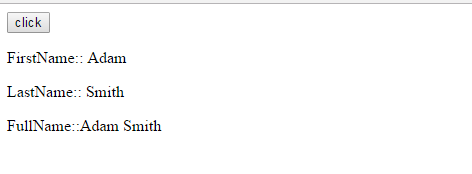
Computed Getters And Setters | Example
Computed property provide getters and setters facility to set and get data properties according your program’s need. Below we are giving an example which has two data properties namedfirstName and
Example
|
Watchers | Example
Watchers are used in such scenarios where data changes quickly. In below example we use a javascript object named Question. To see the change in value we have used v-model directive. When a user types something in input textbox ; immediately alert comes up after notifying the change in old value(i.e null initially) and hence this work is done by watcher property as we have seen in above program.
Vue.Js Declarative Rendering
Vue.Js Declarative Rendering:–The designing objective of Vue.Js is optimization of code written for any application which reduces the time and performance. Apart from this you will see the latest design pattern methodologies in Vue.Js which makes your code pretty much easier and productive. So this framework provides an option to use declarative programmimg. In declarative programming when a data is connected with DOM then nobody knows how does it happen. So it encapsulate the internal information from outside world entities.
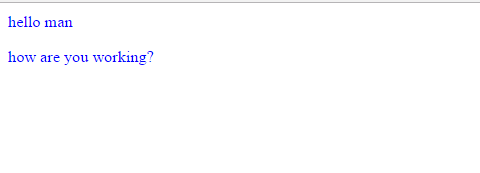
Now the things become reactive as you can see the change in template view . To see this change open the console and type app.message=some value ; immediately you will get some value as output template.
Let us take an example which enables you to understand the declarative rendering approach in Vue.Js.
Example
|
Conditional and Loops | Example
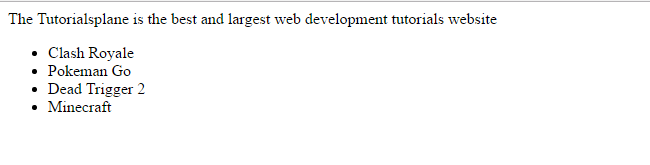
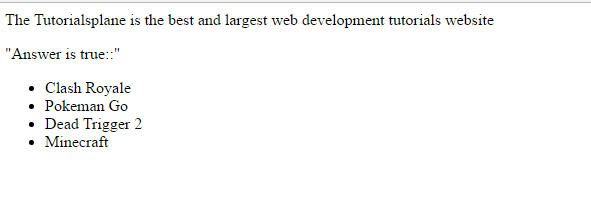
In below example you can see that we can toggle an element according to truthiness and falsiness of a variable name in Vue instance.
Example
|
Explanation of Program | Example
Explanation 1:–The reactivity is everything in Vue.Js which tells a DOM to update the data properties as they demand for it.
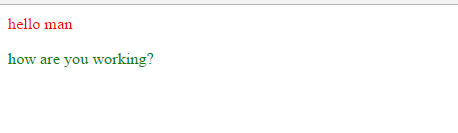
In below example we have defined a property namedans which is initially true. Hence as a result the template”Answer is true is”is being added on output screen. But when when you make a change in data property by writingvm.ans=false ; immediately template become disappear.
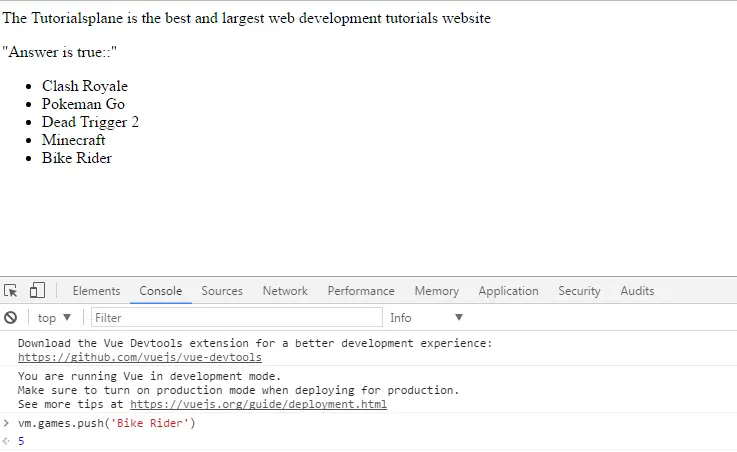
Explanation 2:–When we write vm.games.push(‘Bike Rider’) on output console then we see the quick change in template and resulting one more value in games array list. To justify this statement you can see the below screenshot. Henceforth these two examples are the best suitables for reactivity.
Handling User Input | Example
Here we have written a good example which shows the best usage on v-on directive . Here we bound a function named reverseTemplate()
which is called when a user clicks on button and performs respective operation making template as reversible.
Example
|
Vue.Js LifeCycle Diagram
Vue.Js LifeCycle Diagram:–Vue.Js life cycle diagram is very useful for Vue itself to execute it’s various stages.
Program evaluation goes through various stages when we run our program. As we know basic step to start with each app is to create a Vue instance with a new keyword. Hence so we will discuss all lifecycle callbacks. Vue.Js handles itself it’s callbacks similarily any software program does.
Vue.Js LifeCycle Diagram | Example
Below we are showhing a neat and plain pictorial diagram of lifecycle of Vue.Js which describes each and every stage and their corresponding actions. Read step by step to know much better about whole working of this diagram.
Vue.Js LifeCycle Diagram | Example | Demo
Below we are providing a pictorial representation of lifecycle diagram of Vue.Js. Each step and stage is described in easy way so you can understand the execution flow of the system callback hooks.
beforeCreate():–This callback hook is the starting point of Vue call backs system. Nothing much is happened in this callback. Just we Vue consider it as the beginning of program.
created():–Once the Vue instance is being created most of the data observation related task is automatically covered in this callback. This callback is called by Vue system after observation ofcomputedproperties,methods and watchers etc.
beforeMount():–This call back is really happened just for compilation of template. Once the template is being compiled immediately the output of this stage is given to mount() stage.
mounted():–After template compilation becomes complete then the template is mounted on Virtual DOM using Vue instantiation process. Hence this the stage where $el css selector comes into picture. In other words we can say that in here data object is ready to connect with DOM model.
beforeUpdate():–This hook is invoked together with updated() hook when we make some changes in our DOM. So this hook is considered after mount() hook.
updated():–To see the re-rendering of DOM events this call comes into picture. Hence so if we click on a button then value will change and again DOM will updated. Now we have shown a basic example which will show all callback hooks.
beforeDestroy():–Now almost work is done by Vue.js ; henceforth Vue is ready to call destroyed() method of it’s own.
destroyed():–At last during whole lifecycle diagram this is the last step which is useful release all of it’s important parts like directives,methods,watchers,event listeners etc.
Example
|
Vue.Js Event Modifiers
Vue.Js Event Modifiers:–Vue.Js provides us some modifiers which helps us in various ways when we start programming. So today we will see how does they work and what is their liabilies when we put them together with our code. Also we will observe how would these be change the event actions depending upon our requirement on higher level of programming like testing of software development.
Vue.Js Event Modifiers are used in event handling in various programming situations which are used after directive argument by a dot symbol.
Vue.Js Event Modifiers | Example
Their are several event modifiers which are mentioned below and will be described in details. So let you continue your learning from here itself.
The only thing that come in our mind when we start coding is why and when do use this concept. Hence in today’s programming world syntax, working style is keep on changing. So we will teach you in way where you will never any difficulty.
Only the purpose of above lines is that we want to keep our code neat and best in order to understand better. That is why we use some modifier in Vue.Js.
Also modifier provides flexibility to take a control over his program. All possible scenarios will be given in our examples below.
Below we are listing all event modifiers:
Example
|
|
Explanation of Program | Execution
Explanation:– When you use DOM events in your program, Moreover you will address the problem where and how to bind them. Hence so we will not use them inside event handler likewise in below example. Furthermore we will discuss int another example by using them with the help of v-on directive followed by a dot symbol that will change the behaviour of your program.
So consequently modifiers as name suggests are those who change the program’s behaviour.

DOM event stopPropogation() | Example
Sometimes we come across in situation in our program where we need to access and modify the functionality of the program the way we want. Henceforth we take an example below to modify the DOM property named as stopPropogation() which is useful to bubble up an event. As in here we assume you are a little bit familiar with javascript , DOM etc to understand the execution of above program.
Example
|
Explanation of Program | Execution
Explanation:– As a consequence we come across the result of the program. Here you can see two outputs attached both collectively. Hence so we got two alert boxes one after another i.e first output ‘ you clicked inside span element’
and the second output is
‘you are inside div element’
that is called when we click on span tag’s content.
So to avoid this bubbling up problem we use following code inside the div tag element. Consequently you will not get undesired alert which falls inside div tag.
Note:–Unfollow the comments line inside the code represented by /**\ or // or
onClick="if(event.stopPropagation){event.stopPropagation();}event.cancelBubble=true;"

Modifier | .self | .capture | Example
This tutorials gives you a brief idea about event ordering. There is a concept of event bubbling in which event handlers handles the event the from child to parent hierarchy. Mean while we will learn how to stop bubbling problem using Vue.Js .self and .capture modifiers.
.self modifier does the same task almost like stopPropogation() DOM event.
Example
|
Explanation of Program | Execution
Explanation:– In above example we have used both .capture and .self modifiers to restrict event bubbling happening in bottom to top (child-parent)
Key Modifiers | Example
These modifiers are most useful in various situations depending on you program fuctionality. They are most useful in various situation when once you will make your own app which takes control over the keyboard action based events.
All key modifiers are listed as in below table:
Example
Mouse Button Modifiers | Example
These events are eventually take place when a user clicks a mouse button. So depending upon user’s action there are three types of mouse enabled events which can be bind in Vue.Js.
All three button modifiers are listed as in below table:
Example
|
|

Vue.Js Style and Class Bindings
Vue.Js Style and Class Bindings:–Vue.Js framework is most powerful framework for single page applications as we all professionals know about it . In earlier examples we have seen how does it update html attribute values according to javascript data object dynamically using several directives. Moreover , today we will show you how to update style and class attributes of any element. One yhing to keep in mind is that style attribute binds by using v-bind directive. Hence so see the below examples and their explanation which we have put on your eye to observe the working of directives of Vue.Js.
We will teach you both the key concepts one by one so you have to practice more and more because it’s upto you how much you want to explore in programming work.
Vue.Js Style and Class Bindings | Example
This tutorial gives you the complete glimpse of html elements bindings approach and their implementation . So keep practicing more and more with us to know each topic in depth what it can and what it cann’t.
Vue.Js Style Binding | Example
In here first we are going to teach you all about v-bind:style.Let us see below example and we explained all important parts of the program.
Also we have explained below the code snippet you are seeing just below.
Example
|
Explanation of Program | Execution
Explanation:– Output of above written example can be seen below this paragrap. Here styleObjectA,styleObjectB properties are defined inside data option of the vue instance.But you see here style attributes written in their definition are not renderong upon both the two paragraph elements because you know they have their own inline styles implementations accordingly.
Hence so if you remove these two inline style attribute then immediately you will see that the color of both paragraph elements has been changed to blue from red and green.
For your convenience we are attaching the screenshot of both scenarios.
Vue.Js Class Bindings | Example
Here we have written a nice program which will give you a brief understanding of computed property of Vue as well as their key point of class bindings.
Class binding is used for adding multiple class names to the html elements.
Note:– Today in programming world we make things faster than before. Because we know that we can use multiple classes inside a single html element to manipulate various css style without working extra on a single class attribute css. Hence here in Vue.Js it is very eaiser to add more classes onto an element and thereafter we can update the view after rendering these styles according to their classes. Consequently our we reach on the conclusion that Vue.Js is neat and the best framework which makes our design pattern easier to work with view model.
This example gives an introduction about the computed property also telling how to bind class attribute using v-bind directive.
Below are two example to explore your ideas and understanding power for vue.js programming.
So go through basic example to some explorable one.
See the below code snippet carefully also we will explain each part of the app template.
Here classes will be added only when property value associated with class attribute gives truthiness.
Important:– Now you can easily add multiple classes on a item’s class property by using class binding concept and hence so these classes will work as a reference for styling the template easily. This is absolutely works similar we add multiple class in html document.
Example // class binding using computed property
|
|
Vue.Js class binding | Example
In here we are providing another example to provide more ideas about class bindings.
You can the brief description about the program which is added below. Hence so if you have understand style binding athe easile you can capture it accordingly.
Example
|
Explanation of Program | Execution
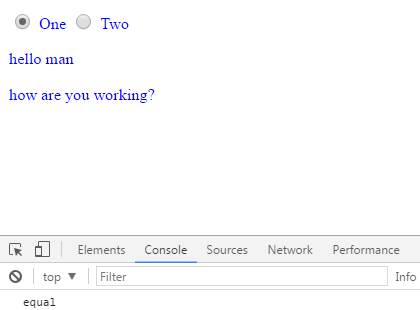
Explanation:– Above program snippet uses two radio buttons and when a user clicks on first button it checks it’s value and compare with data object value i.e valueofRadioButton; and hence so it returns equal as output message on console accordingly.
Hence so don’t confuse with class attribute attached with v-bind directive ; so you can also use other attribute as per your program requirement. Moreover we will give you other best suitable example for class attribute bindings.
Vue.Js Event Handling
Vue.Js Event Handling:–We all are familiar with dom events ; they happen when a user perform some action to see the changes on web page. Hence DOm events make a web page’s layout more interative
In this tutorial we will learn how do those events emit and triggered on some web elements like button.
Here we take v-on directive to listen to the button click event when a use clicks on a button.
Vue.Js Event Handling | Example
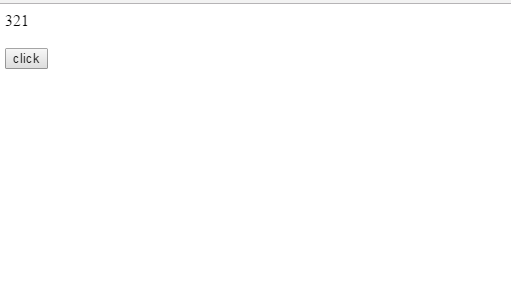
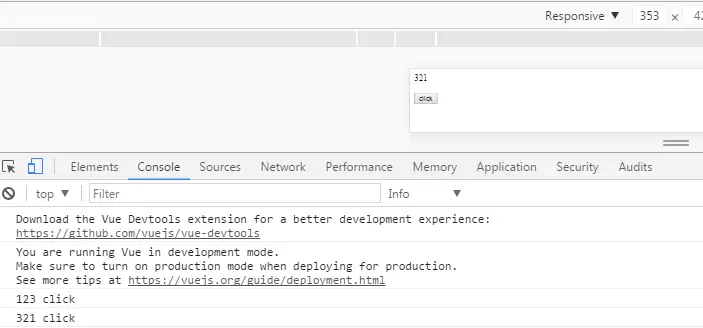
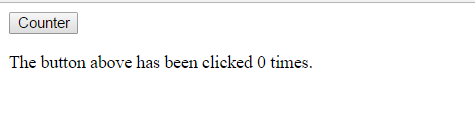
Let us understand the concept of events by an example given below. In below example a variable named counterwill be incremented by one value each time we will click on button. So v-on directive is responsible to listen the click event everytime on each click and you can see the changing value of “counter” by clicking the button.
For your convenience we have given the output screenshot where from you can verify the output of your program if you run on your machine.
Example
|
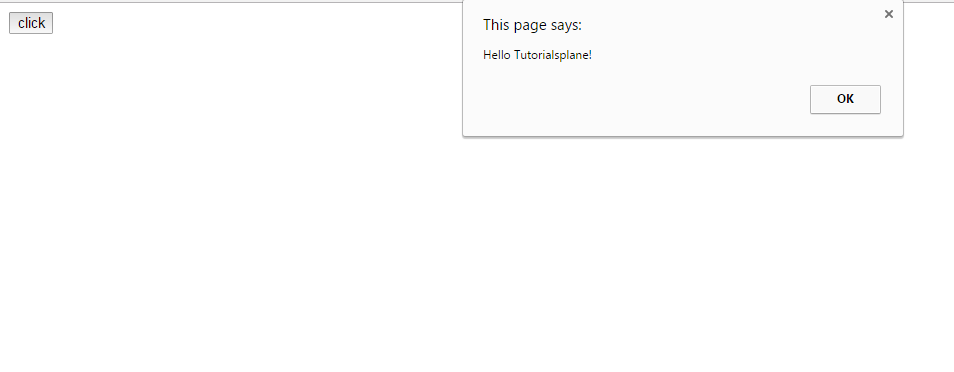
Vue.Js Method Event Handler | Example
In herewe can see that we have bound a method button_click on click of a button. So here this method acts as an event handler which is much robust than above counter example.
Note:–We can also replace v-on directive by the following annotation
Example
|
|
Inline Event Handler | preventDefault() | Example
Here we will call a event handler on method call but one thing to remember is method takes a parameter and gives it to the javascript object which serves to this event. Hence here we call method inside javascript object inside vue instance.
Sometimes we need to apply preventDefault() a DOM event on template element on web page. So below is a brief description of this event.
In our program StopClick button will be stopping working when we try to click and execute it.
Example
|
|


