Vue.Js Reactivity
Vue.Js Reactivity:–Alright, we come to the point that you are very clear with the basics of Vue.js so the time is for studying more advance topic in Vue.js. Here we will teach you about reactivity system in detail. Because reactivity is most important feature of Vue.js.
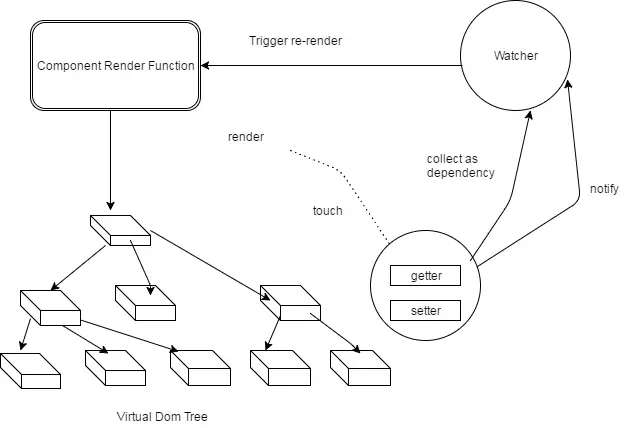
In this tutorial you will learn all about Vue.js reactivity system. When we assign a javascript object’s value to the data option in Vue instance , Vue calls itself it’s internal hoods to invoke the properties and immediately convert them into getters and setters. These getters and setters are responsible for dependency tracking and change notification when property getting changed and cause to re-render the template again in DOM. During the process a watcher instance is associated with a component instance which records any properties “touched” during the component rendering. Hence so when a setter is triggered, it notifies the watcher and re-renders a component again.
Vue.Js Reactivity | Example
Reactivity | Demo | Example
<script src="https://cdnjs.cloudflare.com/ajax/libs/vue/2.3.0/vue.js"></script>
<div id="app">{{ message }}</div>
<script>
var vm = new Vue({
el: '#app',
data: {
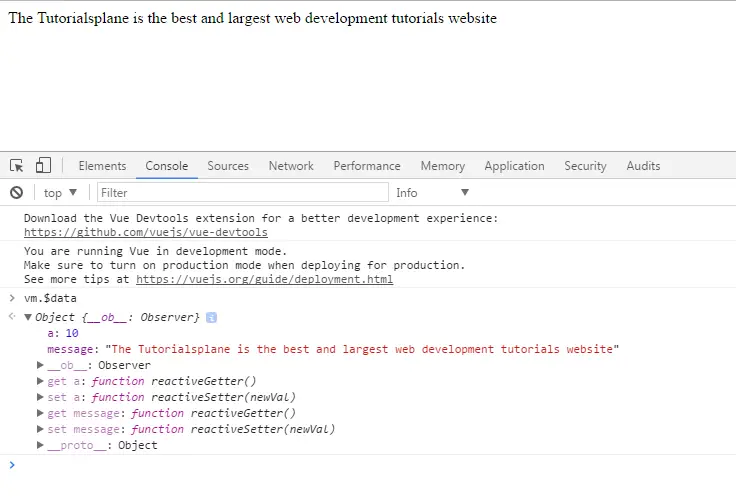
message:'The Tutorialsplane is the best and largest web development tutorials website',
a:10
}
})
</script>
|
reactiveSetter() and reactiveGetter() | Example
When Vue’s instance is created then automatically Vue.js calls getters and setters internally. If any data property changes then reactiveSetter is invoked. Hence so there are two methods which are being invoked when a property id modified.
Reactivity | Demo | Example
<script src="https://cdnjs.cloudflare.com/ajax/libs/vue/2.3.0/vue.js"></script>
<div id="app"><!--<child-component>{{ parent }}</child-component>--> <!--<button v-on:click="setMessage">click</button>--> <input type="text" /></div>
<script>
   var comp= {
  template: '<div>Template creation using local component</div>'
}
  var vm = new Vue({
  el: '#app',
  data: {
  message:'The Tutorialsplane is the best and largest web development tutorials website',
  ans:true,
  searchQuery:0,
   a: 1,
  parent: 'messageHandler',
  games: [
      'Clash Royale',
      'Pokeman Go',
      'Dead Trigger 2',
      'Minecraft'
    ],
  },
   methods: {
    reverseTemplate: function () {
      this.message = this.message.split('').reverse().join('')
    },
   watch:{
    searchQuery:function(newValue, oldValue){
       console.log("watch called")
       alert('Counter changed from ' + oldValue + ' to ' + newValue + '!')
  }
  }   ,

  methods: {
    setMessage() {
      alert(this.a)
      console.log(this.a)
    }
  },
    template: `
        </p>
<p>
</p>
<div>
            <child-component></child-component>
        </div>
<p>
</p>
<p>`,
         components: {
    'child-component': comp,

    }
  }
})
</script>
|

Explanation Of Program
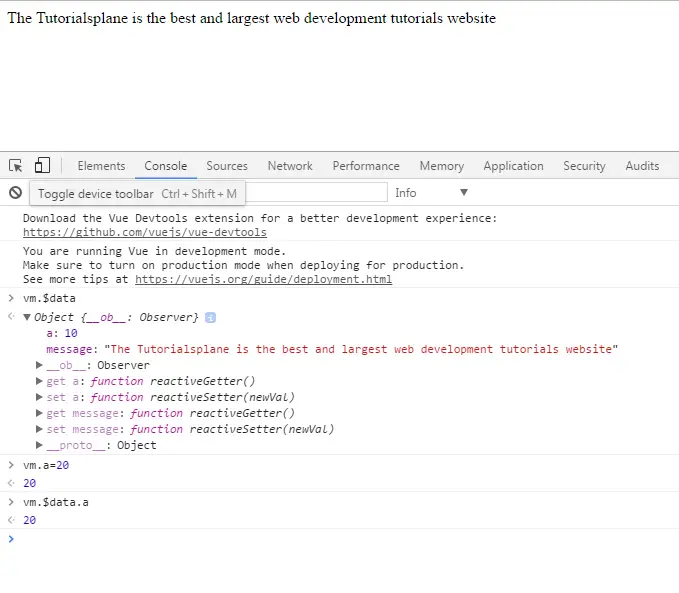
Explanation:– In above screenshot you can see the change in a’s value. Initially a’s value is ’10’ but you can change it dynamically in javascript console by typing vm.a=20. But all changes will remove from the program once you close the browser’s window.
Change Detection Precautions | Example
Vue does not allow adding new root level property dynamically to the existing Vue instance. However it is possibly done by nested object using Vue.set(object, key, value) method which you will see later in this tutorial.
To add a root level property you have to initialize a Vue instance by declaring all root level properties upfront without a value assigned to it.
Example
<script src="https://cdnjs.cloudflare.com/ajax/libs/vue/2.3.0/vue.js"></script>
<div id="app">{{ message }}</div>
<script>
var vm = new Vue({
el: '#app',
data: {
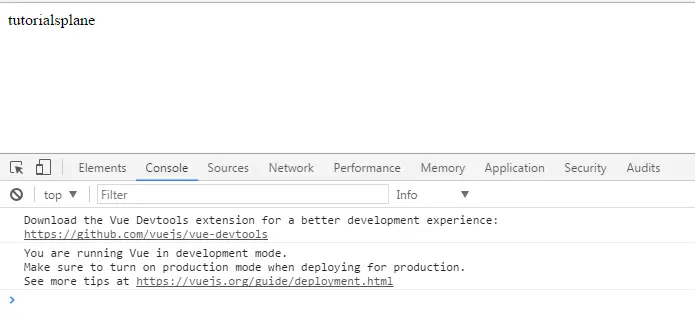
message:'',
a:10
}
})
vm.message='tutorialsplane'
</script>
|


Explanation of Program
Explanation:–Here we are attaching two screenshots for your better understanding. Here main motive is how to follow the precaution to define a data property in vue instance because a getter looks over it when Vue is instantiated itself in the program.
In first screenshot red lines indicates the warning message for data property named message saying something like “message is not defined but referencing during rendering process of Vue.js system.” Hence so to remove this problem we have to define “message” property with a blank string by a symbol single quotes(‘ ‘). Now you get the desired output string tutorialsplane assigned to message property.
How To Update Data Property In Vue.Js | Example
To understand much better read each step given below carefully:
1.Now here we will tell you how to add a data property programmatically in existing Vue instance. Now we will have to create a nested object and therefore we will reference it in our main Vue object.
2.In this tutorial we are showing three propertiesa, b and planes which are added programmatically. We have justified their getters and setters which are shown in program output console.
3.We have used Object.assign() method to add three properties which we have told you in above line.
Example
<script src="https://cdnjs.cloudflare.com/ajax/libs/vue/2.3.0/vue.js"></script>
<div id="app"><button>click </button></div>
<script>
  var vm = new Vue({
  el: '#app',
data: function () {
    return {
        someObject:{
            cars: true,
             message:'tutorialsplane',
             a:10,
     }
    }
   },
   methods: {
        click_me: function () {
            //this.someObject=this.$set(this.someObject, 'planes', true)
            this.someObject = Object.assign({}, this.someObject, { a: 1, b: 2,'planes':true })
            console.log('hi')
            console.log(this.someObject)
            vm.$data.someObject.a=99
            vm.$data.someObject.b=100
            vm.$data.someObject.cars=false
            vm.$data.someObject.planes=false
        }
    }

})
//vm.message='tutorialsplane'
</script>
|
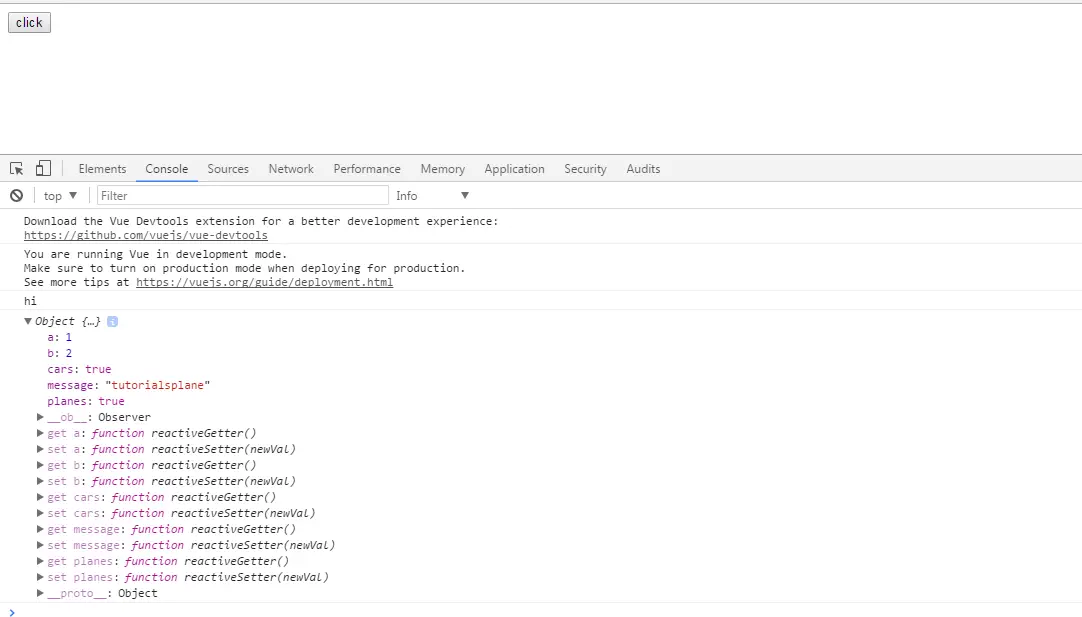
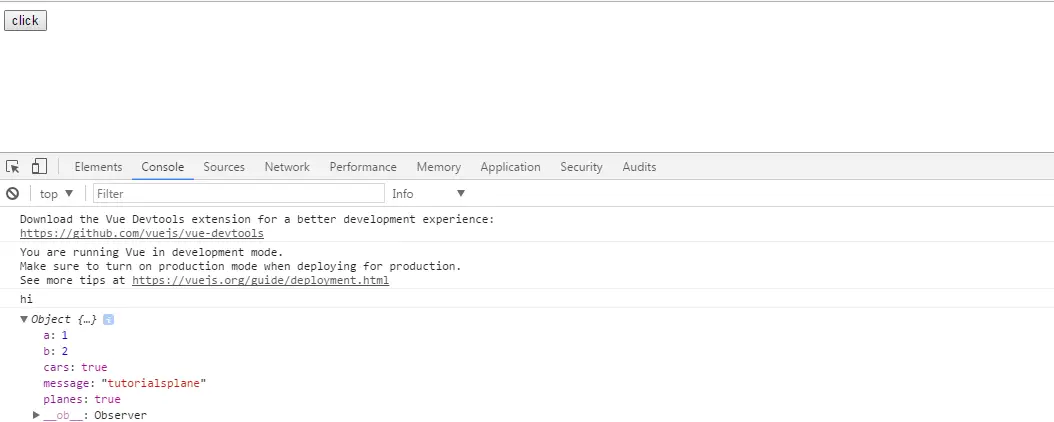
Explanation of Program
Explanation:–Once we click on button then we see the getters and setters on console. Usually we have three properties a,b,cars and planes added to the root Vue instance.
Also you can access each of them by typing vm.$data.someObject.planes and see the result on console. Same thing you can do in your program to change the data properties which is clearly represented in above code snippet.
Async Update Queue | Example
Vue observes especially for the change in any data property and updates it’s DOM asynchronously. Hence so it calls itself the watcher to see the change and if if it founds a change quickly it keeps it in buffer inside a queue. If one watcher triggers many times then it will be pushed in queue only once in order to reduce DOM manipulations. So in next event loop “tick” iteration, it calls the queue data to be executed and flushes out the queue accordingly.
In this process Vue performs execution of different phases in each loop cycle using the following internal methods Promise.then,MutationObserver,setTimeout(fn, 0)
Example
<head>
<script src="https://cdnjs.cloudflare.com/ajax/libs/vue/2.3.0/vue.js"></script>
<script>
</script>
</head>
<body>
<div id="app-2">
<div id="example">{{ message }}</div>
</div>
<script>
Vue.component('example', {
template: '<span>{{ message }}</span>',
data: function () {
return {
message: 'not updated'
}
}
})
var vm = new Vue({
el: '#app-2',
data: {
message: '123'
}
})
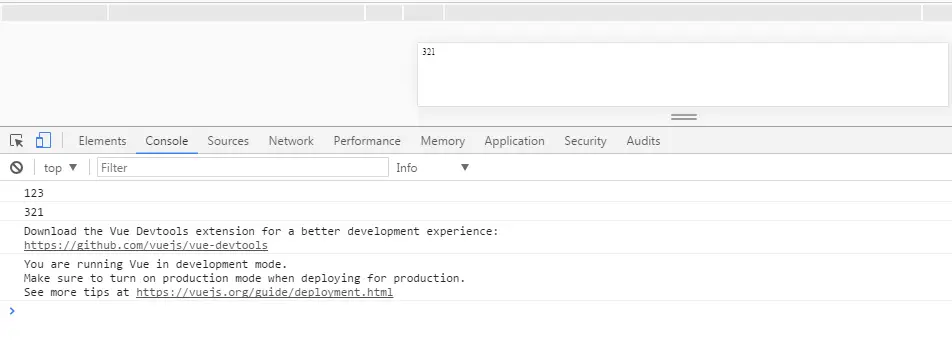
vm.message = '321 ' // change data
vm.$el.textContent === 'message changed' // false
console.log(vm.$el.textContent)
Vue.nextTick(function () {
vm.$el.textContent === 'DOM updated ' // true
console.log(vm.$el.textContent)
})
</script>
</body>
</html>
|
Explanation Of Program
Explanation:–In above example we have writtten nextTick(callBack) function which tells Vue that a specific data property is being changed so it gives instruction to the Vue system to update DOM model. Don’t confuse with the method how does it work. It is useful in re-rendering of DOM itself when a change is occured in Vue instance variable, data properties etc.
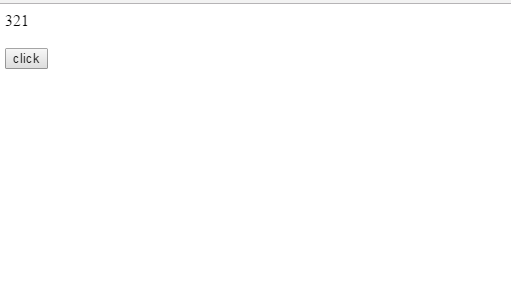
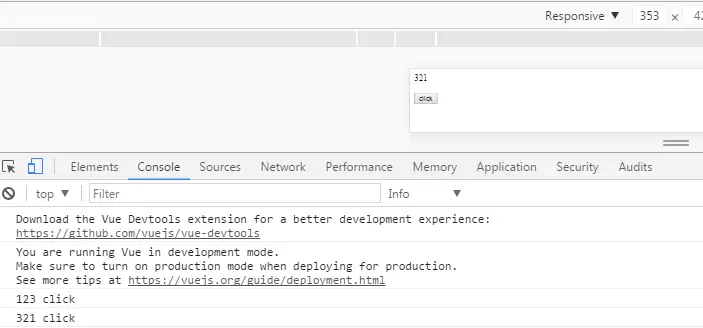
How To Use vm.$nextTick() In Components | Example
A method vm.$nextTick() can be used in Vue components to ensure the updation in DOM but but thing to keep in mind is that you can apply this method while using comonent’s template. See the below examples whichs explains everything possible which is needed while DOM Manipulations.
Example
<html>
<head>
<script src="https://cdnjs.cloudflare.com/ajax/libs/vue/2.3.0/vue.js"></script>
</head>
<body>
<div id="app-2">
<div id="example">{{ message }}</div><br />
<button @click="updateMessage">click</button/>
</div>
<script>
Vue.component('example', {
template: '<span>{{ message }}</span>',
data: function () {
return {
message: 'not updated'
}
}
})
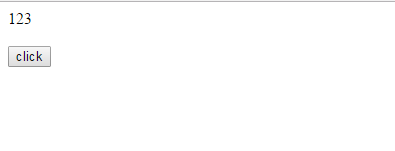
var vm = new Vue({
el: '#app-2',
data: {
message: '123'
},
methods: {
updateMessage: function () {
this.message = '321'
console.log(this.$el.textContent) // => 'not updated'
this.$nextTick(function () {
console.log(this.$el.textContent) // => 'updated'
})
}
}
})
</script>
</body>
</html>
|
Before Button Click
After Button Click Browser Window
After Button Click Window Console
Advertisements


