Vue.Js LifeCycle Diagram
Vue.Js LifeCycle Diagram:–Vue.Js life cycle diagram is very useful for Vue itself to execute it’s various stages.
Program evaluation goes through various stages when we run our program. As we know basic step to start with each app is to create a Vue instance with a new keyword. Hence so we will discuss all lifecycle callbacks. Vue.Js handles itself it’s callbacks similarily any software program does.
Vue.Js LifeCycle Diagram | Example
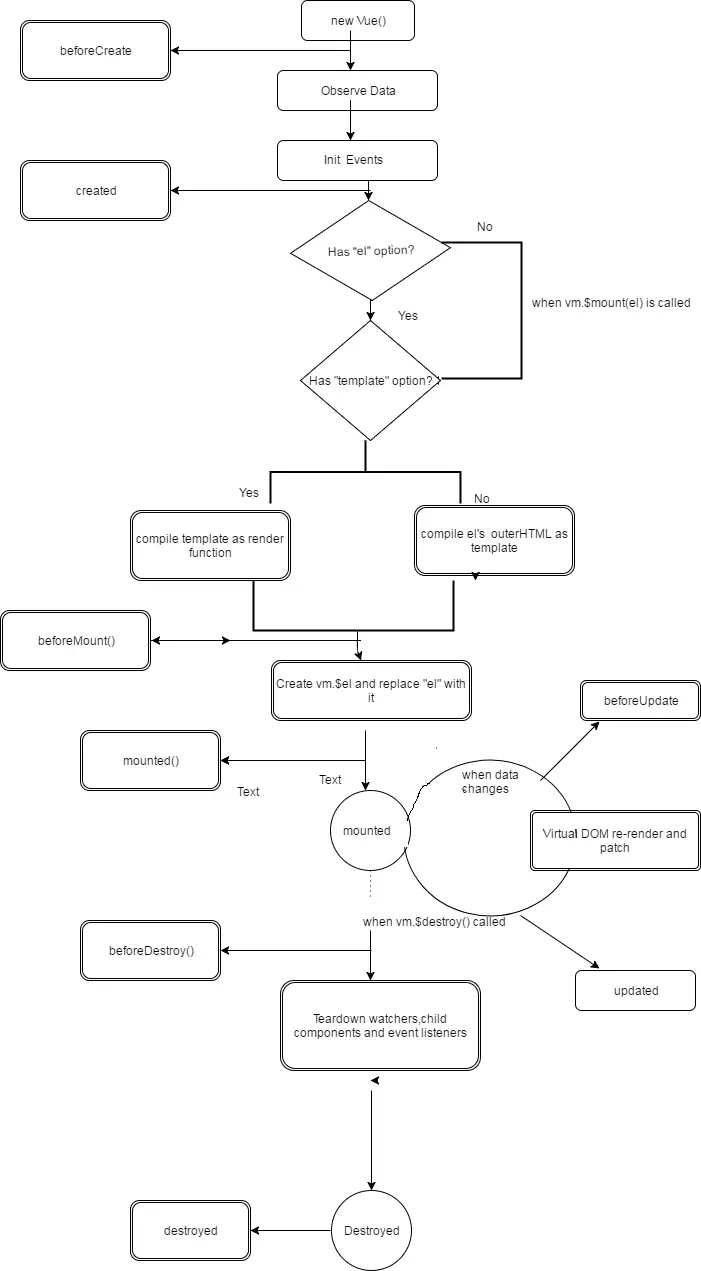
Below we are showhing a neat and plain pictorial diagram of lifecycle of Vue.Js which describes each and every stage and their corresponding actions. Read step by step to know much better about whole working of this diagram.
Vue.Js LifeCycle Diagram | Example | Demo
Below we are providing a pictorial representation of lifecycle diagram of Vue.Js. Each step and stage is described in easy way so you can understand the execution flow of the system callback hooks.
beforeCreate():–This callback hook is the starting point of Vue call backs system. Nothing much is happened in this callback. Just we Vue consider it as the beginning of program.
created():–Once the Vue instance is being created most of the data observation related task is automatically covered in this callback. This callback is called by Vue system after observation ofcomputedproperties,methods and watchers etc.
beforeMount():–This call back is really happened just for compilation of template. Once the template is being compiled immediately the output of this stage is given to mount() stage.
mounted():–After template compilation becomes complete then the template is mounted on Virtual DOM using Vue instantiation process. Hence this the stage where $el css selector comes into picture. In other words we can say that in here data object is ready to connect with DOM model.
beforeUpdate():–This hook is invoked together with updated() hook when we make some changes in our DOM. So this hook is considered after mount() hook.
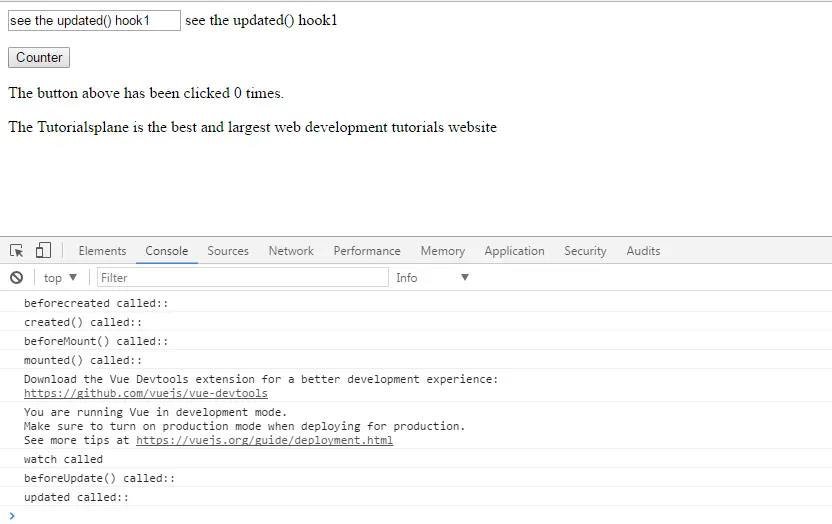
updated():–To see the re-rendering of DOM events this call comes into picture. Hence so if we click on a button then value will change and again DOM will updated. Now we have shown a basic example which will show all callback hooks.
beforeDestroy():–Now almost work is done by Vue.js ; henceforth Vue is ready to call destroyed() method of it’s own.
destroyed():–At last during whole lifecycle diagram this is the last step which is useful release all of it’s important parts like directives,methods,watchers,event listeners etc.
Example
<script src="https://cdnjs.cloudflare.com/ajax/libs/vue/2.3.0/vue.js"></script>
<div id="app">
<input type="text" /> {{ searchQuery }}
Seaching

<div>

<ol>
<li style="list-style-type: none">
<ol>
<li>{{ result }}</li>
</ol>
</li>
</ol>


</div>
<a>Trigger a handler</a> <!--<a v-on="click: n++">Trigger an expression</a>--> <button>Counter</button>
The button above has been clicked {{ counter }} times.
<!--<input type="text" v-model="message">--> {{ message }}
</div>
<script>
  function init(){
  var vm = new Vue({
  el: '#app',
  data: {
  message:'The Tutorialsplane is the best and largest web development tutorials website',
   counter:0,
    n: 0,
    searchQuery:'',
    isSearching:false,
    results:[]
  },
     watch:{
    searchQuery:function(newValue, oldValue){
       console.log("watch called")
       alert('Counter changed from ' + oldValue + ' to ' + newValue + '!')
  }
  },
   beforeCreate: function() {
          console.log("beforecreated called::")
       },
 created: function() {
         console.log("created() called::")
       },


      methods: {
      onprint: function (e) {
      console.log(e.target.tagName) // "A"
    }
  },
   mounted() {
          console.log("mounted() called::")
       },

   beforeMount() {
          console.log("beforeMount() called::")
       },
        beforeUpdate() {
          console.log("beforeUpdate() called::")
       },
       updated: function(){
          console.log("updated called::")
       },
      beforeDestroy: function() {
          console.log("beforeDestroy() called::")
       },
       destroyed:function(){
            console.log("destroyed() called::")
       }
  })
}
</script>
|
Advertisements
Add Comment
📖 Read More
- 1. Vue.Js Declarative Rendering
- 2. Vue.Js Computed And Watcher Properties
- 3. Vue.Js Template With Components
- 4. Vue.Js Reactivity
- 5. Vue.js Create Dynamic Table Component


