Bootstrap change input focus color
Bootstrap change input focus color blue grow– While working with the custom theme we often need to customize the default bootstrap element’s behavior, on the same way we sometimes need to change the default color of input focus blue grow. We can override the default color using our custom CSS. Let us create a simple example to change the input focus color in form field.
Bootstrap change input focus color Example
Here we have created one simple example to change the focus color –
On the same way you can customize the input focus default grow color. If you run the above example it will produce output something like this-

Bootstrap change tooltip content on click
Bootstrap change tooltip content on click jQuery– We can change tooltip content such as title on click event using jQuery. Here in this article we are going to create one example to dynamically change the tooltip content.
Bootstrap change tooltip content on click jQuery Example
You can change the title of tooltip in bootstrap using jQuery Simply as below –
If you run the above example it will produce output something like this –

Vue.js Substring
Vue.js Substring Function– It is very simple to get the substring of a string in Vue.js. We can create filters to get the substring from a string.
Vue.js Substring Function JavaScript Example
We can use native javascript substring method to get a substring of a string. Let us create an example to get the substring from string –
If you run the above example it will produce output something like this-
![]()
Vue.Js Trim String
Vue.Js Trim String– It is very simple to trim string in Vue.Js, we can create filters to trim string in vue.js, Here in this tutorial we are going to create an example which will show how to trim string in Vue.js.
Vue.Js Trim String JavaScript Example
You can trim any string/text in vue.js simply as below-
Vue.Js Trim String Example:
new Vue({
el: '#app',
data: function() {
return {
text: ' This is string having space at both side. '
}
},
filters: {
trim: function(string) {
return string.trim()
}
}
});
//Usage
|
If you run the above example it will produce output without blank space at both end.
Magento 2 get category image url
Magento 2 get category image url By Id– We can get category url from category object in Magento 2. Here in this article we are going to explain how you can fetch the url and display the image on phtml.
Magento 2 get category image url By Id Example
Here in the below example we have fetched the category url from category object and displayed it on phtml-
Magento 2 get category image url Example:
$categoryId = 5;
$_objectManager = \Magento\Framework\App\ObjectManager::getInstance();
$category = $_objectManager->create('Magento\Catalog\Model\Category')->load($categoryId);
$_outputhelper = $this->helper('Magento\Catalog\Helper\Output');
$_imgHtml = '';
if ($_imgUrl = $category->getImageUrl()) {
$_imgHtml = '
|
 ';
$_imgHtml = $_outputhelper->categoryAttribute($category, $_imgHtml, 'image');
echo $_imgHtml;
}
';
$_imgHtml = $_outputhelper->categoryAttribute($category, $_imgHtml, 'image');
echo $_imgHtml;
}
Magento 2 set session timeout
Magento 2 set session timeout– We can set the session timeout in Magento from Backend Configuration settings for frontend and backend.
Magento 2 set frontend session timeout Frontend | Backend Example
You can set frontend and backend timeout from backend settings. Go to the below settings and set Session Lifetime –
Admin Session Timeout
Using this setting we can increase the admin user login time.
Go to Stores->Settings->Configuration->Advanced->Admin->Security->Admin Session Lifetime
Now add value in seconds in Admin Session Lifetime setting.
Frontend Session Timeout
We can increase the frontend user login time using this setting.
Go to Stores->Settings->Configuration->Advanced->Admin->Security->Frontend Session Lifetime
Now add value in seconds in Frontend Session Lifetime setting.
Magento 2 Extra Fee Extension
Magento 2 Extra Fee Extension– Sometimes we need few custom fees on products, shipping fee, Payment fee etc. There are many extensions available to manage various extra fees. Here in this article, we are going to have an overview on some of them. These extensions are fully supported in Community & Enterprise edition.
Magento 2 Extra Fee Extension Download | Additional Fees Extension
There are following extensions available which can be used to manage multiple fees(Additional Fees) in Magento 2. Let us go one by one-
Mage Wrox Magento 2 Multi Fees extension
This is one of the best extension which can be used to manage multiple fees.
Features
- Extra product/service fees
- NEW Shipping fees
- Segmenting fees by Store Views and customer groups
- Conditions to display/hide additional fees
- 3 fee input types
- Fixed/ percent fee prices
- Tax calculation settings
- The ability to customize a fee’s Label, Name, Description, add a customer’s message
- Supported Community & Enterprise Version– СE 2.1.x+, 2.2.x; EE 2.1.x+, 2.2.x
Services
- FreeLife-time Support
- FreeLife-time Updates
Frontend
Sample fee on frontend-

Backend
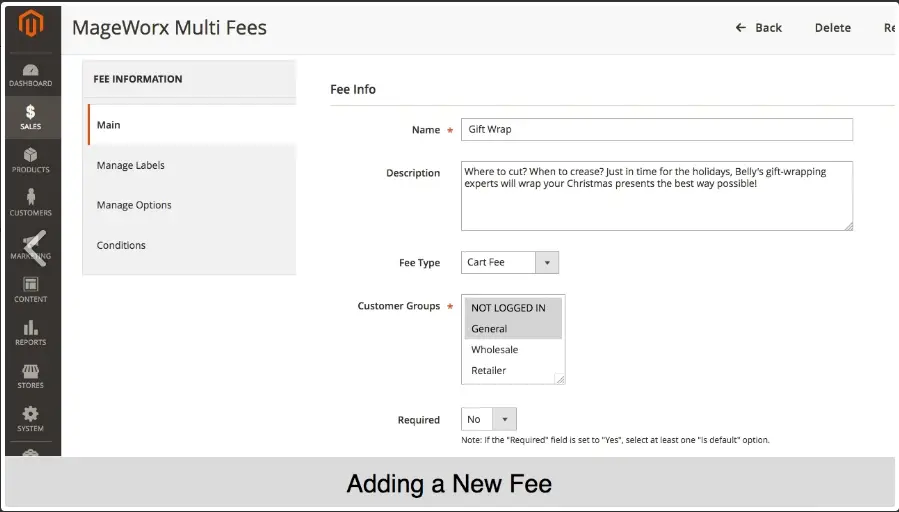
Download Extension
Vue.Js Call function on Page Load
Vue.Js Call function on Page Load – It is very simple to call function on page load in Vue.Js.
Vue.Js Call function on Page Load Example
You can call function on page load in vue.js simply as below –
Vue.Js Call function on Page Load Example:
new Vue({
    // ...
    methods:{
        myFunction: function() {//definition goes here}
    },
    created: function(){
        this.myFunction()
    }
});
|
We can use created to call function on page load in vue.js, The myFunction() will be called on page load.
Magento 2 Create Coupon Code Programmatically
Magento 2 Create Coupon Code Programmatically It is very simple to create coupon code programmatically in magento2. Here in this article we are going to explain how you can create coupons in Magento2.
Magento 2 Create Coupon Code Programmatically | Script | Example
You can create coupon code simply as below-
Inject Rule Factory in Constructor
Magento 2 Create Coupon Code Programmatically Example:
protected $ruleFactory

public function __construct(\Magento\SalesRule\Model\RuleFactory $ruleFactory) {
    $this->rulesFactory = $ruleFactory
}
|
Create Coupon Code
Now use the below code to create coupon programmatically-
Create Coupon Programmatically Example:
$ruleData = [
            "name" => "Custom Discount",
            "description" => "Get Custom Discount",
            "from_date" => null,
            "to_date" => null,
            "uses_per_customer" => "0",
            "is_active" => "1",
            "stop_rules_processing" => "0",
            "is_advanced" => "1",
            "product_ids" => null,
            "sort_order" => "0",
            "simple_action" => "fixed_amount",
            "discount_amount" => "50",
            "discount_qty" => null,
            "discount_step" => "3",
            "apply_to_shipping" => "0",
            "times_used" => "0",
            "is_rss" => "1",
            "coupon_type" => "COUPON",
            "use_auto_generation" => "0",
            "uses_per_coupon" => "0",
            "simple_free_shipping" => "0",
            "customer_group_ids" => [0, 1, 2, 3],
            "website_ids" => [1],
            "coupon_code" => 'FLAT_50',
            "store_labels" => [],
            "conditions_serialized" => '',
            "actions_serialized" => ''
        ];

$ruleModel = $this->ruleFactory->create();
$ruleModel->setData($ruleData);
$ruleModel->save();
|


