Category Archives: Ionic Questions
Ionic get current version
You can run the command $ ionic info in your project folder to get the current version of ionic framework.
Example
Run the following command to get current ionic version-
Example:
$ ionic info |
The above command will give you current version of ionic framework.
Disable hardware back button in Ionic framework
Disable hardware back button in Ionic framework : Sometimes we need to to disable back button in ionic application. You can use event.preventDefault() to prevent the hardware back button click. Here in this tutorial we are going to explain the functionality how you can disable the back button in ionic framework.
Disable hardware back button in Ionic framework
You can disable the back button simply as below –
Disable hardware back button in Ionic framework:
|
This will prevent the default back button action.
If you want to disable the back button for some state you can use the following method to disable the back button functionality only for that state. In this case back button will work as normally except the specified state.
Disable hardware back button in Ionic framework:
|
This will prevent the default back button action.
Ionic Add App Icon And Splash Screen
Ionic Add App Icon And Splash Screen : Ionic adds it’s default icon and splash screen while creating the apps if you have not added the icon and splash screen. Here in this tutorial we are going to explain how you can add app icon and add splash screen.
Ionic Add App Icon And Splash Screen
You can add icons and splash screen following the below steps –
Add Icon –
You can add the icon in ionic framework simply as –
- 1. Add an icon in resources folder which is located at the root of the application –
Add the icon.png as below –

-
Now Simply Run the below Command –
ionic resources --icon
- Now it will create the respective icons for your app.
Now let us add the splash screen in ionic framework –
Add Splash Screen –
You can add the splash screen in ionic framework simply as –
- 1. Add an Splach image spalsh.png in resources folder which is located at the root of the application –
Add the splash.png as below –
-
Now Simply Run the below Command –
ionic resources --splash
- Now it will create the respective splash screen for your app.
Rename App in Ionic Framework
Rename App in Ionic Framework – We sometimes need to rename the app in ionic framework. You can rename the app simply following the steps described in this post. Here in this tutorial we are going to explain the steps to rename the ionic apps.
Rename App in Ionic Framework
You can follow the below steps to rename the app in ionic. We are going to explain separately for android and ios framework.
How to Rename app in Ionic Framework – Android
Step 1 :
Open config.xml which is at root and change the name –
config.xml file contains the following content-
  My First App

        An Ionic Framework and Cordova project.


      Ionic Framework Team

....

.....

.......
Now change the name in
Step 2 :
Execute the following command –
ionic platform remove android
Now go to platforms folder and make sure the android folder is deleted.
Step 3 :
Run the below command –
ionic platform add android
Now you application is renamed successfully.
How to Rename app in Ionic Framework – IOS
Step 1 :
Open config.xml which is at root and change the name –
config.xml file contains the following content-
  My First App

        An Ionic Framework and Cordova project.


      Ionic Framework Team

....

.....

.......
Now change the name in
Step 2 :
Execute the following command –
ionic platform remove ios
Now go to platforms folder and make sure the ios folder is deleted.
Step 3 :
Run the below command –
ionic platform add ios
Now you application is renamed successfully.
Detect Internet connection in Ionic Framework
Detect Internet connection in Ionic Framework : For internet based application it is very important to check internet connection. For checking internet connection we need network information cordova plugin. Here in this tutorial we are going to explain the how to detect the internet connection in ionic framework. Let us go step by step.
Detect Internet connection in Ionic Framework
Steps to detect internet connection in Ionic Framework-
1 . Install Network Information Cordova Plugin
First Install the Network Information Cordova Plugin. Run the following command to install the network information plugin –
Install Network Information Cordova Plugin Example-
cordova plugin add org.apache.cordova.network-information |
After Running this command cordova network plugin will be installed.
After the successful installation of network cordova plugin let us check internet connection using the below code-
Ionic Check Internet Connection : JavaScript
Install Network Information Cordova Plugin Example-
|
|
The above example will detect the internet connection and popup a message if connection is not available.
Supported Platforms –
The network cordova plugin supports in the following devices –
- Amazon Fire OS
- Android
- BlackBerry 10
- Browser
- iOS
- Windows Phone 7 and 8
- Tizen
- Windows
- Firefox OS
Constants –
You can use the following constants to check the connection. Constants available are as below –
- Connection.UNKNOWN – Unknown connection
- Connection.ETHERNET – Ethernet connection
- Connection.WIFI – Wi-Fi Connection
- Connection.CELL_2G – Cell 2G Connection
- Connection.CELL_3G – Cell 3G Connection
- Connection.CELL_4G – Cell 4g Connection
- Connection.CELL – Cell Generic Connection
- Connection.NONE – No Network Connection
More Examples
Let us have more detail about cordova network plugin.
Network Related Events In Cordova Plugin – Ionic (Check Offline)
This is used to detect the already connected device. It is fired when already connected device goes offline-
Check offline in ionic framework Example:
document.addEventListener("offline", onOffline, false);

function onOffline() {
    // do stuff when offline
}
|
Network Related Events In Cordova Plugin – Ionic (Check Online)
This is used to detect when device is connected to internet-
Check online in ionic framework Example:
document.addEventListener("online", online, false);

function online() {
    // do stuff when online
}
|
Ionic clear localstorage data
Ionic clear localstorage data : if you want to clear local storage data in ionic framework you can use the clear method to clear the cache, localstorage and history. Here in this tutorial we are going to explain how you can clear local storage data in ionic framework.
Ionic clear localstorage data
If you want to clear localstorage use the below method-
Ionic clear localstorage data:
$window.localStorage.clear(); $ionicHistory.clearCache(); $ionicHistory.clearHistory(); |
Or you can create a function and call it when you want to clear local storage.
Here a function in your controller call this to clear data in ionic –
Ionic clear localstorage data: Example
 $scope.clearLocalStorage = function(){
 $window.localStorage.clear();
 $ionicHistory.clearCache();
 $ionicHistory.clearHistory();
 };
|
If you call the above method in your application it will clear all local storage data.
Align Button In Ionic Framework
Align Button In Ionic Framework : Sometimes we need to align the buttons left or right in ionic framework. In this tutorial we are going to explain how you can text align left, right or center in Ionic. We will explain the examples with online demo.
Align Button In Ionic Framework
You can align left or right buttons in ionic framework as below. Let us go one by one.
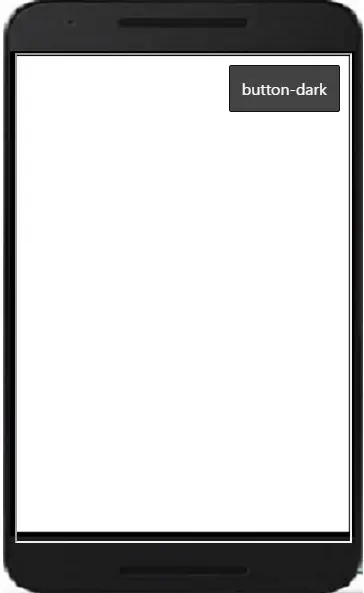
Ionic Button – Left Align Example
Here is an example to add left align of a button.
If you run the above example it will look something like this

Ionic Button – Right Align Example
Here is an example to add left align of a button.
If you run the above example it will look something like this
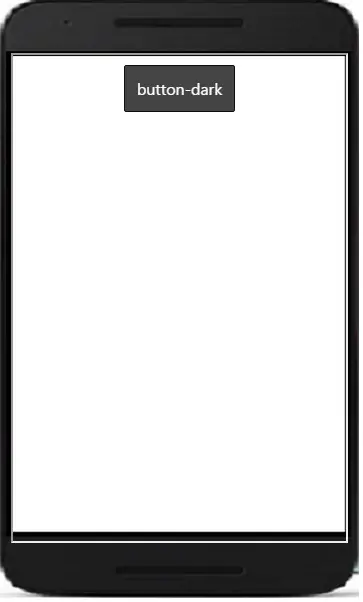
Ionic Button – Center Align Example
Here is an example to add left align of a button.
If you run the above example it will look something like this
Ionic change side menu background color
Ionic change side menu background color : We often need to change the ionic side menu background color and text color. Default color for ion-side menu is white. Here in this tutorial we are going to explain how you can create beautiful sidebar with your custom background and custom text color.
Ionic change side menu background color
For adding custom background we need to override the default styles with our custom style-
Step 1 – Add css to change sidebar Background
.my-side-menu{
 background: #333;
}
This is used to add the main sidebar’s background color.
Step 1 – Add css to change sidebar List Background, Border & Text Color
.my-list-item{
 background: #333 !important;
 color:#fff !important;
 border:#564545 !important;
}
This will override the default background color of list item class “.item”. Add your custom font color border color and font color you want to add.
If you run the above example it will produce the following output –

Ionic Add Icon in Side Menu
Ionic Add Icon in Side Menu : Menus are main navigation system in any application. Side menu bar contains the navigation links with meaningful icons. Here in this tutorial we are going to explain how you can create ionic side bar with beautiful icons. We will explain this will example and demo.
Ionic Add Icon in Side Menu
You can add side menu icons simply as below –
In the above example respective icons are added in the left side bar of ionic framework.
If you run the above example it will produce the output something like this –
![]()


