Category Archives: Core Php
PHP Create Table
PHP Create Table:– In the previous Tutorial we’ve learned how to create a database on MySQL server. Now it’s time to create some tables inside the database that will actually hold the data. A table organizes the information into rows and columns.
Creating Database Table
The SQL CREATE TABLE statement is used to create a table in database.Now we pass database name parameter also to create proper table into specific database. In below example we crate a table name ‘JohnData’ inside ’employee’ database.
Example // How to create a database table
connect_error) {
    die("Connection failed: " . $conn->connect_error);
}
//$sql="CREATE DATABASE employee";

$sql = "CREATE TABLE JohnData (
id INT(6) UNSIGNED AUTO_INCREMENT PRIMARY KEY,
firstname VARCHAR(30) NOT NULL,
lastname VARCHAR(30) NOT NULL,
email VARCHAR(50),
reg_date TIMESTAMP
)";

if ($conn->query($sql) === TRUE) {
    echo "Table 'JohnData' created successfully";
} else {
    echo "Error creating table: " . $conn->error;
}

$conn->close();
?>
|

PHP Create Database
PHP Create Database:–
Now you’ve understood how to open a connection to the MySQL database server. In this tutorial you will learn how to execute SQL query to create a database.
Before saving or accessing the data, we need to create a database first. The CREATE DATABASE statement is used to create a new database in MySQL.
Creating a Database
After creation of database by using CREATE DATABASE followed by database name ; we apply a mysqli query to check whether database is created or not.In below example you can easily see that how do we create a database named employee.
Example // How to create a database
connect_error) {
    die("Connection failed: " . $conn->connect_error);
}
$sql = "CREATE DATABASE employee";
if ($conn->query($sql) === TRUE) {
    echo "Database created successfully";
} else {
    echo "Error creating database: " . $conn->error;
}
$conn->close();
?>
|

PHP MySql Connect
PHP MySql Connect:– In order to store some relevant data into mysql database we need to connect php to database server.Like we are using xampp software package for php web development so here we get inbuilt mysql server. Hence there is no need for extra installation of mysql server.
But if you have already a mysql server running on your machine sometimes port conflict issue may be occur.The solution for this problem is to disable mysql server service from your computer.
So only the xampp package is enough to work with database.
Connection to MySql Database
PHP offers two different ways to connect to MySQL server: MySQLi (Improved MySQL) and PDO (PHP Data Objects) extensions.
While the PDO extension is more portable and supports more than twelve different databases, MySQLi extension as the name suggests supports MySQL database only. MySQLi extension however provides an easier way to connect to, and execute queries on, a MySQL database server.
In PHP you can easily do this using the mysqli_connect() function. All communication between PHP and the MySQL database server takes place through this connection. Here’re the basic syntaxes for connecting to MySQL using MySQLi and PDO extensions:
Example // How to connect to the mysql database
connect_error) {
    die("Connection failed: " . $conn->connect_error);
}
echo "Connected successfully";
?>
|

PHP and MySQL Web Development
PHP and MySQL Web Development:–MySQL is an open source relational database management system (RDBMS) based on Structured Query Language (SQL).
MySQL runs on virtually all platforms, including Linux, UNIX, and Windows.MySQL can be used for a variety of applications, but is most commonly found on Web servers. A website that uses MySQL may include Web pages that access information from a database. These pages are often referred to as “dynamic,” meaning the content of each page is generated from a database as the page loads. Websites that use dynamic Web pages are often referred to as database-driven websites.
Many database-driven websites that use MySQL also use a Web scripting language like PHP to access information from the database. MySQL commands can be incorporated into the PHP code, allowing part or all of a Web page to be generated from database information. Because both MySQL and PHP are both open source (meaning they are free to download and use), the PHP/MySQL combination has become a popular choice for database-driven websites.
PHP is a fast and feature-rich open source scripting language used to develop Web Applications or Internet / Intranet Applications.
MySQL is a powerful open source database server built based on a relational database management system (RDBMS) and is capable of handling a large concurrent database connection.
When combined together, talented PHP and MySQL developers can build very powerful and scalable Web / Internet / Intranet Applications.
PHP and MySQL are referred to as development tools.
PHP and MySQL are Open Source, meaning that they are free development tools, and there is a large community of dedicated volunteer programmers who contribute to make improvements and are continuously adding features to it. The development tools and database servers that require licensing costs have limited programming resources compared to open source development tools, which have an enormous and fast growing dedicated and knowledgeable community that extends around the world.
There has been disagreement about which tool is better. Naturally, the developer who is more familiar with one tool over the other will stand behind the tool that he or she has experience with.
With our experience, we have found that, PHP and MySQL are the best development tools. When developed correctly, applications can be built with clean and simple usability, complex functionality, speed, power and scalability..0
Advantages of MySQL Database
- MySQL is ideal for both small and large applications
- MySQL is very fast, reliable, and easy to use
- MySQL is free to download and use
- MySQL is developed, distributed, and supported by Oracle Corporation
Database Query:
Below example shows a query written in sql.
|
|
PHP readfile() Vs get_file_contents()
PHP readfile Vs get_file_contents :– In PHP file handling system there are two popular methods to read a file data.
- readfile()
- get_file_contents()
Here are going to discuss both the functions seperately with examples and their respective output screenshots
which you can use on your local computer to understand both the methods in a simple way.
file_get_contents(filename,use_include_path,offset,maxlen)
file_get_contents method is used to read a file contents depending upon your wish as you need in your program.
There are five parameters which we define while calling this function.These parameters are discussed below in detail.
filename
Name of the file to read.
use_include_path
This is a flag and will accept boolean values. If it is TRUE, then the value of FILE_USE_INCLUDE_PATH, PHP constant will be used while searching the file. In recent versions of PHP 5, we should specify FILE_USE_INCLUDE_PATH instead of boolean TRUE.
context
A valid context resource created with stream_context_create(). If you don’t need to use a custom context, you can skip this parameter by NULL.
offset
The offset where the reading starts on the original stream. Negative offsets count from the end of the stream.
Seeking (offset) is not supported with remote files. Attempting to seek on non-local files may work with small offsets, but this is unpredictable because it works on the buffered stream.
maxlen
Maximum length of data read. The default is to read until end of file is reached. Note that this parameter is applied to the stream processed by the filters.
PHP File Handling | Example
Example // readfile() Method
|
|
Example // file_get_contents() Method
|
|

PHP Exception Handling
PHP Exception Handling :– With PHP 5 came a new object oriented way of dealing with errors. Exception handling is used to change the normal flow of the code execution if a specified error (exceptional) condition occurs. This condition is called an exception.
Exception is generated by abnormal behaviour of program; once it happens in your program it will stop the normal flow of your program.Hence in order to maintain programms flow a programmer needs to capture these errors visi at any point of time for continuously flow of rest part of code.
An exception is a signal that indicates some sort of exceptional event or error has occurred.
Try VS CATCH BLOCK
- Try block is used to check a perticular block of code where a programmer expects a possibility of exception whereas Catch block is used to handle an exception
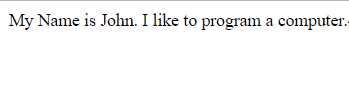
- Here we keep one important thing to keep in mind while program a computer is where to write try block to check regular exceptions.
PHP Exception | Example
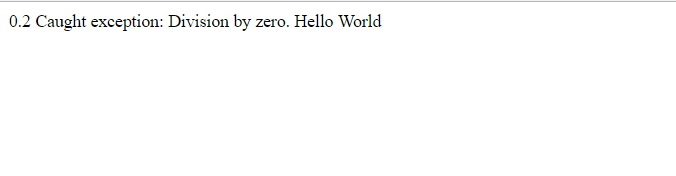
Throwing an Exception
Example
getMessage(), "\n"; } // Continue execution echo "Hello World\n"; ?> |
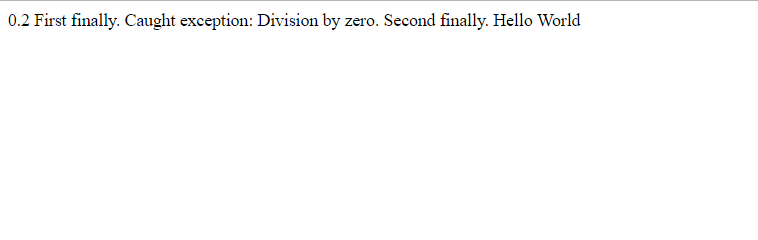
Exception handling with a finally block
Example
getMessage(), "\n";
} finally {
    echo "First finally.\n";
}

try {
    echo inverse(0) . "\n";
} catch (Exception $e) {
    echo 'Caught exception: ',  $e->getMessage(), "\n";
} finally {
    echo "Second finally.\n";
}

// Continue execution
echo "Hello World\n";
?>
|
Creating a Custom Exception Class
To create a custom exception handler you must create a special class with functions that can be called when an exception occurs in PHP. The class must be an extension of the exception class.
The custom exception class inherits the properties from PHP’s exception class and you can add custom functions to it.
Lets create an exception class:
Example
$email wrong E-mail address!");
	}
	echo "correct email address";
}
catch(Emailexception $ex){

	echo $ex->getMessage();
}
?>
|

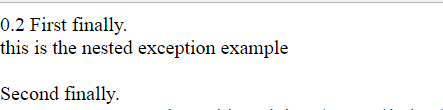
Re-throwing Exceptions
try/catch blocks can be nested. Sometimes you’ll want to catch an exception, look at some of its properties, and then throw it again to let a parent catch block handle it. This can often be useful to check an error condition and decide whether it should be fatal or not. This example code demonstrates re-throwing an exception:
Example
"; echo "this is the nested exception example "; echo " |
PHP Filters
PHP Filters :– Validating data becomes important when your application starts to accept user input. Data validation is an integral part of working with forms. Not only can invalid submitted data lead to security problems, but it can also break your webpage. Today, we’ll take a look at how to remove illegal characters and validate data by using the “filter_var” function.
PHP filters are used to validate and sanitize external input.In earlier tutorial we have learnt about form validation how does it performed on user input to check them properly.
So one step ahead is to learn sanitization with validation which is more important because when beginners start validation scripting they would get some securities issues as well as SQL injection attacks.
PHP Filters | Example
The PHP filter extension has many of the functions needed for checking user input, and is designed to make data validation easier and quicker.
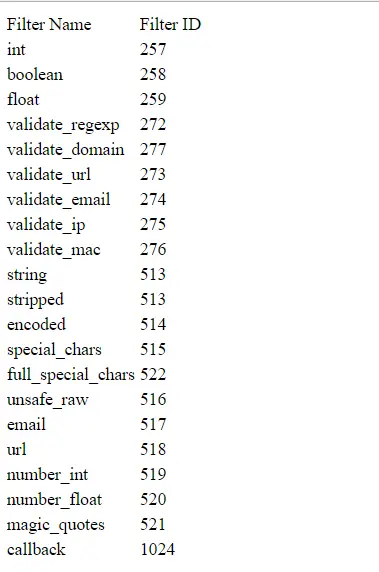
The filter_list() function can be used to list array of all supported filters.
We are explaining some best suitable examples and their outputs in screenshots for better understanding.
Example
$filter){

	echo '
|
PHP filter_var() Function
The filter_var() function filters a single variable with a specified filter.It takes two pieces of data:
The variable you want to check
The type of check to use
Sanitize a String
The following example uses the filter_var() function to remove all HTML tags from a string.
Example
Hello Tom"; echo $str; $newstr=filter_var($str,FILTER_SANITIZE_STRING); echo $newstr; ?> |

Sanitize and Validate an Email Address
The following example uses the filter_var() function to first remove all illegal characters from the $email variable, then check if it is a valid email address:
Example
|
|

PHP Advanced Filters
Validate an Integer Within a Range
Example
 array("min_range"=>$min, "max_range"=>$max))) === false) {
    echo("Variable value is not within the legal range");
} else {
    echo("Variable value is within the legal range");
}
?>
|

PHP Sessions
PHP Sessions :– A session is a way to store information (in variables) to be used across multiple pages. Unlike a cookie, the information is not stored on the users computer.
PHP sessions are stored in server directory.So php sessions are more secure than cookies because they are stored on browser.
PHP $_SESSION super global is an associative array which is used to set and get sessions variable to make their use in web pages.
Session Basics
Sessions are simply server-side cookies each with a corresponding client side cookie that contains only a reference to its server-side counterpart. When a user visits a page, the client sends the reference code to the server, and PHP will then match that reference code to a server-side cookie and load the data in the server’s cookie into the $_SESSION superglobal.
Pros
- Can store very large amounts of data easily.
- Save bandwidth by passing only a reference to the session each pageload. A client-side cookie has to pass all of its data.
- Data is stored on the web server. This makes sessions secure, because the data cannot be viewed or edited by the client.
Cons
- Ends when the browser is closed unless you’ve configured php.ini to extend sessions’ cookie lifetime. Cannot last forever.
Difference between Cookie and Session
- Cookies can not hold multiple variables whereas sessions can hold
- Cookies can store limited amount of data approximately 4 kb but sessions do not have a limitation.
- Cookies are less secure because anyone can access them but sessions are inaccessiable.
- To expire the cookie we need to set a time parameter whereas in sessions we use session_destroy() function.
PHP Sessions | Example
Example
"; ?> Get the session value |

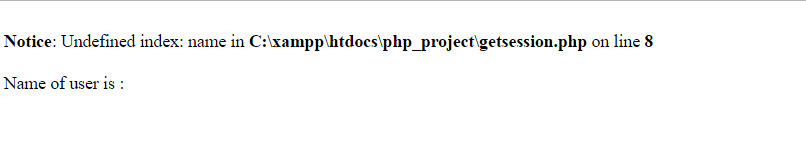
Destroying Sessions | Example
Example//getsession.php
"; ?> Get the session value |
PHP Cookies
PHP Cookies :– Cookies are mechanism for swtoring data in remote browser and to track user’s identity.
So a cookie is a data sent by web server to browser in order to record user’s actions. Cookies are very helpful for web servers because when a user visits a website after being sent a cookie by web server , web server loads website’s web psges contents according to the information stored into cookies.
Cookies are pieces of data exchanged between HTTP servers and clients.
Setting a Cookie in PHP
Only the name parameter is required. All other parameters are optional.
But here we are going to explain all other important parameters for your convenience.
Name
The name of the cookie.
Value
The value of the cookie.
expire
The time the cookie expires. This is a Unix timestamp so is in number of seconds since the epoch. In other words, you’ll most likely set this with the time() function plus the number of seconds before you want it to expire. Or you might use mktime(). time()+60*60*24*30 will set the cookie to expire in 30 days. If set to 0, or omitted, the cookie will expire at the end of the session (when the browser closes).
path
The path on the server in which the cookie will be available on. If set to ‘/’, the cookie will be available within the entire domain. If set to ‘/foo/’, the cookie will only be available within the /foo/ directory and all sub-directories such as /foo/bar/ of domain. The default value is the current directory that the cookie is being set in.
domain
The (sub)domain that the cookie is available to. Setting this to a subdomain (such as ‘www.example.com’) will make the cookie available to that subdomain and all other sub-domains of it (i.e. w2.www.example.com). To make the cookie available to the whole domain (including all subdomains of it), simply set the value to the domain name (‘example.com’, in this case).
secure
Indicates that the cookie should only be transmitted over a secure HTTPS connection from the client. When set to TRUE, the cookie will only be set if a secure connection exists. On the server-side, it’s on the programmer to send this kind of cookie only on secure connection.
httponly
When TRUE the cookie will be made accessible only through the HTTP protocol. This means that the cookie won’t be accessible by scripting languages, such as JavaScript. It has been suggested that this setting can effectively help to reduce identity theft through XSS attacks (although it is not supported by all browsers), but that claim is often disputed. Added in PHP 5.2.0. TRUE or FALSE.
PHP Cookie | Example
Example
";
?>
 0) {
    echo "Cookies are enabled.";
} else {
    echo "Cookies are disabled.";
}
?>


";
    }
?>
|