Category Archives: Codeigniter Tutorial
Codeigniter Connect Your Database
Codeigniter Connect Your Database – This database reference is used to connect database. There are two ways to connect to the database. Here in this tutorial, we are going to explain the both ways to connect your database.
Connect your database | Example.
Functions:-
There are following functions available in connect to your database. Now we will explain one by one.
- 1. Automatically connecting.
- 2. Manually connecting.
- 3. Connecting to multiple databases.
- 4. Reconnecting / Keeping the Connection Alive.
- 5. Manually closing the Connection.
1. Automatically connecting
The auto connect feature will load and represent the database class with every page load. To enable ‘auto connecting’. add the word database to the library array.
File path where we load auto connect feature:-
| application/config/autoload.php |
2. Manually connecting
If any particular page requires database connectivity then you can manually connect to your database by adding this line of code.
Manualaly database connection code:-
$this->load->database(); |
Manually connecting to a database
The first parameter of the function can optionally be used to specify a particular database group from your config file.
$this->load->database('group_name');
|
To connect manually to a desired database you can pass an array of values.
Syntax of manually connecting to a database:-
$config['hostname'] = 'localhost'; $config['username'] = 'username'; $config['password'] = 'password'; $config['database'] = 'database_name'; $config['dbdriver'] = 'mysqli'; $config['dbprefix'] = ''; $config['pconnect'] = FALSE; $config['db_debug'] = TRUE; $config['cache_on'] = FALSE; $config['cachedir'] = ''; $config['char_set'] = 'utf8'; $config['dbcollat'] = 'utf8_general_ci'; $this->load->database($config); |
3. Connecting to multiple databases
If you need to connect more than one database then you can do like this:-
Syntax of connecting multiple database:-
$DB1 = $this->load->database('group_one', TRUE);
$DB2 = $this->load->database('group_two', TRUE);
|
4. Reconnecting / Keeping the Connection alive
If the database server idle timeout is set to some limit while you are doing some heavy PHP lifting, you should consider pinging the server by using the reconnect() method.
Syntax of reconnecting / keeping the connection alive:-
$this->db->reconnect(); |
5. Manually closing the connection
While codeigniter takes care of closing your database connections still you can explicitly close the connection.
Syntax of manually closing the connection:-
$this->db->close(); |
Codeigniter Database Configuration
Codeigniter Database Configuration – Database refrence provides configuration that are used to deal with database operations. Codeigniter has a config file where we store our database connection values like (username, password, database name) etc. We can also set database connection values for specific environment by placing database.php in the respective environment config folder. Here in this tutorial, we are going to explain how to Database Configuration reference.
Codeigniter Database Configuration | Example.
Let us understand how to configure database in codeigniter with examples.
Database Configuration
The config settings are stored in a multi-dimensional array with this prototype.
Lets see how to configure database:
$db['default'] = array(
        'dsn'   => '',
        'hostname' => 'localhost',
        'username' => 'root',
        'password' => '',
        'database' => 'database_name',
        'dbdriver' => 'mysqli',
        'dbprefix' => '',
        'pconnect' => TRUE,
        'db_debug' => TRUE,
        'cache_on' => FALSE,
        'cachedir' => '',
        'char_set' => 'utf8',
        'dbcollat' => 'utf8_general_ci',
        'swap_pre' => '',
        'encrypt' => FALSE,
        'compress' => FALSE,
        'stricton' => FALSE,
        'failover' => array()
);
|
Some database driver like(PDO, PostgreSQL, Oracle, ODBC) may require a full DSN string to be provided. In this case, you should use ‘dsn’ configuration setting. Like this:-
Lets see DSN configuration setting:
//PDO $db['default']['dsn'] = 'pgsql:host=localhost;port=5432;dbname=database_name'; // Oracle $db['default']['dsn'] = '//localhost/XE'; |
We can also use failovers for the situation when the main connection cannot connect for any reason. These failovers can be specified by setting the failovers for a connection like this:-
Syntax of failover connection:
$db['default']['failover'] = array(
                array(
                        'hostname' => 'localhost1',
                        'username' => '',
                        'password' => '',
                        'database' => '',
                        'dbdriver' => 'mysqli',
                        'dbprefix' => '',
                        'pconnect' => TRUE,
                        'db_debug' => TRUE,
                        'cache_on' => FALSE,
                        'cachedir' => '',
                        'char_set' => 'utf8',
                        'dbcollat' => 'utf8_general_ci',
                        'swap_pre' => '',
                        'encrypt' => FALSE,
                        'compress' => FALSE,
                        'stricton' => FALSE
                ),
                array(
                        'hostname' => 'localhost2',
                        'username' => '',
                        'password' => '',
                        'database' => '',
                        'dbdriver' => 'mysqli',
                        'dbprefix' => '',
                        'pconnect' => TRUE,
                        'db_debug' => TRUE,
                        'cache_on' => FALSE,
                        'cachedir' => '',
                        'char_set' => 'utf8',
                        'dbcollat' => 'utf8_general_ci',
                        'swap_pre' => '',
                        'encrypt' => FALSE,
                        'compress' => FALSE,
                        'stricton' => FALSE
                )
        );
|
Query Builder
The query builder class is globally enabled or disabled through setting the $query_builder. The default setting is TRUE.
Syntax of query builder:
$query_builder = TRUE; |
Codeigniter Database Quick Start: Example Code
Codeigniter Database Quick Start: Example Code – This database reference is used for showing how the database class is used. We can also use this reference to fetching the data from database and display on the browser with multiple and single result of query. We can load datbase like this $this->load->database(‘database_name’);. If you already loaded database in autoload or configure in file config/database.php then no need to load manually. Here in this tutorial, we are going to explain how to use quick start database reference.
Codeigniter Database Quick Start | : Example Code.
Let us understand how database quick start reference works in codeigniter with examples.
Load datbase quick start reference
First load database quick start reference to use its functions, this reference can be loaded simply as below-
How to load database quick start reference:
$this->load->database('database_name');
|
Functions:-
There are following functions available in database quick start reference. Now we will explain one by one.
- 1. Standard Query With Multiple Results.
- 2. Standard Query With Single Result.
- 3. Standard Insert.
- 4. Query Builder Insert.
- 5. Query Builder query.
1. Standard Query With Multiple Results.
Here is simple demo of standard query with multiple results.
Syntax of standard query with multiple results.
db->query('SELECT name, username, email FROM admin');
foreach ($query->result() as $row)
{
echo $row->name;echo "
|
Output will be like this:-
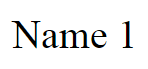
2. Standard query with single results.
Here is simple demo of standard query with single results.
Syntax of standard query with single results.
db->query('SELECT name FROM admin');
$row = $query->row();
echo $row->name;
}
}
?>
|
Output will be like this:-
3. Standard Insert.
Here is simple demo of standard insert data in database.
Syntax of standard insert data in database.
db->escape($title).", ".$this->db->escape($name).")"; $this->db->query($sql); echo $this->db->affected_rows(); } } ?> |
Output will be like this:-
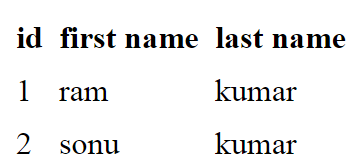
4. Query Builder Insert.
Here is simple demo of query builder insert.
Syntax of query builder insert.
 "sonu",'name' => "kumar");
$sql = $this->db->insert('blog', $data);
if($sql)
{
echo "Inserted successfully";
}
else
{
echo "unable to insert";
}
}
}
?>
|
Output will be like this:-

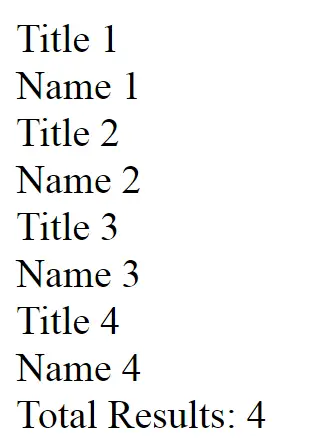
5. Query Builder query.
Here is simple demo of query builder query.
Syntax of query builder query.
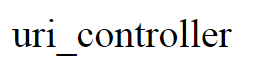
defined('BASEPATH') OR exit('No direct script access allowed');
class quick_start_controller extends CI_Controller
{
public function insert()
{
$query = $this->db->get('blog');
foreach ($query->result() as $row)
{
echo $row->title;
}
}
}
?>
|
Output will be like this:-

Codeigniter Zip Encoding Class Library
Codeigniter Zip Encoding Class Library – This library is used to craete a zip file either text or binary data type. Archives can be downloaded to your desktop or saved to a directory. We can load zip encoding class library like this $this->load->library(‘zip’);. Here in this tutorial, we are going to explain how to use zip encoding class library.
Codeigniter zip encoding class library | Example.
Let us understand how zip encoding class library works in codeigniter with examples.
Load zip encoding class library
First load zip encoding class library to use its functions, this library can be loaded simply as below-
How to load zip encoding class library:
$this->load->library('zip');
|
Class reference:-
There are following references available in zip encoding class library. Now we will explain.
1. Compression level.
This reference is used to set range from 0 to 9.
compression_level = 2
$this->zip->compression_level = 0;
2. Add data.
This reference is used to add data to the zip archive. it can work with single and multiple file mode.
add_data($filepath[$data = NULL])
- Parameters :
- $filepath (mixed) : A single file path or an array of file => data pairs.
- $data (array) : File contents (ignored if $filepath is an array).
- Returns type : void
EXAMPLE.
Here is simple demo of add data class references.
load->library('zip');
$filename = 'hello.txt';
$filedata = 'Welcome page';
$this->zip->add_data($filename, $filedata);
}
}
?>
|
3. Add directory.
This reference gives permit you to add directory.
add_dir($directory)
- Parameters :
- $directory (mixed) : Directory name string or an array of multiple directories.
- Returns type : void
EXAMPLE.
Here is simple demo of add directory class references.
load->library('zip');
$this->zip->add_dir('myfolder');
$this->zip->download('my_directory.zip');
}
}
?>
|
4. Read File.
This reference gives permit you to compressa file.
read_file($path[$archive_filepath = FALSE])
- Parameters :
- $path (string) : Path to file.
- $archive_filepath (mixed) : New file name/path (string) or (boolean) whether to maintain the original filepath.
- Returns type : TRUE on success, FALSE on failure
- Returns type : Bool
EXAMPLE.
Here is simple demo of read file.
load->library('zip');
$path = 'uploads/Jellyfish.jpg';
$newpath = './imagesManupulation/read.jpg';
$this->zip->read_file($path, $newpath);
$this->zip->download('my_backup.zip');
}
}
?>
|
5. Read Directory.
This reference gives permit you to compress a directory.
read_dir($path[$preserve_filepath = TRUE[$root_path = NULL]])
- Parameters :
- $path (string) : Path to file.
- $preserve_filepath (bool) : Whether to maintain the original path.
- $root_path (string) : Part of the path to exclude from the archive directory.
- Returns type : TRUE on success, FALSE on failure
- Returns type : Bool
EXAMPLE.
Here is simple demo of read directory.
load->library('zip');
$path = './uploads';
$this->zip->read_dir($path);
$this->zip->archive('D:/xampp/htdocs/CodeIgniter/file/zip.zip');
}
}
}
?>
|
6. Archive.
This reference is used to write teh zip encoded file to a directory.
archive($filepath)
- Parameters :
- $path (string) : Path to file.
- Returns type : TRUE on success, FALSE on failure
- Returns type : Bool
EXAMPLE.
$this->zip->archive('path to folder/zip.zip');
7. Download.
This reference is used to zip file to be downloaded from your server.
download($filename = 'solidcoupon.zip')
- Parameters :
- $filename (string) : Archive file name.
- Returns type : void
EXAMPLE.
$this->zip->download('solidcoupon.zip');
8. Get zip.
This reference Returns the zip-compressed file data.
get_zip()
- Parameters :
- $path (string) : Path to file.
- $preserve_filepath (bool) : Whether to maintain the original path.
- $root_path (string) : Part of the path to exclude from the archive directory.
- Returns : Zip file content
- Returns type : string
EXAMPLE.
Here is simple demo of get zip file.
load->library('zip');
$name = 'mytext.txt';
$data = 'Welcome to SolidCoupon.';
$this->zip->add_data($name, $data);
$zip_file = $this->zip->get_zip();
$this->zip->download($zip_file);
}
}
}
?>
|
8. Clear data.
This reference is used to clear caches between calls the program.
clear_data()
- Parameters :
- Returns type : Void
EXAMPLE.
Here is simple demo of get zip file.
$this->zip->clear_data(); |
Codeigniter User Agent Class Library
Codeigniter User Agent Class Library – This library used for identify the browser, mobile device and robot visiting your website. We can also use this library to detect support for the language, character set, and referrer. We can load user agent class library like this $this->load->library(‘user_agent’);. Here in this tutorial, we are going to explain how to use user agent class library.
Codeigniter user agent class library | Example.
Let us understand how user agent class library works in codeigniter with examples.
Load user agent class library
First load user agent class library to use its functions, this library can be loaded simply as below-
How to load user agent class library:
$this->load->library('user_agent');
|
Class reference:-
There are following references available in user agent class library. Now we will explain.
1. is browser.
This reference is used to Returns TRUE/FALSE if the user agent is a known web browser.
is_browser([$key = NULL])
- Parameters :
- $key (string) : Optional browser name.
- Returns : TRUE if the user agent is a (specified) browser, FALSE if not.
- Returns type : Bool
Example.
Controller code:-
load->library('user_agent');
$this->load->view('library/user_agent_view');
}
}
?>
View code:-
agent->is_browser())
{
$agent = $this->agent->browser().' '.$this->agent->version();
}
echo $agent;
echo $this->agent->platform();
?>
Output will be like this:-

2. is mobile.
This reference is used to Returns TRUE/FALSE if the user agent is a known mobile device.
is_mobile([$key = NULL])
- Parameters :
- $key (string) : Optional mobile device name.
- Returns : TRUE if the user agent is a (specified) mobile device, FALSE if not.
- Returns type : Bool
Example.
View code:-
agent->is_mobile('iphone'))
{
echo "User is using iphone";
}
elseif ($this->agent->is_mobile())
{
echo "User is using mobile";
}
else
{
echo "User is using Web";
}
?>
Output will be like this:-

3. is robot.
This reference is used to Returns TRUE/FALSE if the user agent is a known mobile device.
is_robot([$key = NULL])
- Parameters :
- $key (string) : Optional robot name.
- Returns : TRUE if the user agent is a (specified) robot, FALSE if not.
- Returns type : Bool
Example.
View code:-
agent->is_robot())
{
$roboot = $this->agent->robot();
}
echo $roboot;
?>
Output will be like this:-

4. is referral.
This reference is used to Returns TRUE/FALSE if the user agent was referred from another site.
is_referral()
- Parameters :
- Returns : TRUE if the user agent is a referral, FALSE if not.
- Returns type : Bool
5. browser.
This reference is used to Returns name of your web browser and visiting website.
browser()
- Parameters :
- Returns : Detected browser or an empty string.
- Returns type : String
6. Version.
This reference is used to Returns version number of your web browser.
version()
- Parameters :
- Returns : Detected browser version or an empty string.
- Returns type : String
7. Mobile.
This reference is used to Returns name of your mobile device which is currently use in visiting website.
mobile()
- Parameters :
- Returns : Detected mobile device brand or an empty string.
- Returns type : String
8. Robot.
This reference is used to Returns name of your robot visiting site.
robot()
- Parameters :
- Returns : Detected robot name or an empty string.
- Returns type : String
9. Platform.
This reference is used to Returns platform viewing your site (Linux, Windows, OS X, etc).
platform()
- Parameters :
- Returns : Detected operating system or an empty string.
- Returns type : String
10. Referrer.
This reference is used to refer on the another site.
referrer()
- Parameters :
- Returns : Detected referrer or an empty string.
- Returns type : String
11. Agent string.
This reference is used to containing the full user agent string.
agent_string()
- Parameters :
- Returns : Full user agent string or an empty string.
- Returns type : String
12. Accept lang.
This reference is used to accepts a particular language.
accept_lang([$lang = 'en'])
- Parameters :
- $lang (string) : Language key
- Returns : TRUE if provided language is accepted, FALSE if not.
- Returns type : String
Example.
View code:-
agent->accept_lang('en'))
{
echo 'You accept English!';
}
?>
Output will be like this:-

13. Accept charset.
This reference is used to accepts a particular character set.
accept_charset([$charset = 'utf-8'])
- Parameters :
- $charset (string) : Character set
- Returns : TRUE if the character set is accepted, FALSE if not.
- Returns type : Bool
14. Parse.
This reference is used to parse a custom user agent string.
parse($string)
- Parameters :
- $string (string) : A custom user-agent string
- Returns type : void
Codeigniter URI Class Library
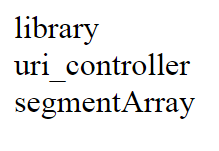
Codeigniter URI Class Library – This library used for parsing the url, and breaking it down into several segment and passed to the controller or store as a variable. It is also used to retrieve information from your URI strings. It is automatically loaded by the system so there is no need to load manually. Here in this tutorial, we are going to explain how to use URI class library.
Codeigniter uri class library
Let us understand how uri class library works in codeigniter with examples.
Class reference:-
There are following references available in uri class library. Now we will explain.
1. Segment.
This reference is used to give Permit you to retrieve a specific segment.
segment($n[$no_result = NULL])
- Parameters :
- $n (int) : Segment index number.
- $no_result (mixed) : What to return if the searched segment is not found.
- Returns : Segment value or $no_result value if not found.
- Returns type : mixed
Example.
uri->segment(3, 0);
if ($this->uri->segment(3) === FALSE)
{
echo $product_id = 0;
}
else
{
echo $product_id = $this->uri->segment(2);
}
}
}
?>
Output will be like this:-
2. Rsegment.
This reference is used to retrieve a specific segment from your re-routed URI in the event.
rsegment($n[$no_result = NULL])
- Parameters :
- $n (int) : Segment index number.
- $no_result (mixed) : What to return if the searched segment is not found.
- Returns : Routed segment value or $no_result value if not found.
- Returns type : mixed
3. Slash segment.
This reference is used to add a trailing and leading slash based on the second parameter.
slash_segment($n[$where = 'trailing'])
- Parameters :
- $n (int) : Segment index number.
- $where (string) : Where to add the slash (‘trailing’ or ‘leading’).
- Returns : Segment value, prepended/suffixed with a forward slash, or a slash if not found.
- Returns type : String
Example.
uri->slash_segment(1);
echo $this->uri->slash_segment(2, 'leading');
echo $this->uri->slash_segment(3, 'both');
}
}
}
?>
Output will be like this:-

4. Slash rsegment.
This reference is used to add slashes a specific segment from your re-routed URI.
slash_rsegment($n[$where = 'trailing'])
- Parameters :
- $n (int) : Segment index number.
- $where (string) : Where to add the slash (‘trailing’ or ‘leading’).
- Returns : Routed segment value, prepended/suffixed with a forward slash.
- Returns type : string
5. Uri to assoc.
This reference is used to turn uri segment into an associative array of key/values pair.
uri_to_assoc([$n = 3[$default = array()]])
- Parameters :
- $n (int) : Segment index number.
- $default (array) : Default values.
- Returns : Associative URI segments array.
- Returns type : String
Example.
'Sonu', 'Gender' => 'Male', 'Location' => 'Noida');
$array = $this->uri->uri_to_assoc(3, $default);
print_r($array);
}
}
?>
Output will be like this:-

6. Ruri to assoc.
This reference is used to creates an associative array using the re routed uri.
ruri_to_assoc([$n = 3[$default = array()]])
- Parameters :
- $n (int) : Segment index number.
- $default (array) : Default values.
- Returns : Associative URI segments array.
- Returns type : String
7. Assoc to uri.
This reference is used to take an associative array as input and generate a uri string from this reference.
assoc_to_uri($array)
- Parameters :
- $array (array) : Input array of key/value pairs.
- Returns : URI string.
- Returns type : String
Example.
 'Sonu', 'Gender' => 'Male', 'Location' => 'Noida');
$str = $this->uri->assoc_to_uri($array);
echo $str;
}
}
?>
Output will be like this:-

8. Uri string.
This reference return a string with the complete uri..
uri_string();
- Parameters :
- Returns : URI string.
- Returns type : String
Example.
Output will be like this:-

9. Ruri string.
This reference return re routed uri.
ruri_string()
- Parameters :
- Returns : Routed URI string.
- Returns type : String
10. Total segments.
This reference return total number of segment.
total_segments()
- Parameters :
- Returns : Count of URI segments.
- Returns type : int
11. Total rsegments.
This reference return total number of segment in your re routed uri.
total_rsegments()
- Parameters :
- Returns : Count of routed URI segments.
- Returns type : int
12. segment array.
This reference return an array containing the URI segment.
segment_array()
- Parameters :
- Returns : URI segments array.
- Returns type : Array
Example.
uri->segment_array();
foreach ($segs as $segment)
{
echo $segment;
echo '
';
}
}
}
?>
Output will be like this:-
12. Rsegment array.
This reference return the array of segments in your re-routed URI.
rsegment_array()
- Parameters :
- Returns : Routed URI segments array.
- Returns type : Array
Codeigniter Typography Class Library
Codeigniter Typography Class Library -We can load typography class library like this $this->load->library(‘typography’);. This library provide various functions that are used to adjust formating in text. Here in this tutorial, we are going to explain how to use typography class library.
Codeigniter typography class library | Example
Let us understand how typography class library works in codeigniter with examples.
Load typography class library
First load typography class library to use its functions, this library can be loaded simply as below-
How to load typography class library:
$this->load->library('typography');
|
Class reference:-
There are following references available in typography class library. Now we will explain.
1. Protect braced quotes.
This reference is used to desirable to protect single and double quotes within curly braces.
$protect_braced_quotes = FALSE
Example.
load->library('typography');
echo $this->typography->protect_braced_quotes=true;
}
}
?>
|
2. Auto typography.
This function is used to format text so that it is semantically and typographically correct HTML.
auto_typography($str[, $reduce_linebreaks = FALSE])
- Parameters :
- $str (string) : Input string
- $reduce_linebreaks (bool) : Whether to reduce consequitive linebreaks
- Returns : HTML typography-safe string
- Returns type : String
Example.
load->library('typography');
$string = "This is my first paragraph!";
$string = $this->typography->auto_typography($string);
echo $string;
}
}
?>
Output will be like this:-

3. Format characters.
This function is similar to auto typography. except that it only does character conversion
format_characters($str)
- Parameters :
- $str (string) : Input string
- Returns : Formatted string
- Returns type : String
Example.
load->library('typography');
$string = "Solid coupon!";
$string = $this->typography->format_characters($string);
echo $string;
}
}
?>
Output will be like this:-

4. nl2br except pre.
This function is is used to converts newlines to breakline tags unless they appear within pre tags
nl2br_except_pre($str)
- Parameters :
- $str (string) : Input string
- Returns : Formatted string
- Returns type : String
Example.
load->library('typography');
$string = "Welcome to \n tutorialsplane!";
$string = $this->typography->nl2br_except_pre($string);
echo $string;
}
}
?>
Output will be like this:-
Codeigniter Trackback Class Library
Codeigniter Trackback Class Library – We can load trackback class library using $this->load->library(‘trackback’);. This library provide various functions that are used to enable you to send and recieve trackback data. Here in this tutorial, we are going to explain how to use trackback class library.
Codeigniter trackback class library | Example
Let us understand how trackback class library works in codeigniter with examples.
Load trackback class library
First load trackback class library to use its functions, this library can be loaded simply as below-
How to load trackback class library:
$this->load->library('trackback');
|
Functions:-
There are following functions available in trackback class library. Now we will explain.
- 1. Sending Trackbacks.
- 2. Creating a Trackback Table.
- 3. Processing a Trackback.
1. Sending Trackbacks.
Here is simple demo of sending trackbacks.
Syntax of sending trackbacks function.
load->library('trackback');
$tb_data = array(
'ping_url'  => 'http://example.com/trackback/456',
'url'       => 'http://www.my-example.com/blog/entry/123',
'title'     => 'The Title of My Entry',
'excerpt'   => 'The entry content.',
'blog_name' => 'My Blog Name',
'charset'   => 'utf-8'
);
if ( ! $this->trackback->send($tb_data))
{
echo $this->trackback->display_errors();
}
else
{
echo 'Trackback was sent!';
}
}
}
?>
|
Tracksback can be sent from any of your controller using code.
Description of example array data.
- 1. ping_url : Ping_url is a reciever url address where you want to send tracksback.
- 2. url : this is sender url address where we can seen blog entry.
- 3. title : Title of your blog entry.
- 3. excerpt : The content of your blog entry.
- 3. blog_name : name of your blog
- 3. charset : The character encoding your blog is written in.
Codeigniter HTML Table Class Library
Codeigniter HTML Table Class Library -We can load html table class library like this $this->load->library(‘table’);. This library provides various functions that are used to enable you to auto generate html tables from array or database result set. Here in this tutorial, we are going to explain how to use html table class library.
Codeigniter html table class library
Let us understand how html table class library works in codeigniter with examples.
Load html table class library
First load html table class library to use its functions, this library can be loaded simply as below-
How to load html table class library:
$this->load->library('table');
|
Class reference:-
There are following references available in html table class library. Now we will explain.
1. Function.
This function allows you to specify a PHP function or valid function array object to be applied to all cell data..
$function = NULL
Example of Function class reference.
Here is simple demo of function class reference.
Controller Code:-
Syntax of function class reference.
load->library('table');
$this->load->view('table_view');
}
}
?>
|
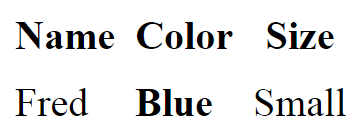
View Code:-
Syntax of retrieving session data on view page.
table->set_heading('Name', 'Color', 'Size');
$this->table->add_row('Fred', 'Blue', 'Small');
$this->table->function = 'htmlspecialchars()';
echo $this->table->generate();
?>
|
Output will be look like this
2. Generate.
This function return a string containing the generated table.
generate([$table_data = NULL])
- Parameters :
- $table_data (mixed) : Data to populate the table rows with
- Returns : HTML table
- Returns type : String
3. Set caption.
This method give permit you to add a caption to the table.
set_caption($caption)
- Parameters :
- $caption (string) : Table caption
- Returns : CI_Table instance (method chaining)
- Returns type : CI_Table
4. Set heading.
This method give permit you to set table heading.
set_heading([$args = array()[...]])
- Parameters :
- $args (mixed) : An array or multiple strings containing the table column titles
- Returns : CI_Table instance (method chaining)
- Returns type : CI_Table
Example.
Here is simple demo of set heading class reference.
Controller page is already defined in above example.
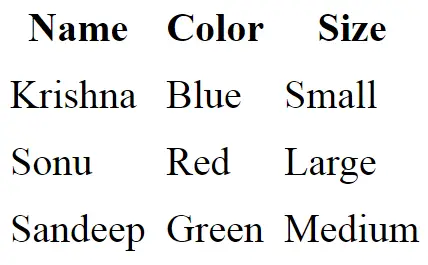
View Code:-
Syntax of set heading html on view page.
table->set_heading('Name', 'Color', 'Size');
$this->table->add_row('Fred', 'Blue', 'Small');
$this->table->add_row('Mary', 'Red', 'Large');
$this->table->add_row('John', 'Green', 'Medium');
echo $this->table->generate();
?>
|
Output will be look like this
5. Add row.
This method is used to add a row in your table.
add_row([$args = array()[...]])
- Parameters :
- $args (mixed) : An array or multiple strings containing the row values
- Returns : CI_Table instance (method chaining)
- Returns type : CI_Table
6. Make columns.
This method takes one dimensional array and create multidimensional array.
make_columns([$array = array()[$col_limit = 0]])
- Parameters :
- $array (array) : An array containing multiple rows’ data
- $col_limit (int) : Count of columns in the table
- Returns : An array of HTML table columns
- Returns type : Array
Example.
Here is simple demo of make coloum reference.
View Code:-
Syntax of make coloum html on view page.
table->make_columns($list, 3); echo $this->table->generate($new_list); ?> |
Output will be look like this
7. Set template.
This method permit you to set your template.
set_template($template)
- Parameters :
- $template (array) : An associative array containing template values
- Returns : TRUE on success, FALSE on failure
- Returns type : Bool
8. Set empty.
This method is used to set non breaking space.
set_empty($value)
- Parameters :
- $value (mixed) : Value to put in empty cells
- Returns : CI_Table instance
- Returns type : CI_Table
9. Clear.
Lets you clear the table heading and row data. If you need to show multiple tables with different data you should to call this method after each table has been generated to clear the previous table information.
clear()
- Parameters :
- Returns : CI_Table instance
- Returns type : CI_Table
More Example about html table library.
Here is simple demo how to display table data from database.
View Code:-
Syntax of display database table on view page.
db->query('SELECT * FROM example');
$result = $this->table->generate($query);
echo $result;
?>
|
Output will be look like this