Ionic Popup
Ionic Popup- Popups are basically used to draw user’s attention and get some information from the user or provide some information. Popups Appear on the top of app’s content. You can manually dismiss the popup to interact the app again.
Ionic Provides various popup alerts that can be used easily in any application. There are – Basic Alerts, Prompt Alerts, Confirmation Alerts, Radio Alerts and Checkbox Alerts available in Ionic.
Here in this tutorial, we are going to explain how to create ionic popup alert step by step with example and demo.You can also use our online editor to edit and run the code online.
Note : These popups are supported in Angular Version > 2.x.
Ionic Popup | Alert | Prompt | Confirmation Alert | Example
Popup is dialog box that is used to show important message or information to User or It can can used
to get some input from user for example – Prompt box to enter wi-fi username/password.
Now let us understand popup alert with example & demo –
- 1. Basic Alerts
- 2. Prompt Alerts
- 3. Confirmation Alerts
- 4. Radio Alerts
- 5. Checkbox Alerts
AlertController is required to create alerts so don’t forget to import this controller.
Basic Alerts
- 1. HTML Part – It contains the view part of basic alert.
- 2. Script Part – This contains typescript code for the basic Alert.
Html Part : demo.html
So now add the following code to create button layout-
Ionic Popup Example: Html Part
|
Html contains the Layout part of the page, a button “Show Alert” is created to call function showAlert() which opens a basic alert, this function is defined in JavaScript Typescript – demo.ts file.
Script Part : demo.ts
It contains script resources to create Alert Box, showAlert() function is defined in this file which is triggered on Button click to open the Alert Box.
Ionic Popup Alerts Example: Script Part
import { Component } from '@angular/core';
import { AlertController } from 'ionic-angular';
@Component({
templateUrl: 'demo.html'
})
export class DemoPage {
constructor(public atrCtrl: AlertController) {
}
showAlert() {
let alert = this.atrCtrl.create({
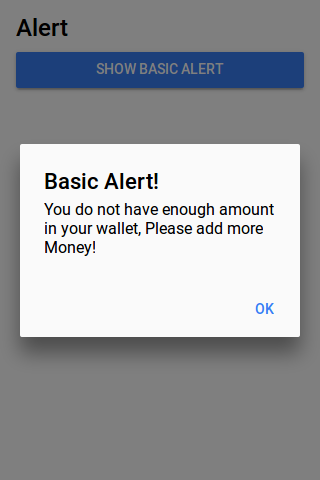
title: 'Basic Alert!',
subTitle: 'You do not have enough amount in your wallet, Please add more Money!',
buttons: ['OK']
});
alert.present();
}
}
|
Import AlertsController, add in constructor and call create() method with parameters.
So we can see clearly only following things are required to create alerts.
1. importing AlertController.
2. calling it in constructor.
The output of above example will be something like this-
Confirm Alerts | Confirmation Box | Yes | No
Confirmation Alert is used to get acceptance of user. Here is simple Confirmation Box
- 1. HTML Part – It contains the Html Part.
- 2. Script Part – It contains typescript code for the Confirmation Alerts.
Html Part : demo.html
Html template contains button to Call the Confirm Alert which calls showConfirmAlert Function –
Ionic Confirmation Box Alert Example: Html Part
|
Script Part : demo.ts
This contains definition of showConfirmAlert() function which is used to show confirm box –
Ionic Confirmation box Alerts Example: Script Part
import { Component } from '@angular/core';
import { AlertController } from 'ionic-angular';

@Component({
  templateUrl: 'demo.html'
})
export class DemoPage {
  constructor(public atrCtrl: AlertController) {

  }
 showConfirmAlert() {
  let alertConfirm = this.atrCtrl.create({
    title: 'Delete Items',
    message: 'Are You Sure to delete this itemss?',
    buttons: [
      {
        text: 'No',
        role: 'cancel',
        handler: () => {
          console.log('No clicked');
        }
      },
      {
        text: 'Yess',
        handler: () => {
          console.log('Yes clicked');
        }
      }
    ]
  });
  alertConfirm.present();
}


}
|
The output of above example will look something like this –

Prompt Alerts
This basically used to get user input for example- Enter Wifi password.
- 1. HTML Part – It contains the Html Part.
- 2. Script Part – It contains typescript code for the Prompt Alerts.
Html Part : demo.html
This contains button to Call the Prompt Alert box which calls prompt Function –
Ionic Prompt Alerts Example: Html Part
|
Script Part : demo.ts
Script Part contains the definition of prompt function –
Ionic Prompt box Alerts Example: Script Part
import { Component } from '@angular/core';
import { AlertController } from 'ionic-angular';
@Component({
templateUrl: 'demo.html'
})
export class DemoPage {
constructor(public atrCtrl: AlertController) {
}
showPromptAlert() {
let alert = this.atrCtrl.create({
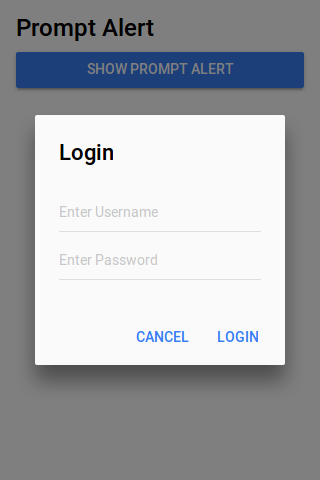
title: 'Login',
inputs: [
{
name: 'username',
placeholder: 'Enter Username'
},
{
name: 'password',
placeholder: 'Enter Password',
type: 'password'
}
],
buttons: [
{
text: 'Cancel',
role: 'cancel',
handler: data => {
console.log('You Clicked on Cancel');
}
},
{
text: 'Login',
handler: data => {
if (User.isValid(data.username, data.password)) {
// login is valid
} else {
// invalid login
return false;
}
}
}
]
});
alert.present();
}
}
|
The Above Example Will Output something like this –
Radio Alerts
This shows radio options to user and user can select only one option from list.
- 1. HTML Part – It contains the Html Part.
- 2. Script Part – It contains typescript code for the Radio Alerts.
Html Part : demo.html
Html template contains button to which triggers radio alert Function –
Ionic Radio Popup Alert Box Example: Html Part
|
Script Part : demo.ts
It contains function definition
Ionic Radio Alert Popup box Example: Script Part
import { Component } from '@angular/core';
import { AlertController } from 'ionic-angular';
@Component({
templateUrl: 'demo.html'
})
export class DemoPage {
constructor(public atrCtrl: AlertController) {
}
showRadioAlert() {
let alert = this.atrCtrl.create();
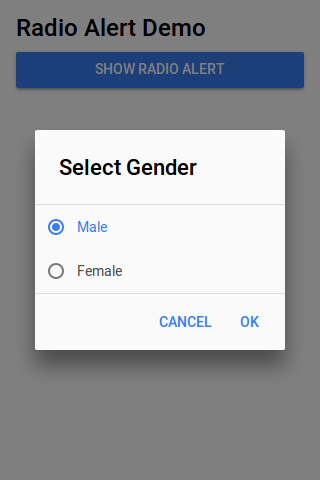
alert.setTitle('Select Gender');
alert.addInput({
type: 'radio',
label: 'Male',
value: 'Male',
checked: true
});
alert.addInput({
type: 'radio',
label: 'Female',
value: 'Female',
checked: true
});
alert.addButton('Cancel');
alert.addButton({
text: 'OK',
handler: data => {
this.testRadioOpen = false;
this.testRadioResult = data;
}
});
alert.present();
}
}
}
|
Radio Alert output looks like this
Checkbox Alerts
It is used to provide multiple options and user can select more than one option from list.
- 1. HTML Part – It contains the Html Part.
- 2. Script Part – It contains typescript code for the Checkbox Alerts.
Html Part : demo.html
Html template contains button to Call Checkbox alert Function –
Ionic Checkbox Alerts Box Example: Html Part
|
Script Part : demo.ts
This contains definition of showCheckboxAlert() function –
Ionic Checkbox Alert box Alerts Example: Script Part
import { Component } from '@angular/core';
import { AlertController } from 'ionic-angular';

@Component({
  templateUrl: 'demo.html'
})
export class DemoPage {
  constructor(public atrCtrl: AlertController) {

  }
  showCheckboxAlert() {
    let alert = this.atrCtrl.create();
    alert.setTitle('Which Fruit do you like?');

    alert.addInput({
      type: 'checkbox',
      label: 'Mango',
      name: 'input-mango',
      id: 'input-mango',
      value: 'Mango',
      checked: true
    });

   alert.addInput({
      type: 'checkbox',
      label: 'Banana',
      name: 'input-banana',
      id: 'input-banana',
      value: 'Banana'
    });
   alert.addInput({
      type: 'checkbox',
      label: 'Apple',
      name: 'input-apple',
      id: 'input-apple',
      value: 'Apple'
    });

    alert.addButton('Cancel');
    alert.addButton({
      text: 'Okay',
      handler: data => {
        console.log('Checkbox data:', data);
      }
    });
    alert.present();
  }

}
|
Learn More
Don’t Stop! Learn More..
Instance Members
config
create(options)
Display an option with title, inputs and buttons.
-
options – Options to configure the alert box.
Options
Following options are available-
| Property | Type | Detail |
|---|---|---|
| title | string | This is used to add the title for alert box. |
| subTitle | string | Adds subtitle for alert box. |
| message | string | Adds message for alert box |
| cssClass | string | Adds custom css classes, Add classes separated by space. |
| inputs | Array | An array of inputs, See input options below. |
| buttons | Array | An array of buttons. See options below. |
| enableBackdropDismiss | Boolean | Disable backdrop tap dismiss, set false, default value for this option is true. |
Input options
| Property | Type | Description |
|---|---|---|
| type | string |
This is used to define the input type such as – text, email, number, etc. |
| name | string |
The name for the input box. |
| placeholder | string |
This is used to add the placeholder for input box. |
| value | string |
Adds default value of input. |
| label | string |
Adds label of input. |
| checked | boolean |
Whether or not the input is checked. |
| id | string |
Add input box id. |
Button Options
| Property | Type | Description |
|---|---|---|
| text | string |
Adds button text. |
| handler | any |
Emitted when the button is pressed. |
| cssClass | string |
Adds custom css class to button. |
| role | string |
The buttons role, null or cancel. |
Keywords
Ionic popup modal, template, popup close, alert, button style, window etc.
Magento check if admin user logged in or not
Magento check if admin user logged in or not : While working with magento we sometimes need to decide whether user is logged from front end or admin. Mage::getSingleton(‘core/session’, array(‘name’ => ‘adminhtml’)); is used to get the admin end logged in user session. Here in this tutorial we are going to explain how you can check the customer login on magento backend ie admin.
Magento check if admin user logged in or not
You can check the customer is logged in simply as below –
Magento check if admin user logged in or not:
Mage::getSingleton('core/session', array('name' => 'adminhtml'));

$userSession = Mage::getSingleton("customer/session");

if($userSession->isLoggedIn()) {
  echo "Is Logged In from Admin";
} else {
   echo "User Not Logged on Admin";
}
|
Using the above method you can check that the user is logged in from admin or not.
Magento check if customer is logged in
Magento check if customer is logged in : While working with magento we sometimes need to decide whether user is logged from front end or not. Mage::getSingleton(‘core/session’, array(‘name’ => ‘frontend’)); is used to get the front end logged in user session in Magento 1.x but In magento 2.x object manager $objectManager->get(‘Magento\Customer\Model\Session’) is used to get the customer session. Here in this tutorial we are going to explain how you can check the customer login on magento 1 and magento 2 front end.
Magento check if customer is logged in | Magento 2
It is very simple to check the looged in customer in magento 2, using the below method you can check whether the customer is logged in or not anywhere in the application. We have used object manager to get the customer session.
Magento 2 check if frontend user is logged in:
$objectManager = \Magento\Framework\App\ObjectManager::getInstance();
$customerSession = $objectManager->get('Magento\Customer\Model\Session');
if($customerSession->isLoggedIn()) {
   // customer logged in
}else{
// customer not logged in.
}
|
Magento 1.x
In magento 1 you can check the customer is logged in simply as below –
Magento check if frontend user is logged in:
Mage::getSingleton('core/session', array('name' => 'frontend'));

$customerSession = Mage::getSingleton("customer/session");

if($customerSession->isLoggedIn()) {
  echo "Is Logged In";
} else {
   echo "User Not Logged";
}
|
Using the above method you can check that the user is logged in from front end or not.
Magento Get Payment Information
Magento Get Payment Information : You can use order model Mage::getModel(‘sales/order’) to fetch the payment information. Using this model you can get the details about the payment method which was used while creating the order. Here in this tutorial we are going to explain how you can get the payment detail using the sales order model.
Magento Get Payment Information
You can get the payment instance from the order object as below –
Magento Get Payment Information:
 $orderId = 111;
 $order = Mage::getModel('sales/order')->load($orderId);
$payment = $order->getPayment();
|
Which will give you the payment instance of the object.
More Details About Payment
Let us have more details about the payment.
Magento get credit card type : Payment
You can get the credit card type as below-
Magento get credit card type : Payment:
$orderId = 111;
$order = Mage::getModel('sales/order')->load($orderId);
$payment = $order->getPayment();
$creditCardType = $payment->getData('cc_type');
|
This will give you the credit card type used in order.
Magento get payment method code from Order
You can get the payment method code as below-
Magento get payment method code from Order
$orderId = 111;
$order = Mage::getModel('sales/order')->load($orderId);
$payment = $order->getPayment();
$paymentMethodCode = $payment->getMethodInstance()->getCode();
|
This will give you the payment method code used in order.
Magento get payment method Title from Order
You can get the payment method title as below-
Magento get payment method title from Order
$orderId = 111;
$order = Mage::getModel('sales/order')->load($orderId);
$payment = $order->getPayment();
$paymentMethodTitle = $payment->getMethodInstance()->getTitle();
|
This will give you the payment method title used in order.
Magento get credit card information
You can get credit card information as below-
Magento get credit card information
$orderId = 111;
$order = Mage::getModel('sales/order')->load($orderId);
$payment = $order->getPayment();
$payment->getMethodInstance()->getCardsStorage();
$payment->getMethodInstance()->getCardsStorage()->getCards();
|
This will give you the credit card information.
Magento Collection Filter
Magento Collection Filter : Magento collection is basically model type which contains the others models. Collections are used for loading data from data. You can join tables, add filter to them. You can perform joinInner(), joinLeft(), joinRight(), joinFull(), joinCross(),joinNatural() using collections.Varien_Data_Collection is used for collections in magento. Here in this tutorial we are going to explain how to use collection for various purpose efficiently. We will cover collection with syntax, example and uses.
Magento Collection Filter
Here are the details about the magento collection-
Magento get Collection
Magento Get Custom Collection Example:
$collection = Mage::getModel('ModuleName/ModelName')->getCollection();
|
Where ModuleName – is name of module and ModelName is name of model you want to load.
Magento collection addfieldtofilter
Here a simple example to add the filter to the field –
Magento collection addfieldtofilter:
$sku = 'testsku';
$collection = Mage::getModel('catalog/product')->getCollection()
                                               ->addFieldToFilter('sku', $sku);
$data = $collection->getData();
print_r($data);
|
When you will run the above example it will give you the product detail. The above example will produce the following query –
SELECT `e`.* FROM `catalog_product_entity` AS `e` WHERE (`e`.`sku` = ‘testsku’)
Magento collection addAttributeToFilter
Here a simple example to add the filter to the field –
magento collection add attribute to filter:
$collection = Mage::getModel('catalog/product')->getCollection();
$collection->addAttributeToFilter('status', 1);
foreach($collection as $product){
echo $product->getId()."
|
The example will give you all products where status is 1 ie. they are enabled.
Magento addAttributeToFilter Conditions
Let have look over other conditions of addAttributeToFilter in magento.
Magento addAttributeToFilter Equal : eq (=)
Here is an example to add the equal condition in magento collection.
Magento addAttributeToFilter Equal Condition:
$collection = Mage::getModel('catalog/product')->getCollection();
$collection->addAttributeToFilter('status', array('eq' => 1)); // With operator
$collection->addAttributeToFilter('status', 1); // Without operator
|
The above example will give the results where status = 1;
Magento addAttributeToFilter Not Equal : neq (!=)
Here is an example to add the not equal condition in magento collection.
Magento add Attribute To Filter Not Equal Condition:
$collection = Mage::getModel('catalog/product')->getCollection();
$collection->addAttributeToFilter('status', array('neq' => 1)); // With operator
|
The above example will give the results where status != 1;
Magento addAttributeToFilter Like : like(%%)
Here is an example to add the like filter in magento collection.
Magento add Attribute To Filter like condition example:
$collection = Mage::getModel('catalog/product')->getCollection();
$collection->addAttributeToFilter('sku', array('like' => '%abc%')); // With operator
|
The above example is used for magento collection like filter query. This example will give the results which fulfills the like condition.
Magento addAttributeToFilter Not Like : nlike(%%)
Here is an example to add the not like filter in magento collection.
Magento add Attribute To Filter Not like condition example:
$collection = Mage::getModel('catalog/product')->getCollection();
$collection->addAttributeToFilter('sku', array('nlike' => '%abc%')); // With operator
|
The above example is used for magento collection Not like filter query. This example will give the results which fulfills the not like condition.
Magento addAttributeToFilter In : in
Magento collection in clause can be generated simply as below-
Magento add Attribute To Filter in condition example:
$collection = Mage::getModel('catalog/product')->getCollection();
$collection->addAttributeToFilter('id', array('in' => array('1','2','3'))); // With operator
|
The above magento collection in clause will give you the results where id is equal to 1, 2 and 3.
Magento addAttributeToFilter Not In : nin
Magento collection not in clause can be generated simply as below-
Magento add Attribute To Filter not in condition example:
$collection = Mage::getModel('catalog/product')->getCollection();
$collection->addAttributeToFilter('id', array('nin' => array('1','2','3'))); // With operator
|
The above magento collection not in clause will give you the results where id is not equal to 1, 2 and 3.
Magento addAttributeToFilter NUll : null
Magento collection null clause can be generated simply as below-
Magento add Attribute To Filter null condition example:
$collection = Mage::getModel('catalog/product')->getCollection();
$collection->addAttributeToFilter('short_description', array('null' => true)); // With operator
|
The above magento collection null clause will give you the results short_description is null.
Magento addAttributeToFilter NOT NUll : notnull
Magento collection not null clause can be generated simply as below-
Magento add Attribute To Filter not null condition example:
$collection = Mage::getModel('catalog/product')->getCollection();
$collection->addAttributeToFilter('short_description', array('notnull' => true)); // With operator
|
The above magento collection not null clause will give you the results short_description is not null.
Magento addAttributeToFilter Less Than : lt(<)
Magento collection less than clause can be generated simply as below-
Magento addAttributeToFilter Less Than : lt condition example:
$collection = Mage::getModel('catalog/product')->getCollection();
$collection->addAttributeToFilter('id', array('lt' => 100)); // With operator
|
The above magento collection less than clause will give you the results where id < 100.
Magento addAttributeToFilter Less Than Or Equals To : lteg(<=)
Magento collection less than or equals to clause can be generated simply as below-
Magento addAttributeToFilter Less Than Or Equals to : lteq condition example:
$collection = Mage::getModel('catalog/product')->getCollection();
$collection->addAttributeToFilter('id', array('lteq' => 100)); // With operator
|
The above magento collection less than or equals to clause will give you the results where id <= 100.
Magento addAttributeToFilter Greater Than : gt(>)
Magento collection greater than clause can be generated simply as below-
Magento addAttributeToFilter greater Than : gt condition example:
$collection = Mage::getModel('catalog/product')->getCollection();
$collection->addAttributeToFilter('id', array('gt' => 100)); // With operator
|
The above magento collection greater than clause will give you the results where id > 100.
Magento addAttributeToFilter greater Than Or Equals To : gteg(>=)
Magento collection greater than or equals to clause can be generated simply as below-
Magento addAttributeToFilter greater Than equals to : gteq condition example:
$collection = Mage::getModel('catalog/product')->getCollection();
$collection->addAttributeToFilter('id', array('gteq' => 100)); // With operator
|
The above magento collection greater than or equals to clause will give you the results where id >= 100.
WordPress Add/Edit Post Redirects to home page
WordPress Add/Edit Post Redirects to home page : Sometimes we face problem while posting content in worpress. There can be many reason for this problem. I was facing the the problem when adding or editing the post. When i click on publish button it was redirecting me to home page always. Here in this tutorial we are going to explain how you can fix this problem.
WordPress Add/Edit Post Redirects to home page
In my case it was mod_security issue. So disabled it and it worked for me. You can disable it by adding the following in .htaccess file.
WordPress Add/Edit Post Redirects to home page:
|
Which will fix your problem.
If the above soultion does not works talk to your hosting provider and ask them to disable the mod_security.
Magento set frontend session time out limit
Magento set frontend session time out limit : To set session time is very simple. You can set the session timeout from magento admin configuration settings. You do not need to add anything at code level. Here we are going to explain the steps how you can set the session time out in magento.
Magento set frontend session time out limit
You can change the magento session simply by changing the following configuration –
Go to – System->Configuration->Advanced->Admin->Security
You will see the following settings –

Android Connect to Magento
Android Connect to Magento : While creating android application of magento we first need to understand how to connect with magento and how to pull the data from the magento using magento api. Here in this tutorial we are going to give the brief introduction how to connection with magento from andoid or ios using the soap or rest api.
Android Connect to Magento
ios
Magento provides the SOAP and REST api for application development. Here are main points which needs to start with android or ios app of magento.
1.SOAP API – http://www.magentocommerce.com/api/soap/introduction.html
2.REST API – http://www.magentocommerce.com/api/rest/introduction.html
3. Now create a New User in your Magento Store with roles. Login to magento Admin and go to system->WebServices->User&Roles.
4. Here create role and a user. Then assign the roles to this User.

Now you can call the soap method as in example below –
Android Connect to Magento Soap Example:
$client = new SoapClient('http://mydomain.com/soap/api/?wsdl');

$session = $client->login('apiUser', 'apiKey');
// get both from apiUser detail in magento.
$params = array(array(
    'status'=>array('eq'=>'pending')
));
$result = $client->call($session, 'sales_order.list', $params);
|
The above example will give you the sales order data.
Magento add product to cart in programmatically
Magento add product to cart in programmatically : In magento we sometimes need to add the products in cart programmatically. Model Mage::getModel(‘checkout/cart’) is used to manage the cart in magento. Products can be added programmatically using this model. Here in this tutorial we are going to explain how to add products in magento cart programmatically.
Magento add product to cart in programmatically
Here is syntax to add an item programattically. First load the product object using product id which you want to add in cart. Then initialize the cart using the Mage::getModel(‘checkout/cart’); model and add the product object with quantity in cart’s object.
Magento add product to cart in programmatically:
load($productId);
$cart = Mage::getModel('checkout/cart');
$cart->init();
$cart->addProduct($product, array('qty' => $qty));
$cart->save();
Mage::getSingleton('checkout/session')->setCartWasUpdated(true);
?>
|
The above example will add the product with 3 quantities in the current cart.


