Category Archives: ionic tutorial
Ionic Events
Ionic Events: Ionic provides inbuilt events which can be used frequently. Here we are going to explain the ionic Events. Below is list of ionic Events.
Ionic Events Example | Syntax | Demo
List of Ionic Events –
| Event | Description |
|---|---|
| on-hold | This is called when touch stays at same place for 500ms. |
| on-tap | This is called on Quick touch when touch is less than 250ms. |
| on-double-tap | This is called when double tap touch. |
| on-touch | This is called immediately when user touches. |
| on-release | This event is called when user ends touch. |
| on-drag | This is called when drag event occurs. |
| on-drag-up | This is called when element is dragged up. |
| on-drag-right | This is called when element is dragged right. |
| This is called when element is dragged down | |
| on-drag-left | This is called when element is dragged left |
| on-swipe | This is called when touch has high moving velocity. |
| on-swipe-up | This is called when touch has high moving velocity in up. |
| on-swipe-right | This is called when touch has high moving velocity in right. |
| on-swipe-left | This is called when touch has high moving velocity in left. |
| on-swipe-down | This is called when touch has high moving velocity in down. |
The above methods can be used frequently in your project.
How to use Events in Ionic?
You can call your defined function on any event defined above. Here we are going to explain some with example.
Call Function on ionic Events
|
|
The above function will be called when you touch the button. The function will generate the alert message on touch event.
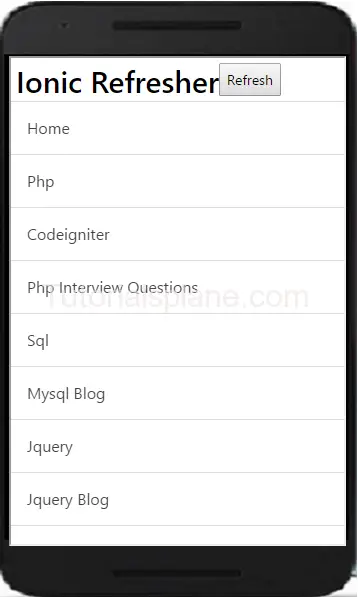
Ionic Ion-refresher
Ionic Ion-refresher : Ion-refresher is used to pull-to-refresh to scroll view. It basically puts the content before the ionicContent or ionicScroll element. Here we are going to explain this with ionicScroll and ionContent element example and demo.
Ionic Ion-refresher
Here is an example of Ion-refresher-
Ion-refresher Javascript Part
Ionic Ion-refresher example
angular.module('myApp', ['ionic'])
.controller('MyCtr', function($scope, $http) {
  $scope.items = ["Php"];
  $scope.refreshNow = function() {
    $http.get('/fresh-items')
     .success(function(freshItems) {
       $scope.items = freshItems;
     })
     .finally(function() {
       $scope.$broadcast('scroll.refreshComplete');
     });
  };
});
|
Ion-refresher Html Part
Ionic js Content
Ionic js Content – Ionic provides ionContent directive which comes with the beautiful feature. Ionic js content area can be configured to use ionic’s scroll or you can use browser’s scrolling. You can implement ionRefresher for pull-to-refresh and for infinite scroll functionality you can use ionInfiniteScroll directive. We are going to explain the ion js content functionality and how to use it with example and demo.
Ionic js Content Syntax
Here is an example of Ionic Content-
Ionic js Content Example-
|
Ionic Backdrop
Ionic Backdrop : It shows the overlay above the content and below the popups, loading and other overlays. Method $ionicBackdrop.retain() and $ionicBackdrop.release() is used for backdrop in ionic. $ionicBackdrop.retain() is used to apply overlay over the content. $ionicBackdrop.release() is used to remove Ionic Backdrop from the content. Each time when $ionicBackdrop.retain() is called the $ionicBackdrop.release() method is also called. Here we are going to explain the ionic backdrop functionality with example and demo.
Ionic Backdrop
Here is syntax and example of ionic Backdrop-
Ionic Backdrop example
.controller('MainCtrl', function($scope, $ionicBackdrop, $timeout) {
    // Your Logic Here..
     $scope.showIonicBackdrop = function() {
    $ionicBackdrop.retain();
    $timeout(function() {
      $ionicBackdrop.release();
    }, 5000);
  };

  }, function(err) {
    console.error('ERR', err);
    // err.status will contain the status code
  });
|
You first need to import service of backdrop in controller then create a function which contains the ionic retain and release method. if you run the above example it will produce the following output –

More About Ionic Backdrop
Let us have more example of Ionic Backdrop.
Ionic Execute Action on Backdrop Disappear/Hidden
You Can Execute Action on backdrop disappear event as below –
Action on Backdrop Disappear/Hidden
.controller('MainCtrl', function($scope, $ionicBackdrop, $timeout, $rootScope) {
    // Your Logic Here..
     $scope.showIonicBackdrop = function() {
    $ionicBackdrop.retain();
    $timeout(function() {
      $ionicBackdrop.release();
    }, 5000);
  };

 // Add action on backdrop disappearing
  $scope.$on('backdrop.hidden', function() {
    // Your action
  });
  }, function(err) {
    console.error('ERR', err);
    // err.status will contain the status code
  });
|
Ionic Execute Action on Backdrop Appear/Show
You Can Execute Action on backdrop Appear event as below –
Ionic Execute Action on Backdrop Appear/Show
.controller('MainCtrl', function($scope, $ionicBackdrop, $timeout, $rootScope) {
    // Your Logic Here..
     $scope.showIonicBackdrop = function() {
    $ionicBackdrop.retain();
    $timeout(function() {
      $ionicBackdrop.release();
    }, 5000);
  };

 // Add action on backdrop disappearing
  $scope.$on('backdrop.shown', function() {
    // Your action
  });
  }, function(err) {
    console.error('ERR', err);
    // err.status will contain the status code
  });
|
Ionic Action Sheet
Ionic Action Sheet : Action Sheet is a slide-up pane which enables users to select one option from set of options. You can easily close the Action sheet by clicking on the backdrop or using escape key. Here we are going to explain the method to create Action Sheet in ionic framework with example and demo.
Ionic Action Sheet Example
Here we have created simple button and added event to create Action Sheet when clicked on it.
Ionic Action Sheet
.controller('MainCtrl', function($scope, $ionicActionSheet) {
// Is Triggered on a button click or on other event.
 $scope.myAcSheet = function() {

   // Show the action sheet
   var hideSheet = $ionicActionSheet.show({
     buttons: [
       { text: 'Btn1- Like This' },
       { text: 'Btn2- Comment' }
     ],
     destructiveText: 'Delete',
     titleText: 'Edit Profile',
     cancelText: 'Cancel',
     cancel: function() {
          // add cancel code..
        },
     buttonClicked: function(index) {
       if(index === 0){
	   // code for button 1
	   }
	   if(index === 1){
	     // code for button 2
	   }
     }
   });

 };

  }, function(err) {
    console.error('ERR', err);
    // err.status will contain the status code
  });
|
In the above example first bind the $ionicActionSheet service with the controller which is required for Action sheet event and then created function $scope.myAcSheet(); which will trigger the pan with specified options.
Now let us call the created function in Html code.
Call Ionic Action Sheet Function
Now call the created function myAcSheet() on button click to trigger the event.
Call Action Sheet In Ioinc
|
|
If you run the above example it will produce the following output –

Action Sheet Methods
Here are following methods available in Action Sheet –
- buttons(Object)– Used to create buttons to show with a text field. Each button is an object.
- titleText(string)– This is string used to add the title of the action sheet.
- cancelText(string=)– This is string used to add text for ‘cancel’ button.
- destructiveText(string=)– The text for a ‘danger’ on the action sheet.
- cancel(function=)– This function is Called on cancel button is pressed or the backdrop is tapped or the hardware back button is pressed.
- buttonClicked(function=)– This function is Called when one of the non-destructive buttons is clicked , Buttons are identified by the index.
- destructiveButtonClicked(function=)– This is function Called when the destructive button is clicked. Return true to close the action sheet and false to keep it opened.
- cancelOnStateChange(boolean=)– This is boolean and used to cancel the action sheet on the basis of navigation state change.
- cssClass(string)-This is string to add custom CSS class.
Ionic Icons
Ionic Icons : Icons has rich icons which are free to use and open source. You can simple create icons in ionic by just adding the class .icon and it’s icon ionicon class name for the icons which you want to create for example home icon – class=”icon ion-home” is used. Feel free to use icons as you want in your application. You can also add icons in buttons. Here we are going to explain the icons utility with example and demo.
Ionic Icons List
Let us create some most common used icons in ionic-
-
Home Icon –
Add class – ion-home
-
Settings Icon –
Add class – ion-settings
-
Delete Icon –
Add class – ion-trash-a
-
User Icon –
Add class – ion-person
-
Chat Icon –
Add class – ion-chatbubble-working
-
Battery Icon
Add class – ion-battery-half
-
Bluetooh Icon
Add class – ion-bluetooth
-
Image Icon
Add class – ion-image
-
Wi-Fi Icon
Add class – ion-wifi
-
Volume Icon
Add class – ion-volume-high
-
Volume Mute
Add class – ion-volume-mute
Here an example of both text and background color-
If you run the above example it will produce the following output-
![]()
For complete list of icons please refer – Ionic Icons List
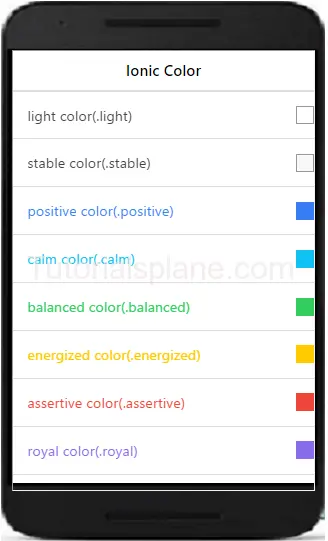
Ionic Colors
Ionic Colors : Ionic provides ready color utility which you can use frequently in you application. Ionic provides recommended naming convention for colors. It’s easy and simple to use ionic colors utility rather than adding the colors in css. You can also override the default colors. Here we are going to explain the color utility with example and demo.
Ionic Colors
Here is list of colors available in ionic Colors-
Text Colors Class
If you want to change the text color add the below css-
- .dark
- .stable-dark
- .positive
- .calm
- .balanced
- .energized
- .assertive
- .royal
- .dark
Background Colors Class
If you want to change the background color add the below css-
- .dark-bg
- .stable-dark-bg
- .positive-bg
- .calm-bg
- .balanced-bg
- .energized-bg
- .assertive-bg
- .royal-bg
- .dark-bg
Here an example of both text and background color
Ionic Colors example with syntax
|
If you run the above example it will produce the following output-
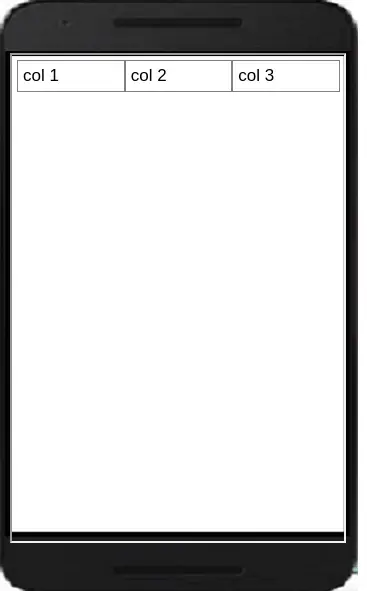
Ionic Grid
Ionic Grid – Ionic provides beautiful grid system. It uses css flexible box and layout module so ionic supports all devices which supports layout module standard. Grid in ionic is basically 12 column layout system. You can add columns as per your requirement. Here we are going to explain the grid system in ionic.
Ionic Grid Example
To create grid columns we first need to create row. Add class .row in div and add the child divs with class name .col. Add the .col class as much as you want to create columns. Below is simple example of grid with 3 columns.
If you run the above example it will produce output something like this –
More About Grid
Let us learn more about the grid system in ionic framework.
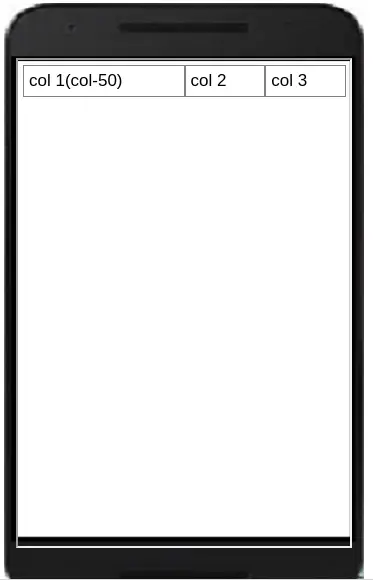
Explicit Column Sizes
You can explicitly define the column size for example sometimes we need
a specific column to be larger than the other columns in the same row. By default each column evenly takes the available area but for the specific size of the column ionic uses the percent system(12 column grid system).
By using this grid system you can make a column larger by just using the percentage and the others remaining columns will divide the remaining area. Let us create a simple example to understand the explicit column sizes.
Example
In the above example first column will be 50% of the screen size and the rest columns will adjust accordingly. If you run the above example it will produce output something like this –
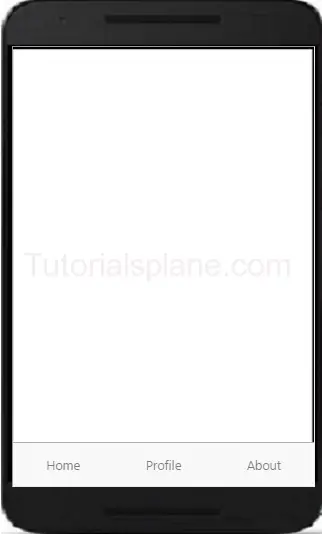
Ionic Tabs
Ionic Tabs : Tabs are basically used for navigation in mobile device. It can be placed on the top or bottom. It can contain the the links icons in top or bottom. Tabs are beautiful ways used for navigation in mobile devices. Here we are going to explain the ionic tabs with example and demo.
Syntax for Ionic Tabs
The class .tabs is used to create the tabs. Items in tab are added using the .tab class. Tab can be positioned at top or bottom of the screen.
The above example will give following output-
Ionic Tabs on Top of Screen
The class .tabs-icon-top is used to create the tabs on top of screen.
The above example will give following output-
Tabs with icons
You can add icons in ionic framework as below –
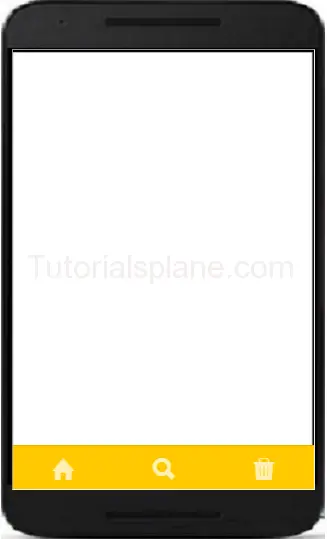
The above example will give following output-
![]()
Colored Tabs Example
You ca create colored tabs using the ionic color pattern. Here is list of colors available in ionic –
- tabs-default
- tabs-light
- tabs-stable
- tabs-positive
- tabs-calm
- tabs-balanced
- tabs-energized
- tabs-assertive
- tabs-royal
- tabs-dark
You Can use the above classes to add the color in Ionic Tabs-
The above example will give following output-